Dear Strivers,
Hello everyone and a big Happy New Year 2024 to each one of you! January is here, and so is our January 2024 update. Additionally, we extend heartfelt wishes for a blessed Happy Thaipusam to all our friends celebrating! Before we jump into the updates, let’s briefly review the changes we’ve made.


As part of our commitment to delivering a more streamlined experience, we’ve decided to permanently remove our Form module. This change is aimed at enhancing our platform and maintaining a clear focus on user satisfaction.
Well, that’s a wrap for the changes! Let’s get started and read on for the updates!
Enhancements
1. Organize Your Products by Archiving! 📦
Now, you have the power to effortlessly tidy up your products by archiving them. The best part? Archived products retain their purchase history, ensuring no data is lost.
To archive, simply check the box next to the product you want to archive and choose “Archive Products.” Alternatively, you can use the fourth icon in the Action column.
Curious about your archived products? Simply click “Archived Products” at the top left.

Archived Products
Need to bring a product back to life? No problem! Just select the checkbox of the product and click “Unarchive Products.”

2. WA Personal/WA API Broadcast Stats Now Include Contact Owners 👤
When you check the stats for your WA Personal or WA API Broadcasts, the owner of each contacts are now displayed in the table.

3. WA API Broadcasts Load in Sets of 20 Messages
We’ve supercharged your experience! Now, when you scroll down, the system loads 20 results at a time, ensuring a faster and smoother browsing experience.
Dive into your WA API Broadcasts effortlessly!
4. Appointment Unavailability Page 📅
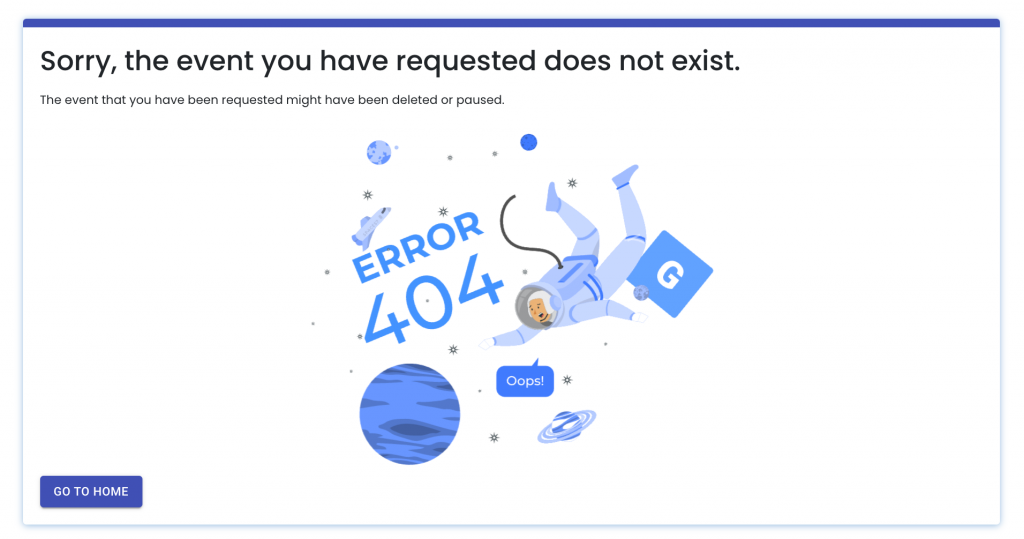
When someone accesses an appointment link with a turned-off status, they’ll now see a page as showcased in the image below. This page serves as a friendly notification, letting contacts know that the link isn’t currently available or doesn’t exist.
5. WA Personal Turbocharged: Faster, Smoother, Better! 🚀
Experience the Difference:
- Swift & Stable Connections: Enjoy an upgraded WA Personal experience with faster and more stable connections!
- Speedy Flowbuilder Responses: Triggering and replying with your flowbuilder just got quicker.
What’s Next?
Stay tuned for even more perks coming your way! 🌟
6. Targeted WA Personal Messages in Automation 📲
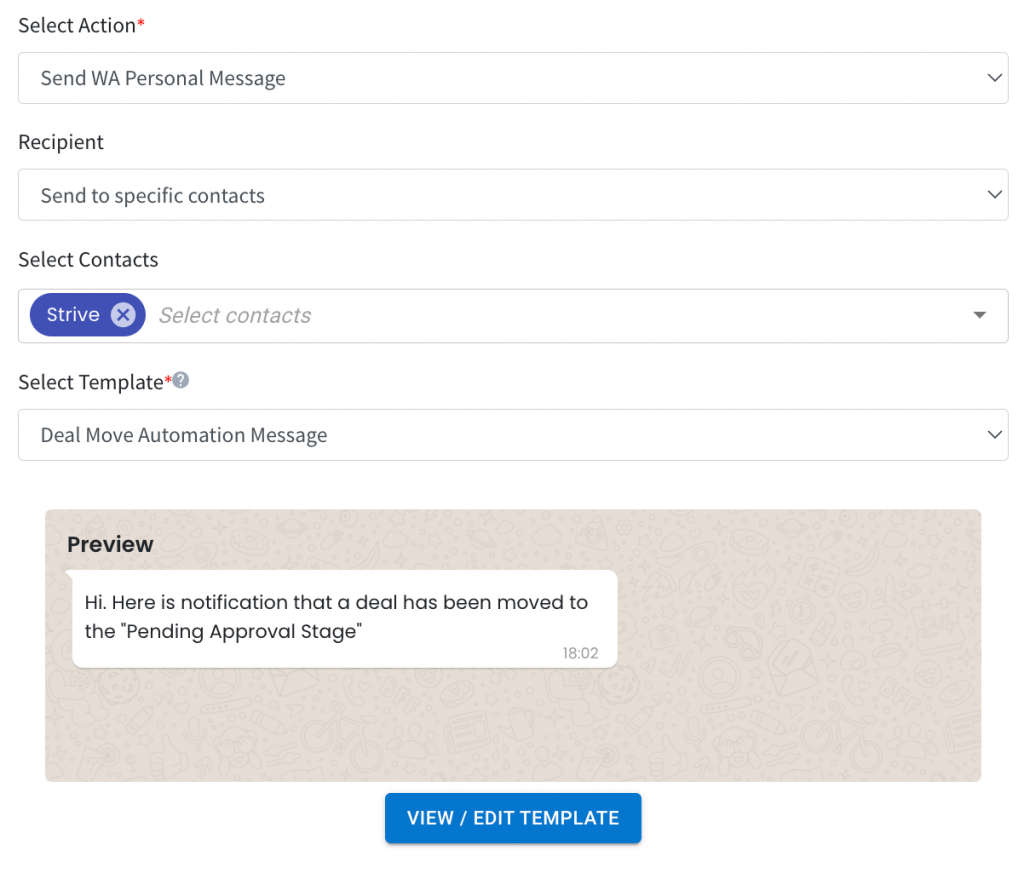
Now, when setting up your automation with the “Send WA Personal Message” action, you have the power to choose your recipients. Whether it’s sending to the contact triggered by the automation or selecting specific contacts, the option is at your fingertips!
Note: “Send to contact from trigger” means the message template will be sent to the contact Send the template to the contact according to the automation trigger selected.
7. Swift Deal Name Loading in KPI Pipeline! ⚡
We’ve optimized the loading speed when typing deal names in Pipeline. Now, it loads a maximum of 8 contacts, ensuring a faster and more efficient display.
If you can’t find the contact you’re looking for, simply type in the initial characters of their name to search. 🪪

8. WA Personal Campaigns Sorted for Your Convenience! 🔄
We’ve reordered your WA Personal Campaigns to showcase the latest ones first, moving down to the oldest. This new arrangement ensures easier navigation and quicker access to your most recent campaigns.

9. Enhanced Contact Privacy in Company Module! 🔒
In the Company module, we’ve strengthened contact privacy. If you’re not the contact owner, you won’t be able to view the contact’s details, activities list, or associated deals.
10. Automate Your Event Follow-Ups via Pabbly and Zapier! 🚀
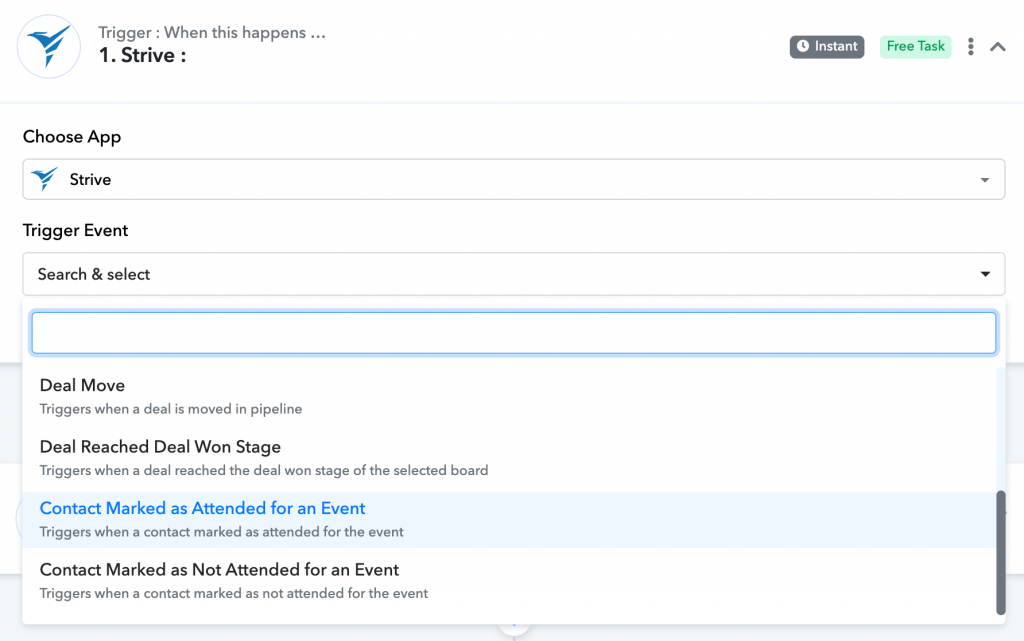
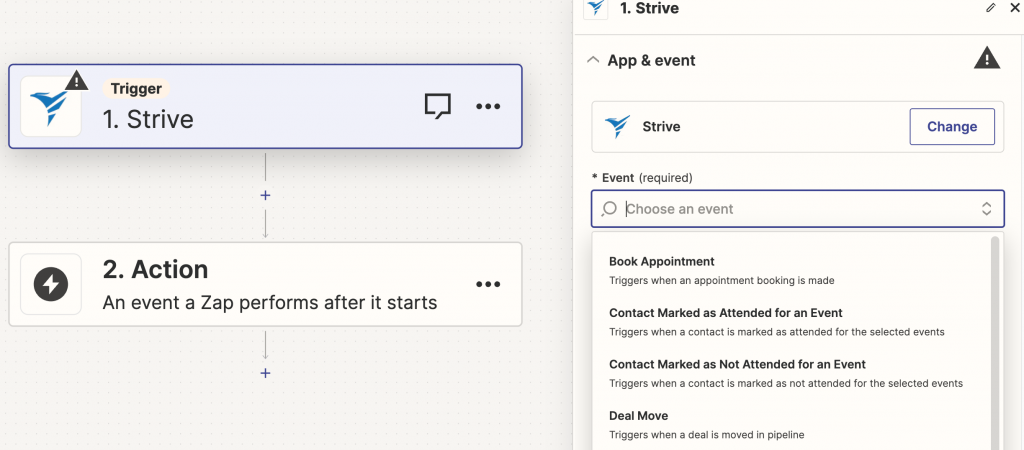
With the new updates in Pabbly and Zapier, you can now trigger actions based on your contacts’ attendance status in Strive events. Set up actions for when contacts are marked as attended or not attended, streamlining your follow-ups and engagement processes effortlessly.
Pabbly:
Zapier:
11. Easily Tag Deals via Pabby and Zapier! 🏷️
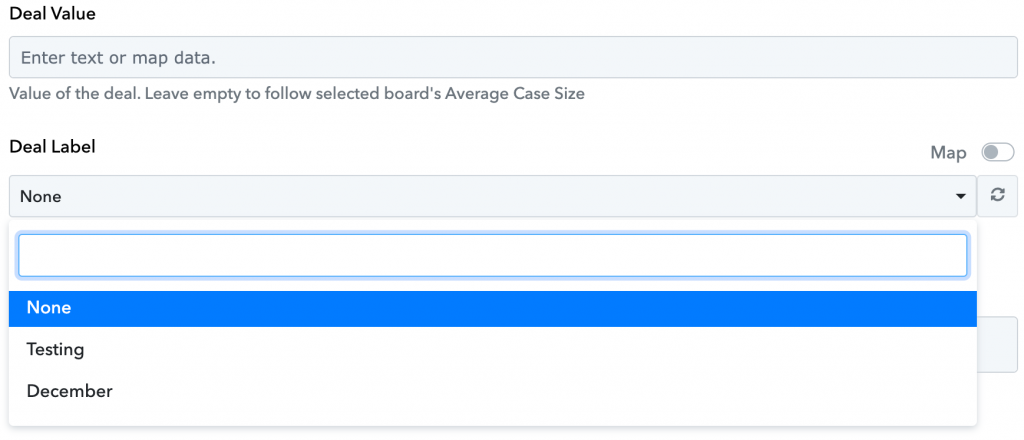
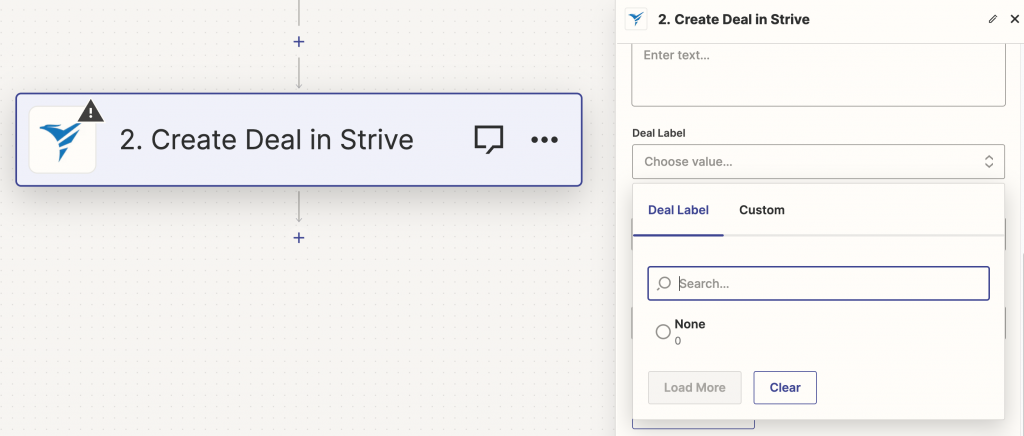
Now, when using Pabbly or Zapier to create deals within Strive, you have the added capability to select and attach labels to the deals right from the board. The selection is available for the action “Create Deal”.
Pabbly:
Zapier:
12. Engage with WA Personal Messages in Converse! 💬
Engage effortlessly with your contacts who message your linked WA Personal Channel directly through Converse.
How to set it up?
- Go to the WA Personal Setup module and link your device.
- Enable Chatbot for your device.
- Click on the third icon in the Action column to activate Converse.

13. Improved Layout and Quick Actions in Contact and Product Module 📦
Wondering what’s new?
We’ve changed the position of action icons in both the Contact List and Product modules to make your actions more accessible and efficient.
In the Product module, you’ll find a repositioned Owner and Action column, now conveniently placed on the right side.
Contact List:

Product:

14. Edit Linked Products in a Snap! ✏️
Now, you have the flexibility to edit your linked pipeline products, allowing you to modify purchase details or make necessary adjustments. 🛠️
Simply check the box next to the product and hit “Edit Product.”
A quick heads-up: If you make changes to a product with an instant purchase trigger, the modifications will be shown in the linked product table. However, a new purchase will be logged in the Product module.

15. WA Personal Campaign now has Total Scheduled column
Our WA Personal Campaign now features a new “Total Scheduled” column. Here’s a quick breakdown for you:
Contacts Enrolled: This column displays the count of unique contacts who enrolled in your WA Personal Campaign.
Total scheduled: The total number of WA Personal Message set to be sent out

16. Email Broadcast now displays ‘Failed’ Status! 📧
If an Email Broadcast encounters an issue and fails to send, the status will be marked as ‘Failed.’
Wondering why it didn’t go through?
Simply hover over the ‘Failed’ status to see the reason.

17. Streamlined Pipeline Mention and Comment Notification! 💬
We’ve improved the readability of your Pipeline notifications for mentions and comments.
Now, these messages will display just below the user’s name, providing a clearer view.
Additionally, you’ll find the board and deal names highlighted in blue at the bottom of each notification for quicker identification.

18. Contact Source Tracking in Table View! 🌐
We’ve added a new column titled “Contact Source”, making it a breeze for you to keep tabs on where your contacts are coming from.

19. WA Personal Campaign Message Saved Indicator! 💾
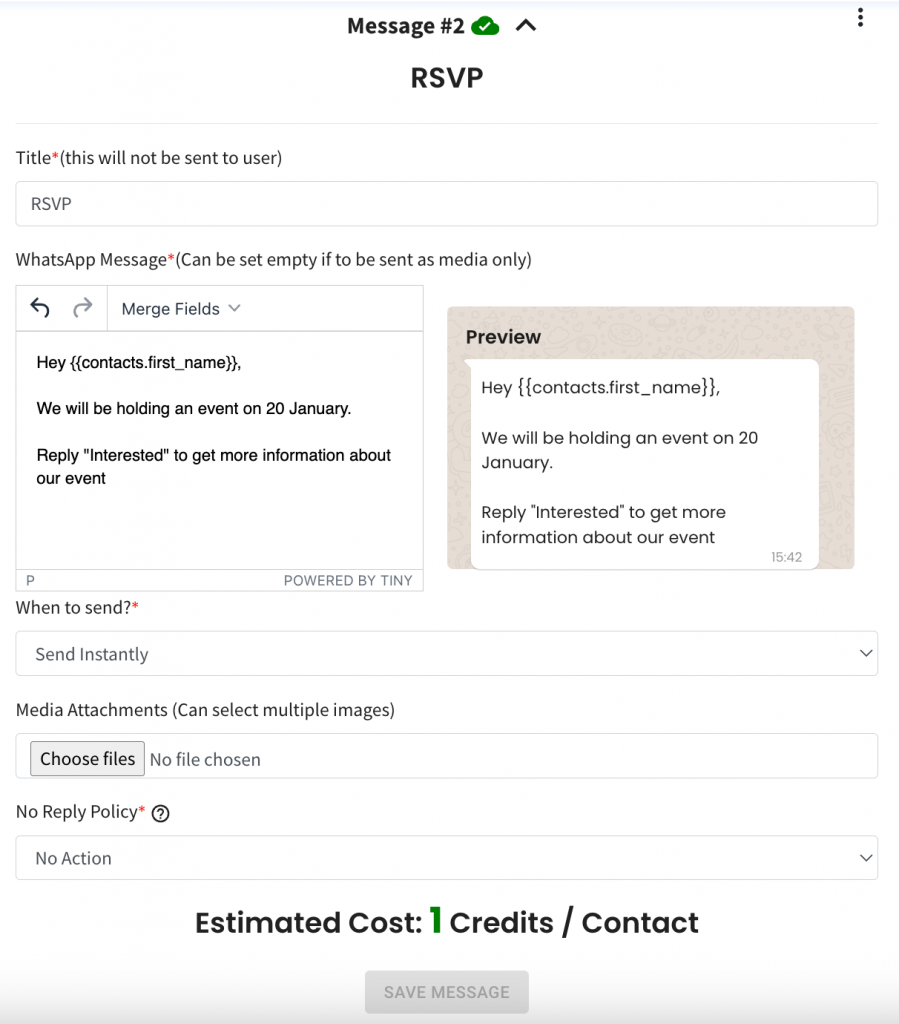
When you hit “Save Message”, the button gracefully grays out, assuring you that your WA Personal Message is securely stored.
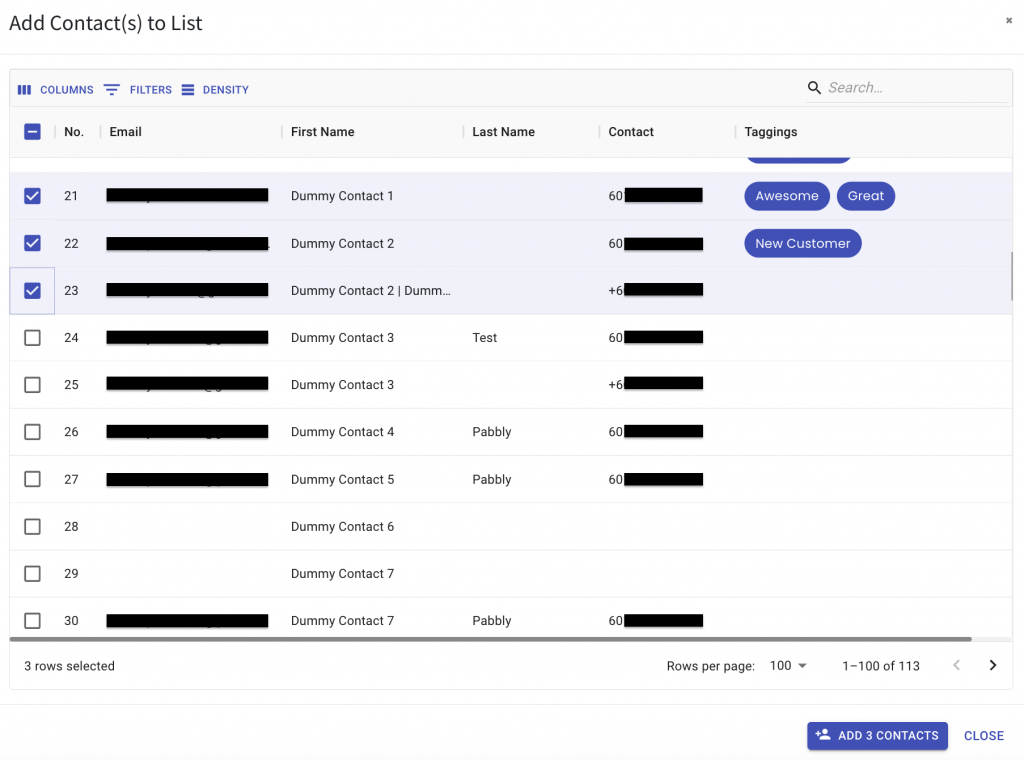
20. Streamlined Contact Addition to Contact List! 📝
Spot the new and improved “Add Contacts” button effortlessly – we’ve relocated it to the bottom right for a clearer and quicker access.
21. Keep Tabs on Your Email Credit Balance! 📧
Ready for a clearer view of your email credits?
Click on “Manage” to view your profile and discover the new display – introducing “Email Remaining Credits”! 🌟
Now, it’s crystal clear how many credits are left within your email credit limit

22. Fresh Look for Converse Chat Box! 🌟
We’ve given our Converse text box a sleek makeover ✨.
Clicking on the left plus icon opens up the options – from images and videos to documents and quick replies.
Easily send multimedia content like images, videos, and
Want to send a voice message? Simply hit the mic icon on the right, record your message, and off it goes to your contact. Stay connected in style with our revamped Converse experience! 📲

23. Top Spot for New Deals Created Via Automation! 🚀
Now, when your automation involves adding a deal to a pipeline, the deal magically appears at the top of the stage. 🌟
This ensures that your newly created deals catch your eye instantly, making tracking and management a breeze!
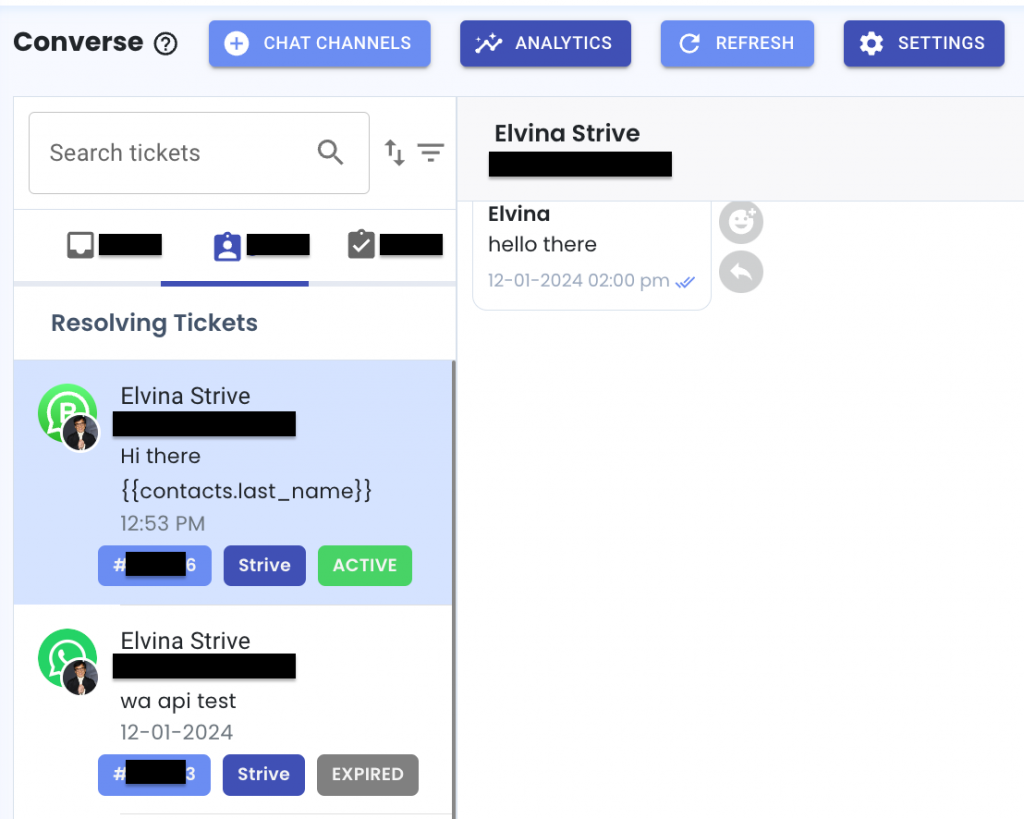
24. Converse Ticket Owner 👤
Now, identifying who owns or accepted a ticket is a breeze! Whether it’s in Resolving or Resolved Tickets, stay in the know with just a glance. 🕵️
25. Duplicate Product Effortlessly! 🤩
Say goodbye to the hassle! Simply select the product by checking the box and click on “Duplicate” to create an identical copy in no time.

26. Dropdown Selection for Company Positions 📋
If you have just added a new company position, in the upcoming contact creation or edit, the company position is available in the dropdown

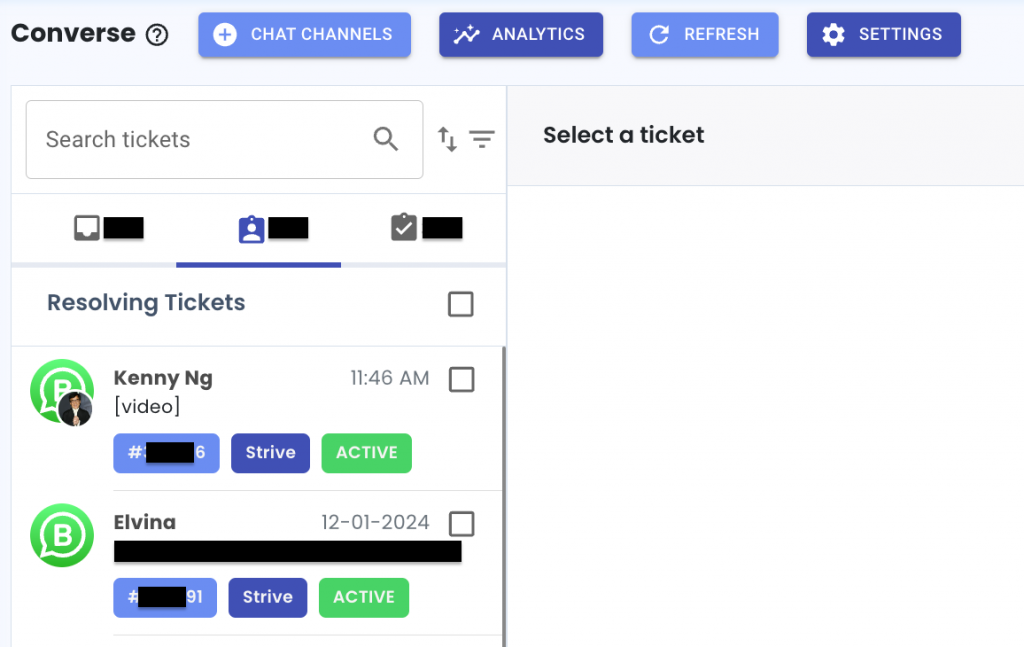
27. Fresh Look for Converse 🌟
Enjoy a wider and refreshed appearance in the Converse message section for a more spacious and appealing look.
28. Improved Icons for Converse Quick Reply & WA Personal Setup 🔒
Spotting whether Converse Quick Reply or WA Personal devices are set to private or public is now easier.
A filled lock icon indicates private, while an outlined lock signifies public settings.
Converse Quick Reply:

WA Personal Setup:

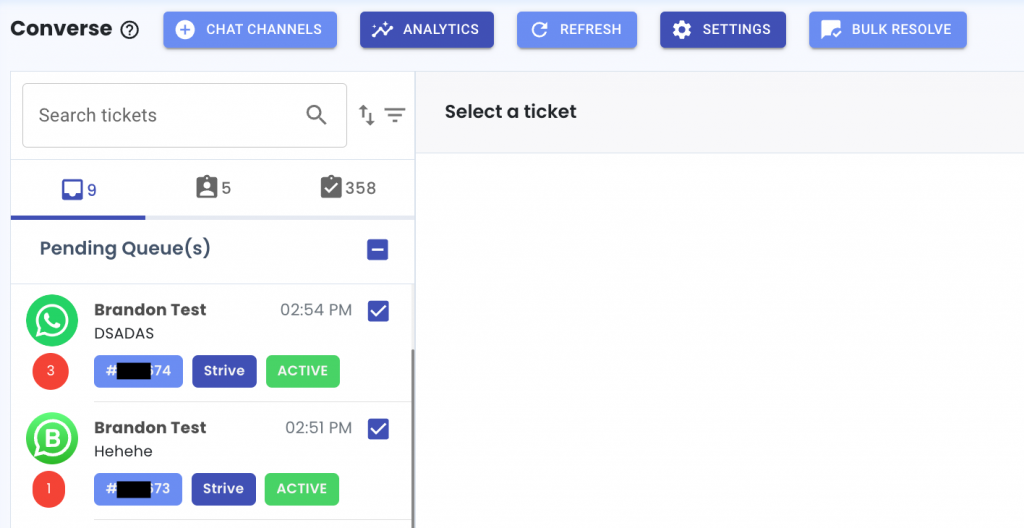
29. Effortless Ticket Resolution! ✨
Say goodbye to the hassle of resolving tickets one by one! 🎉
Now, you can easily select multiple tickets in either the Pending Queue or Resolving Ticket section and resolve them all at once.
This convenient feature streamlines your ticket management process, making it quick and efficient.
30. Converse Quick Reply Control! 🗝️
As the creator of a Quick Reply message, you have the power to configure its privacy setting. Keep it public for all to access or make it private for your eyes only. Other users won’t be able to change the setting you’ve chosen.
*If you’re not the owner of the Quick Reply but have permission to view it, the privacy lock icon will appear in grey colour.

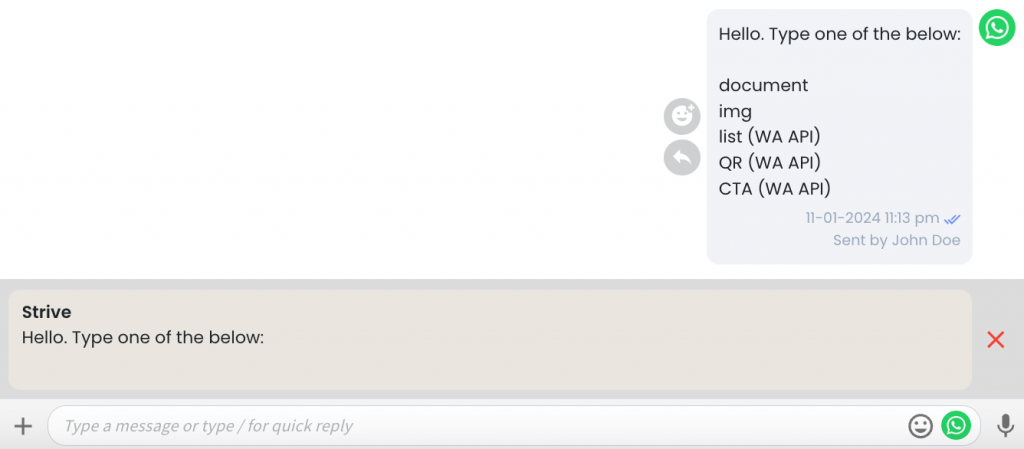
31. Reply to Converse ticket now looks neater ✉️
Now, when you reply to a Converse ticket, the conversation looks cleaner. No more scrolling down to view the text you’re responding to.
If it’s a multi-line message, the first 2 lines are right there for you to see.
32. Easily Identify Channels in Converse! 😎
Now, with just a hover, you can view the phone number associated with your Converse channel directly in the ticket text area.

33. Bulk Move or Bulk Delete Your Deals in KPI Pipeline Table View! ✨
Tired of moving or deleting deals one by one?
Now, in the KPI Pipeline’s table view, you can efficiently perform bulk actions! Simply select the deals you want to manage and choose whether to move them in bulk or remove them all at once.
It’s a time-saving solution for a more organized and hassle-free experience. 📊

34. Longer Notifications Made Neat 📜
Now, when your notification messages get lengthy, they seamlessly flow to the next line. This preventing any cutoffs for a smoother reading experience.

35. Remove Deal Contact Renamed in Pipeline 🔄
We’ve updated the button naming from “Remove” to “Remove from deal” for clearer visibility and easier understanding.

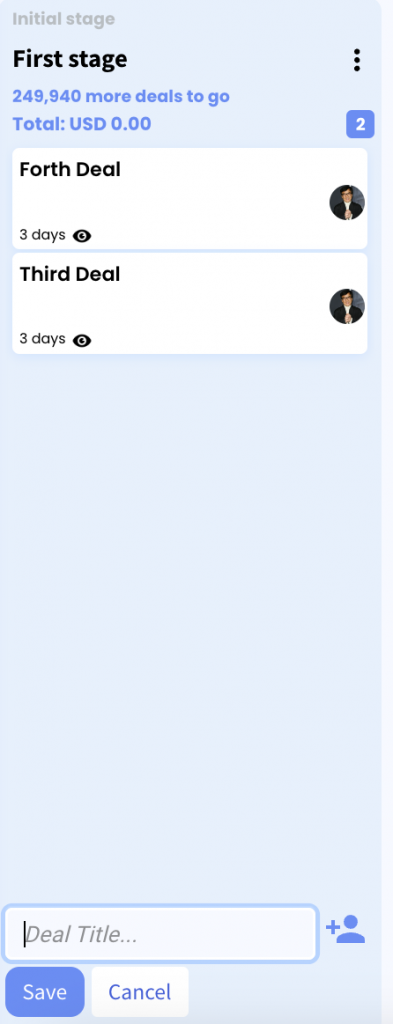
36. Quickly Name Your Deal! 🚀
Now, when you hit “Add Deal” in the stage, you can start typing right away! No need to click inside the text area before entering the deal name.
Save time and effortlessly name your deals! 🖋✨
37. Enter Deal Closed Date in KPI Pipeline 📅
Closing a deal is a big win! 🎉 But what if you missed to update your KPI Pipeline? No worries!
Now, when you move your deal to the “Deal Won” stage, you can easily enter the deal closed date.

38. Non-Owners Can’t Delete Quick Replies! ❌
If you didn’t create the quick reply, you can’t delete it.
This helps prevent accidental deletion and keeps your quick replies safe.

39. Instant Message Replies ✉️
Now, when you click to reply to a message, you can start typing right away without clicking inside the text area first.

40. Appointment Section Naming Updated
We’ve made some changes to make section more clearer! “My Events” is now “My Appointments,” and “Scheduled Events” is now “Scheduled Appointments.

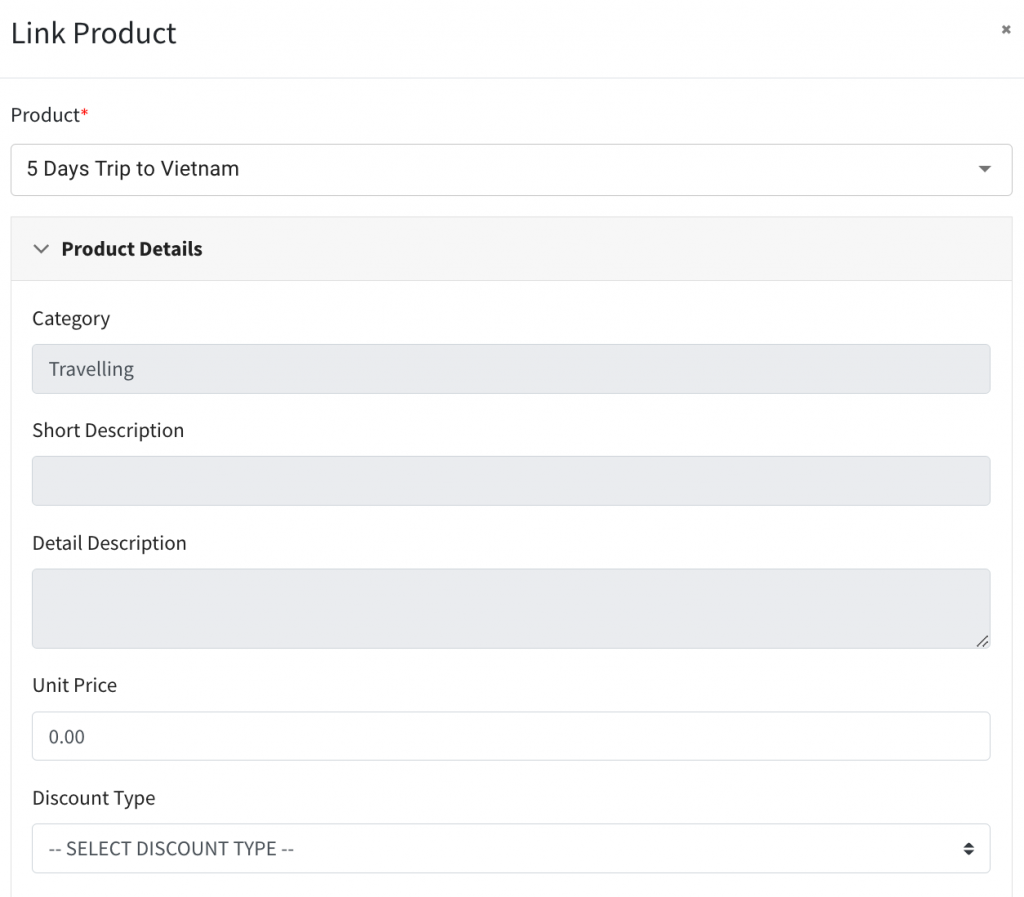
41. Informative Product Linking in Pipeline 🔗
When linking a product in your Pipeline deal, you can see its category and description in the Product Details. This addition makes it simple to get a quick overview of your product details without having to go to the Product module.
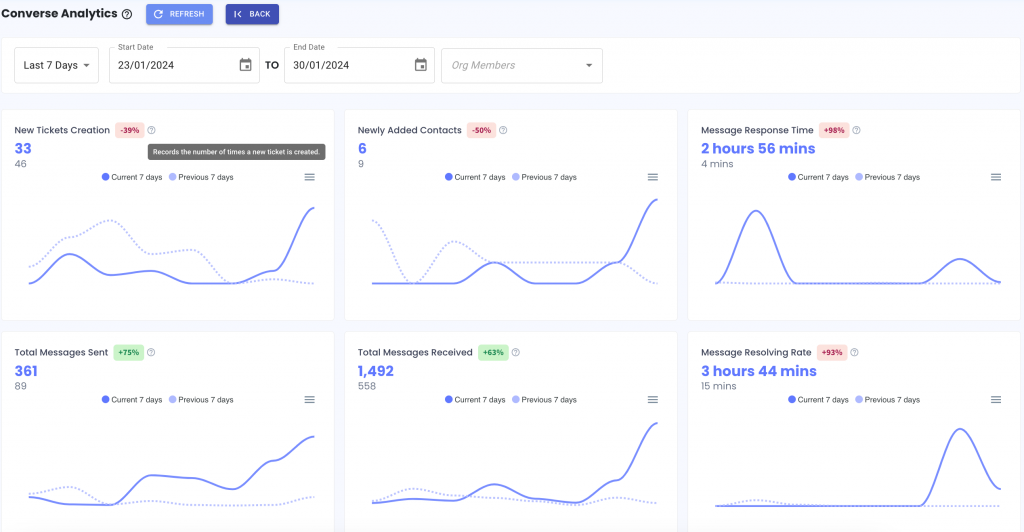
42. Understanding Converse Analytics Graphs! 📊
Curious about the details of each graph?
Simply hover your mouse over the question mark icon next to each graph’s name to get a quick overview of what it represents.
That concludes our January 2024 update! The excitement doesn’t end here; stay tuned for more updates coming your way!

