Strive April 2026 Updates 🚀
April 2026 Update
Dear Strivers,
As we step into May, here’s a quick recap of what we released in April 2026. We hope everyone had a meaningful month. Over the past few weeks, we’ve rolled out several enhancements aimed at improving your daily experience and making the platform even more seamless to use. Read on to explore what’s new.
____________________________________________________________________________
Enhancements
1. Round Robin Assignment Node in Flowbuilder 🌀
What’s New:
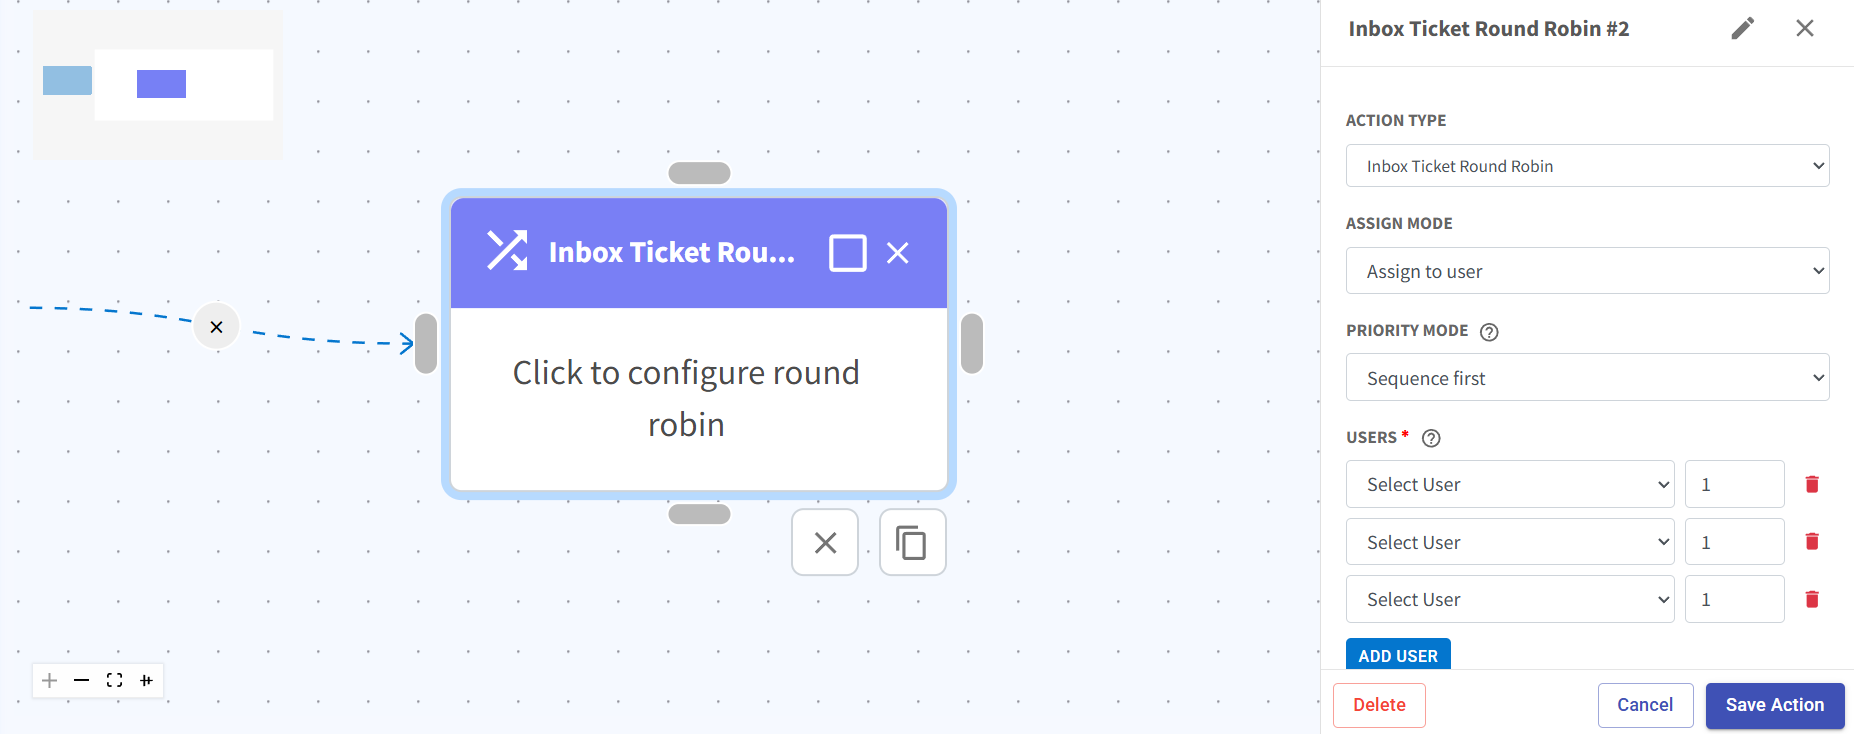
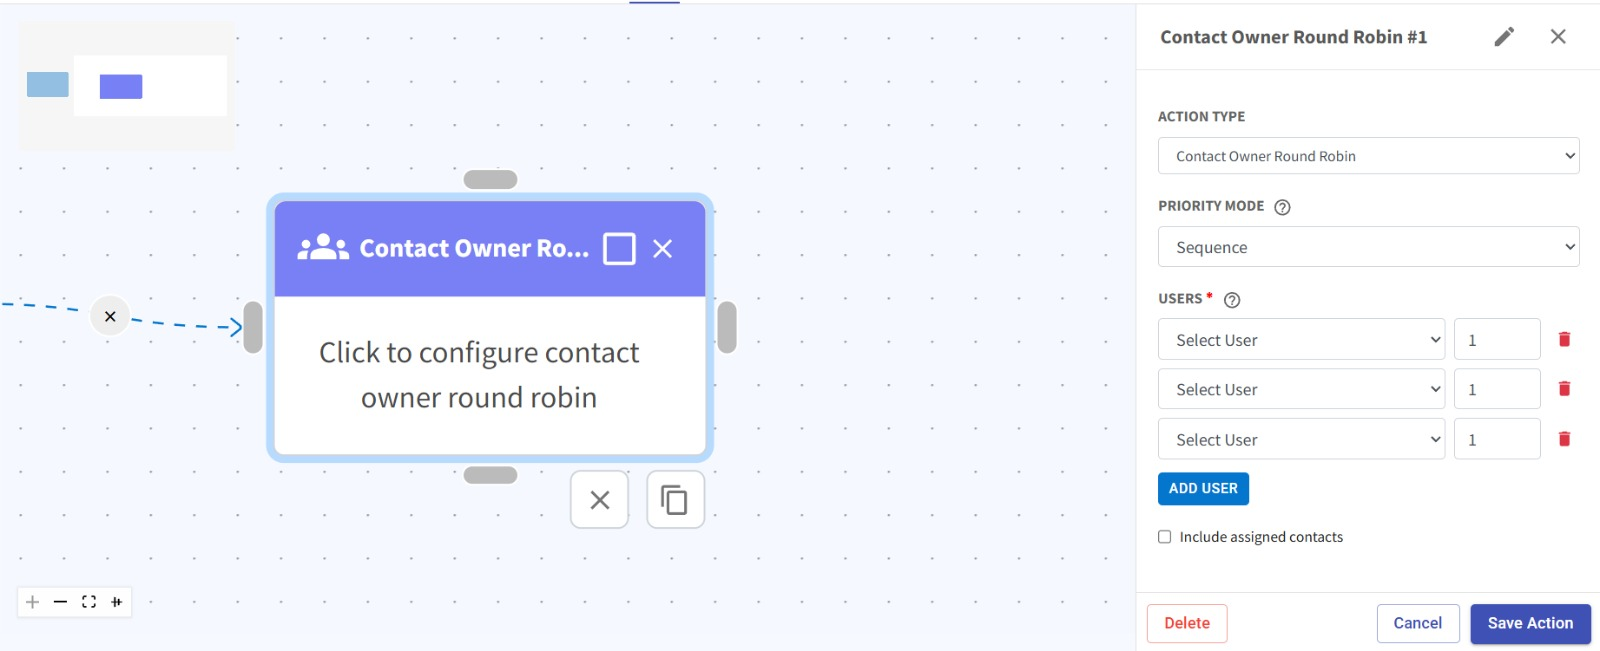
We’ve added a new Round Robin node in Flowbuilder, allowing you to automatically distribute contacts or tickets across users.
You can now configure assignment using different modes such as sequence or weightage, giving you more flexibility in how workloads are distributed within your team.
What it means to you:
No more manual assignment of contacts or tickets.
Ensure fair and efficient workload distribution among team members, whether equally through sequence or based on priority using weightage. ✨
With the new customization options, you can also define your own assign mode and priority mode to better match your business workflow needs.
This helps improve team productivity, response speed, and overall operational efficiency. 🎯
How you can go about it:
Head over to the Flowbuilder module and open an existing flow or create a new one.
Add the Round Robin node at the desired step in your flow.
Choose your assign mode and configure whether you want sequence-based or weightage-based distribution.
Customize your priority mode based on your workflow requirements.
Select the users involved and adjust their order or weightage settings.
Click save action, save the flow and activate it to start automatic distribution.
2. Bulk Duplicate Flows Made Easy 🚀
What's New:
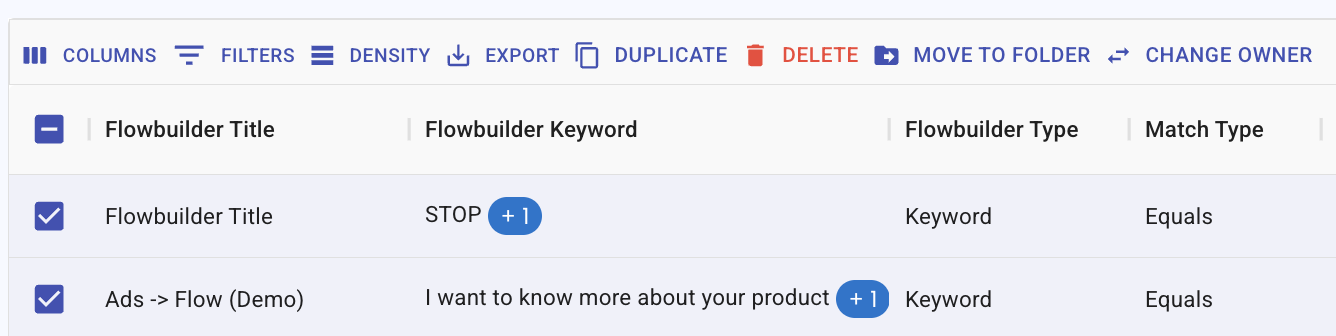
You can now duplicate multiple flows at once, instead of one by one.
What it means to you:
Save time and effort when setting up new flows for your team. ✨
How you can go about it:
1. Select the flows you want to duplicate.
2. Click the 'Duplicate' button.
3. Your new copies are ready to use. 🎉
3. Bulk Update Product Custom Fields in One Go 🛠️
What’s New:
You can now bulk edit custom fields for multiple products in the Product module. 📦
Simply select the products using the checkbox and update their custom fields all at once.
What it means to you:
You can update multiple products quickly without editing them one by one. ⚡
This helps you save time when managing product information.
How you can go about it:
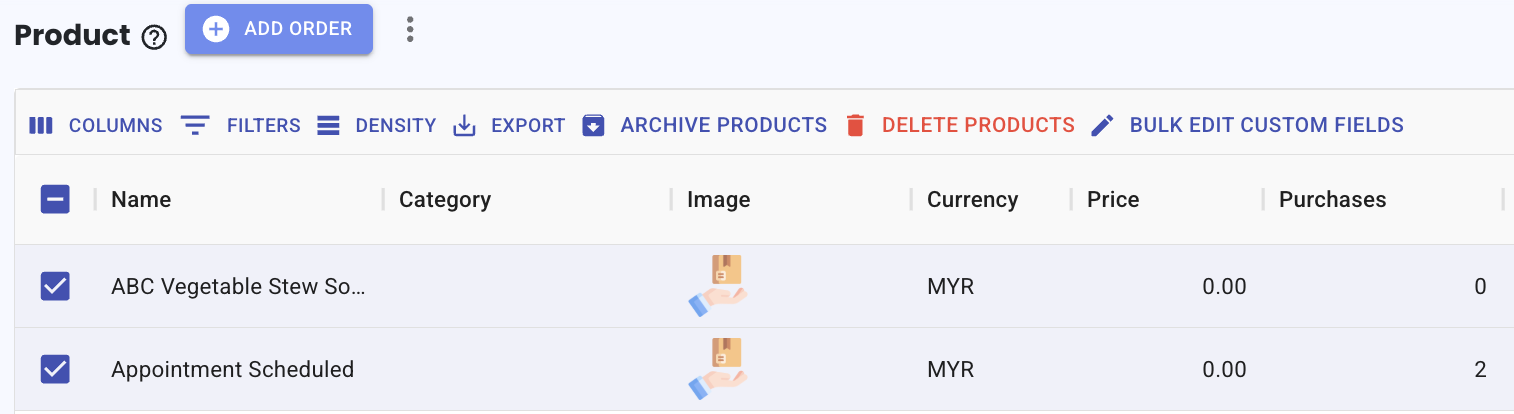
Go to the Product module
Select the products using the checkbox
Click Bulk Edit Custom Fields
Update the custom field as needed
Save your changes
Note: If a custom field does not exist for some products, it will be automatically added during the update.
You can refer to this guide: Guide
4. New Counter Action in Flowbuilder 🔢
What’s New:
A new Counter action is now available in Flowbuilder. ➕
This allows you to update a variable or contact custom field by adding, minus, multiply, or divide a value automatically.
What it means to you:
You can track values such as counts, scores, or number of actions within your flow. 🎯
This makes it useful for use cases like surveys, quizzes, or tracking user behaviour.
How you can go about it:
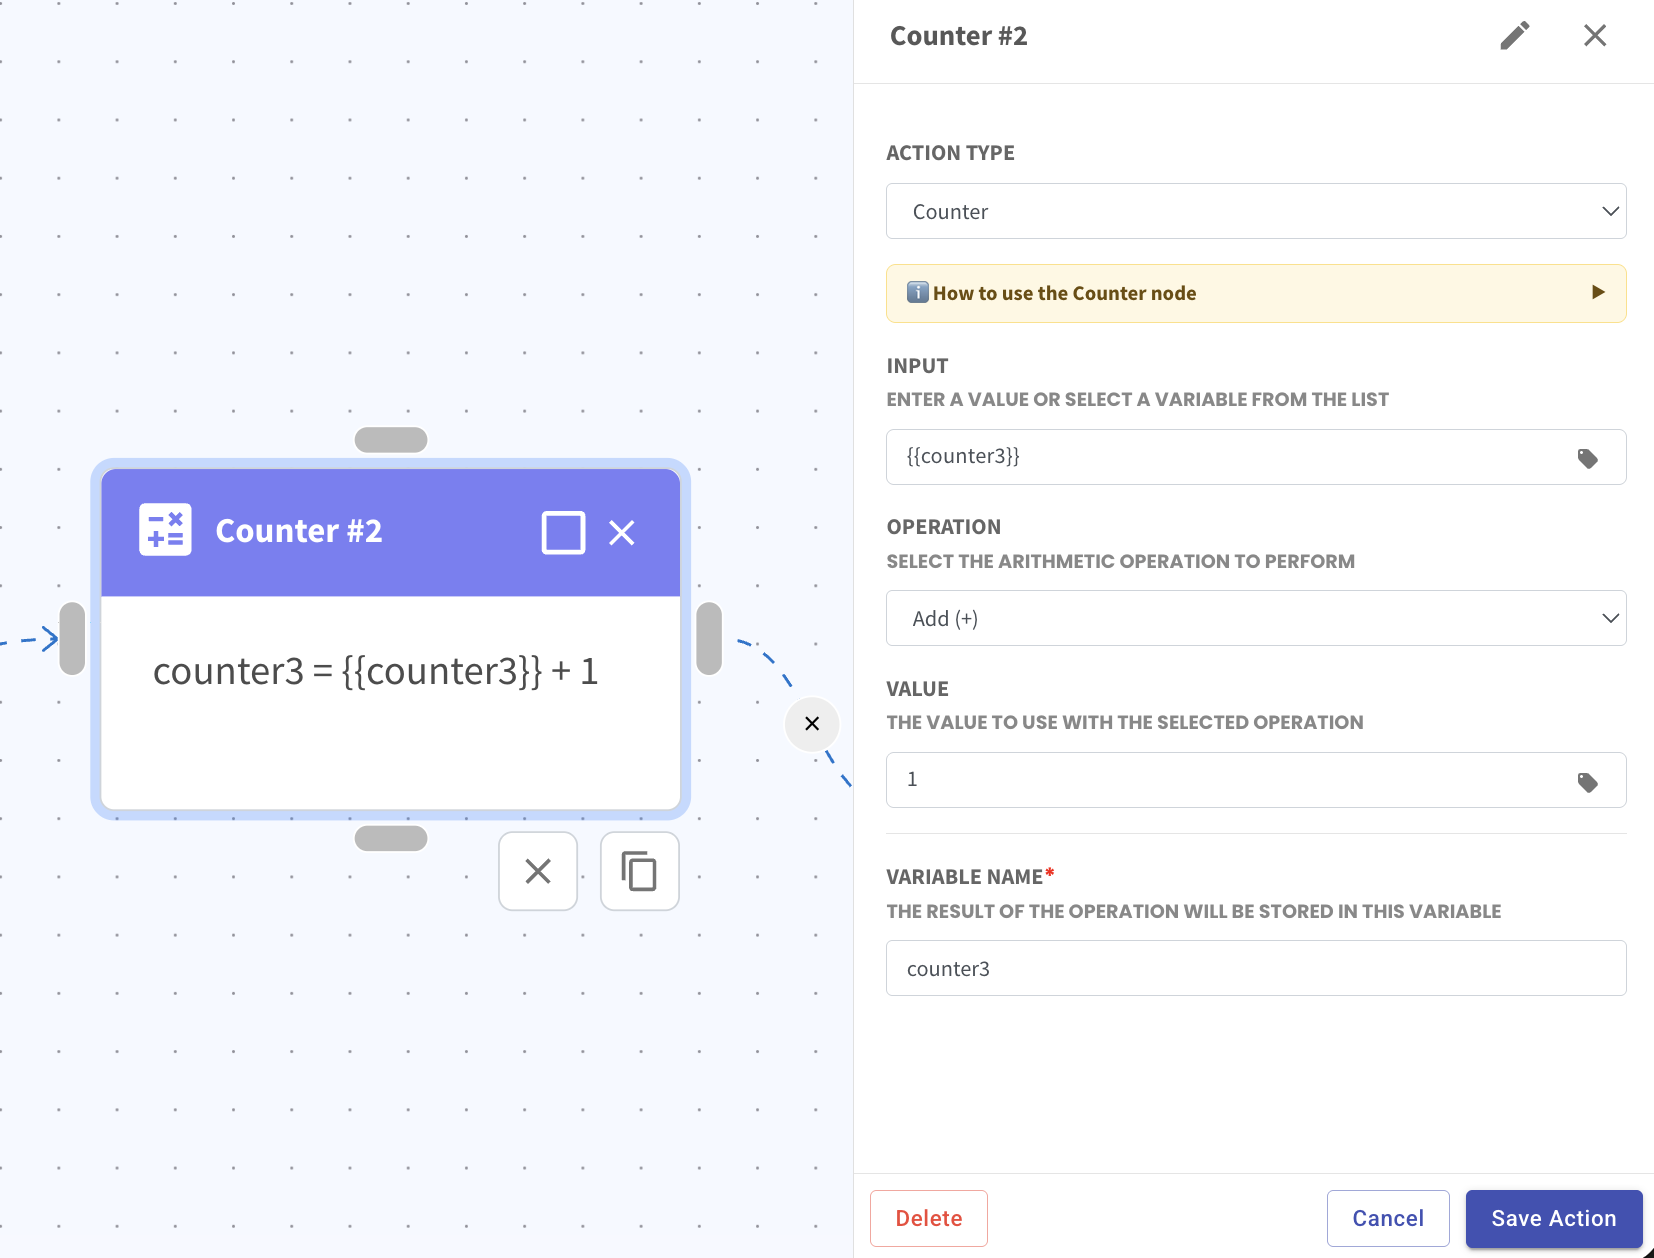
Add the Counter action in your flow
Select the variable or input value
Choose the operation such as Add, Minus, Multiply, or Divide
Enter the value to apply
Set the variable name to store the result
Save the action and continue your flow
Example:
If the variable counter3 value was set as 0, when the contact goes through the flow, 1 will be added.
This means counter3 will now become 1.
You can then use this updated value in the next Counter action or update it into a contact custom field.
5. More Tag Filter Options in Contact List 🏷️
What’s New:
You now have more options when filtering contacts by tagging in the Contact List. 🔍
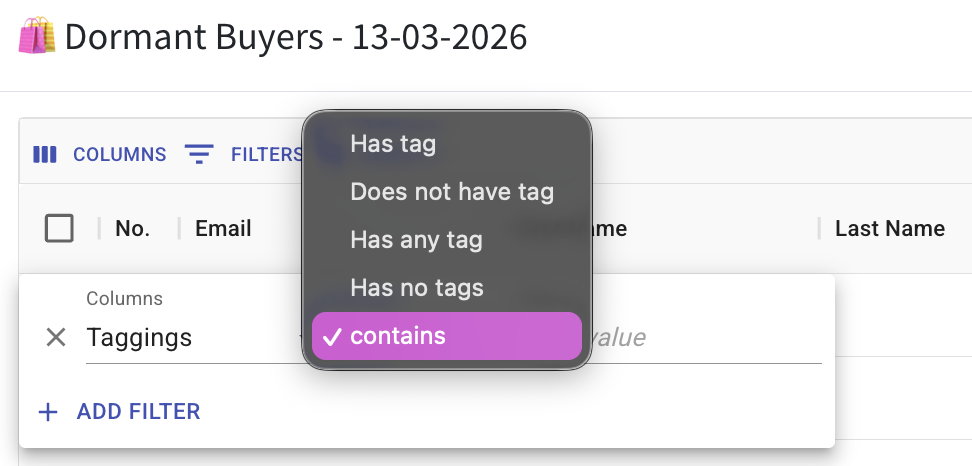
You can choose options like has tag, does not have tag, has any tag, has no tags, or contains when filtering.
What it means to you:
You can filter contacts more precisely based on their tagging. 🎯
This helps you quickly find the exact group of contacts you are looking for.
How you can go about it:
Click on the eye icon to view the contact list
Click on the filter icon
Select Taggings
Choose the filter option such as:
• Has tag
• Does not have tag
• Has any tag
• Has no tags
• ContainsApply the filter
This allows you to better segment and view your contacts based on tagging.
6. Contact Filter with Exclude Tag Option 🚫
What’s New:
You can now use the Exclude Tag option in the Contact filter. 🏷️
This allows you to filter contacts while excluding those with specific tags.
What it means to you:
You can focus only on the contacts that match your criteria without including unwanted tagged contacts. 🎯
This makes your contact filtering cleaner and more accurate.
How you can go about it:
Go to the Contact module
Click on the three horizontal lines
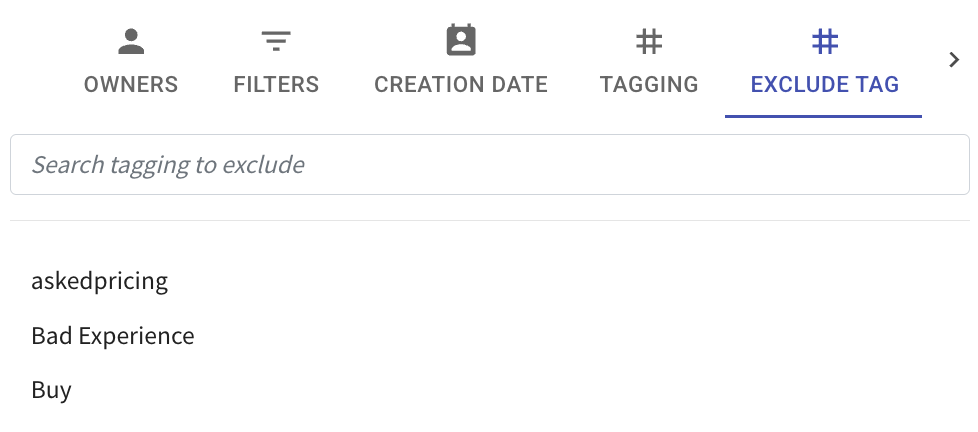
Select Exclude Tag
Choose the tag you want to exclude
Click Apply Filter
Example:
If you exclude the tag Cold Lead, contacts without this tag will be displayed.
7. Search Flow by Typing in Trigger Another Flow 🔍
What’s New:
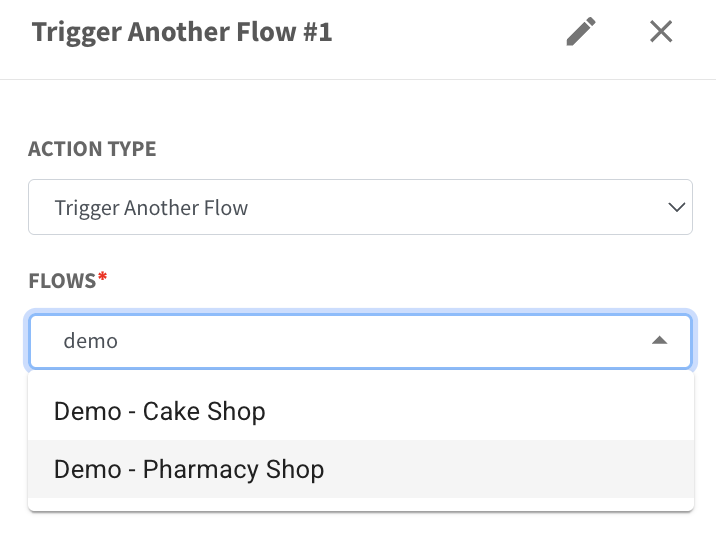
You can now type to search when selecting a flow in the Trigger Another Flow action. ⌨️
Instead of scrolling through a long list, you can quickly find the flow by typing its name.
What it means to you:
You can select the correct flow faster without manually searching through the list. ⚡
This makes your flow setup quicker and reduces the chance of selecting the wrong flow.
How you can go about it:
Add the Trigger Another Flow action in your flow
Click on the Flows dropdown
Type the flow name
Select the flow from the search results
Save the action
This helps you quickly find and select the flow you need.
 _
8. Name Your Imported Contact Lists Instantly ✨
What's New:
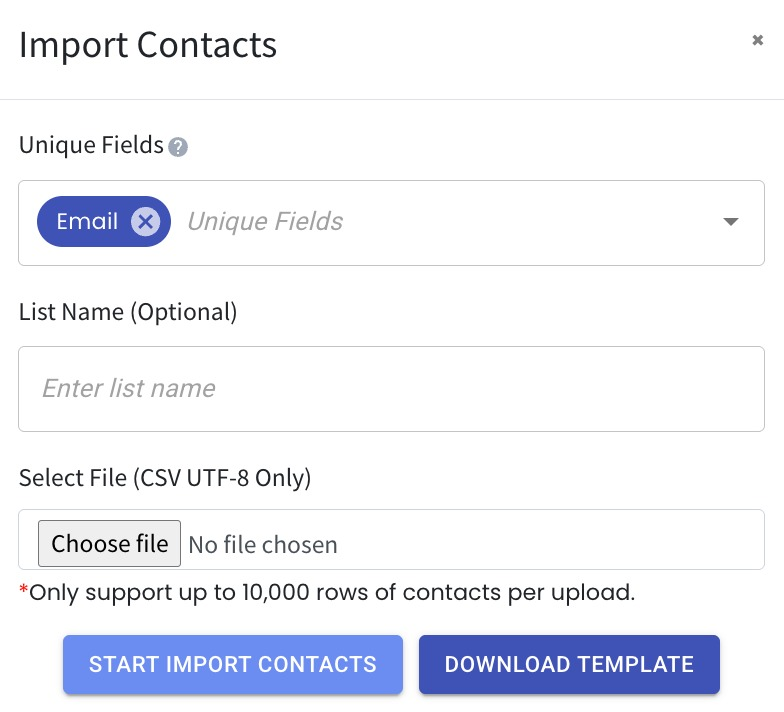
You can now enter a custom name for your contact list right during the import process. No more extra steps to rename it afterward. 🚀
What it means to you:
Save time and stay organised by naming your list as you import it. One less step means a smoother workflow for you. 📋
How you can go about it:
Select the unique field(s) and attach the CSV file
Type your list name in the input field provided
Go through the import process and the name is saved automatically 📝
9. Save Email Templates as New Copies 🗂️
What's New:
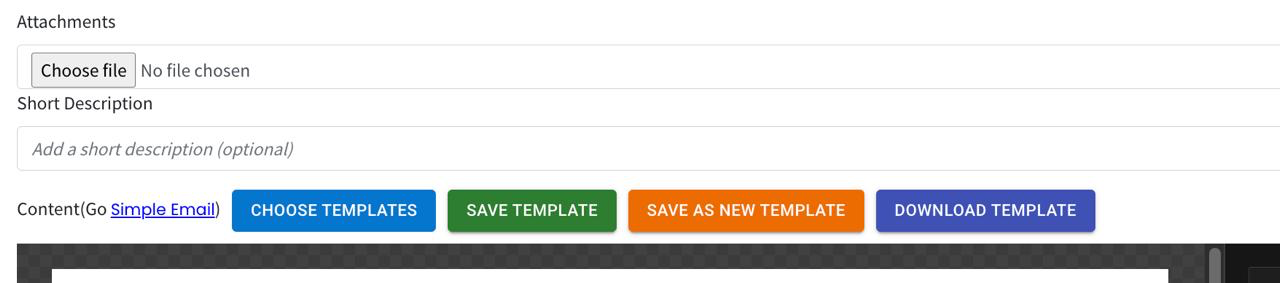
When you make changes to an existing email template, you now have the option to save it as a new template. You can choose to either overwrite the original or keep it and save a new copy. 💾
What it means to you:
You no longer have to worry about losing your original template when making edits. This gives you more control over how your templates are managed, keeping things organised and flexible. 📁
How you can go about it:
Choose an existing email template and make your changes
Click the save option and choose to overwrite or save as a new template
Your new template is saved separately, leaving the original intact 🎉
10. Product List Now Grouped by Currency 🧩
What’s New :
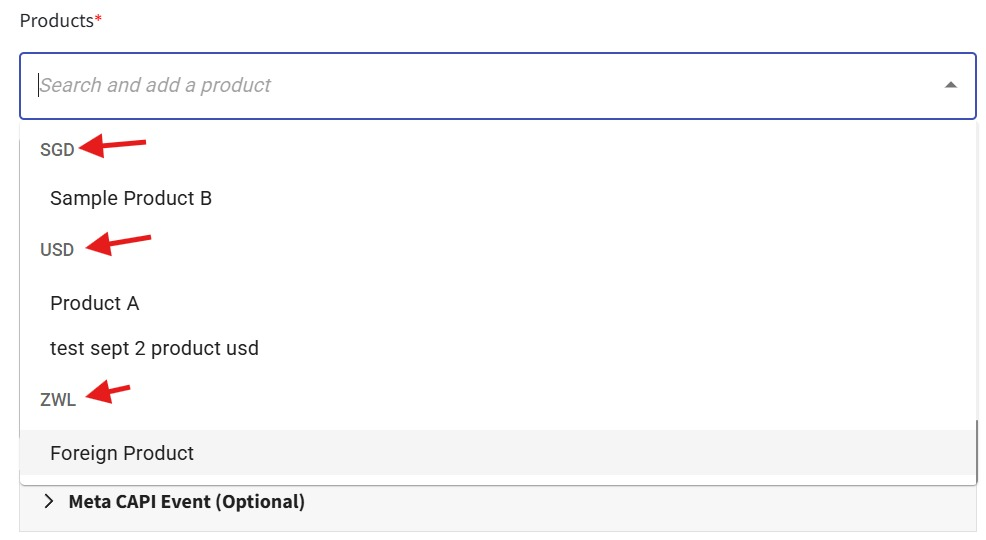
Product selection in Log Purchase is now organized with grouped display by currency.
Products are no longer shown in a flat list. They are now grouped (e.g. SGD, USD, ZWL), making it easier to browse and select the correct product. ✨
What it means to you :
No more scrolling through a long, repetitive list of products with different currencies.
With grouped display, you can quickly find what you need, improving efficiency and reducing selection errors. 🎯
How you can go about it :
No setup is required.
Simply head over to the Log Purchase module and select a product — the list will now be displayed in grouped format automatically.
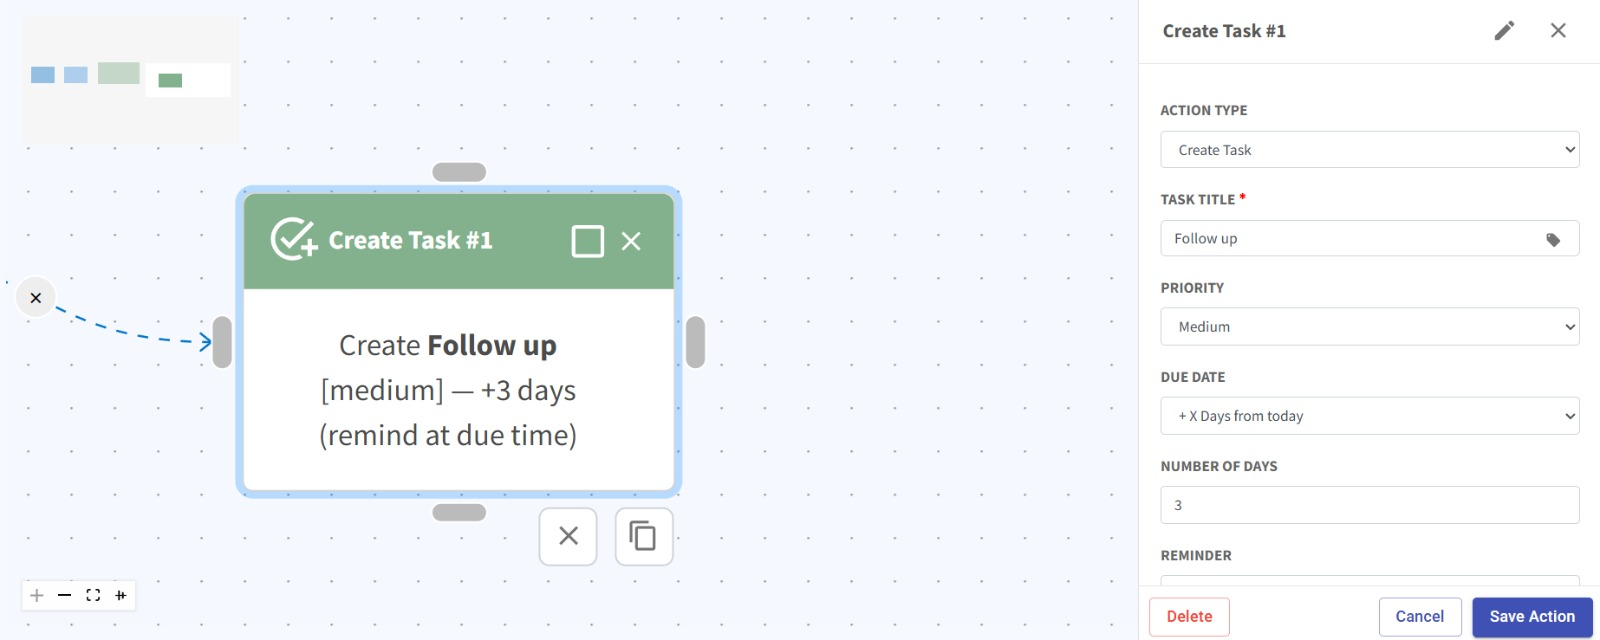
11. Create Tasks Automatically in Your Flow 📝
What’s New:
You can now add a Create Task node in your flow.
Automatically create tasks when contacts meet specific conditions in your flow.
What it means to you:
Stay organized and never miss a follow-up.
Once a contact meets your defined criteria, a task will be created automatically and appear on your homepage for easy tracking. ✨
This helps streamline your workflow and ensures timely follow-ups without manual effort. 🎯
How you can go about it:
Here’s how to set it up in just a few steps:
Head over to the Flowbuilder module and open an existing flow or create a new one.
Add a Create Task node at the desired point in your flow.
Set the conditions that trigger the task creation.
Customize your task details such as title, priority, due date, and reminders.
Click save action, save the flow and you’re all set!
12. Gallery Image Only Action Now Support Buttons 🖼️
What's New:
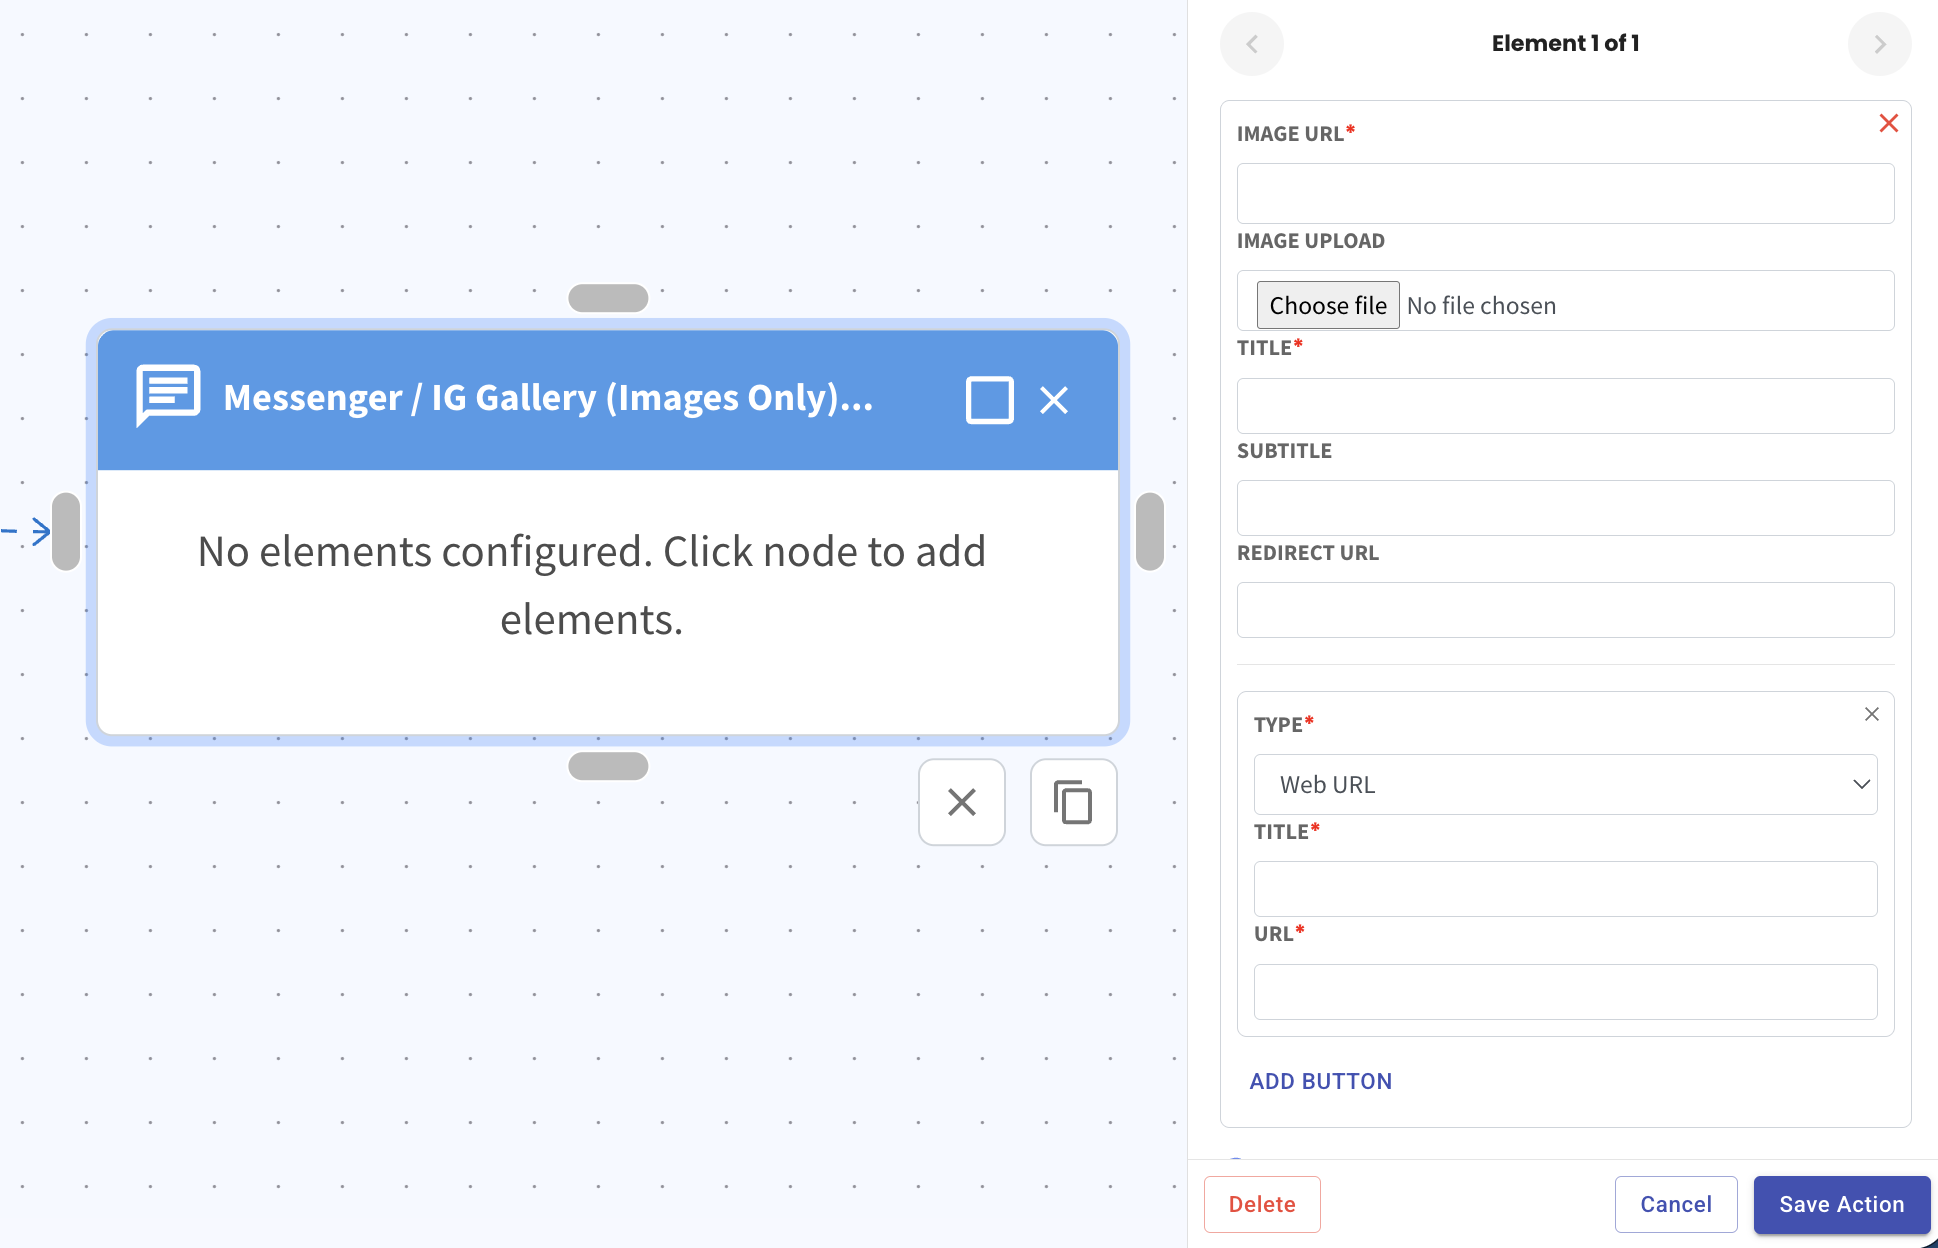
Your Messenger and Instagram gallery can now include buttons alongside images.
Contacts get a richer experience with clear next steps right inside the gallery. ✨
What it means to you:
No more waiting for a contact to reply before the flow moves on.
Once the gallery is sent, the next action runs automatically, keeping your flow smooth and uninterrupted. 🎯
How you can go about it:
Here is how to set it up in just a few steps:
Head over to the Flowbuilder module and open an existing flow or start a new one.
Add a Messenger / IG Gallery (Images Only) action, then click on the node to configure it. Upload your image and fill in the title to get your gallery ready.
Click Add Button at the bottom, choose the button type that fits your goal, and fill in the required fields. Hit Save Action when you are done.
13. Transfer Ownership During User Removal 🔄
What’s New:
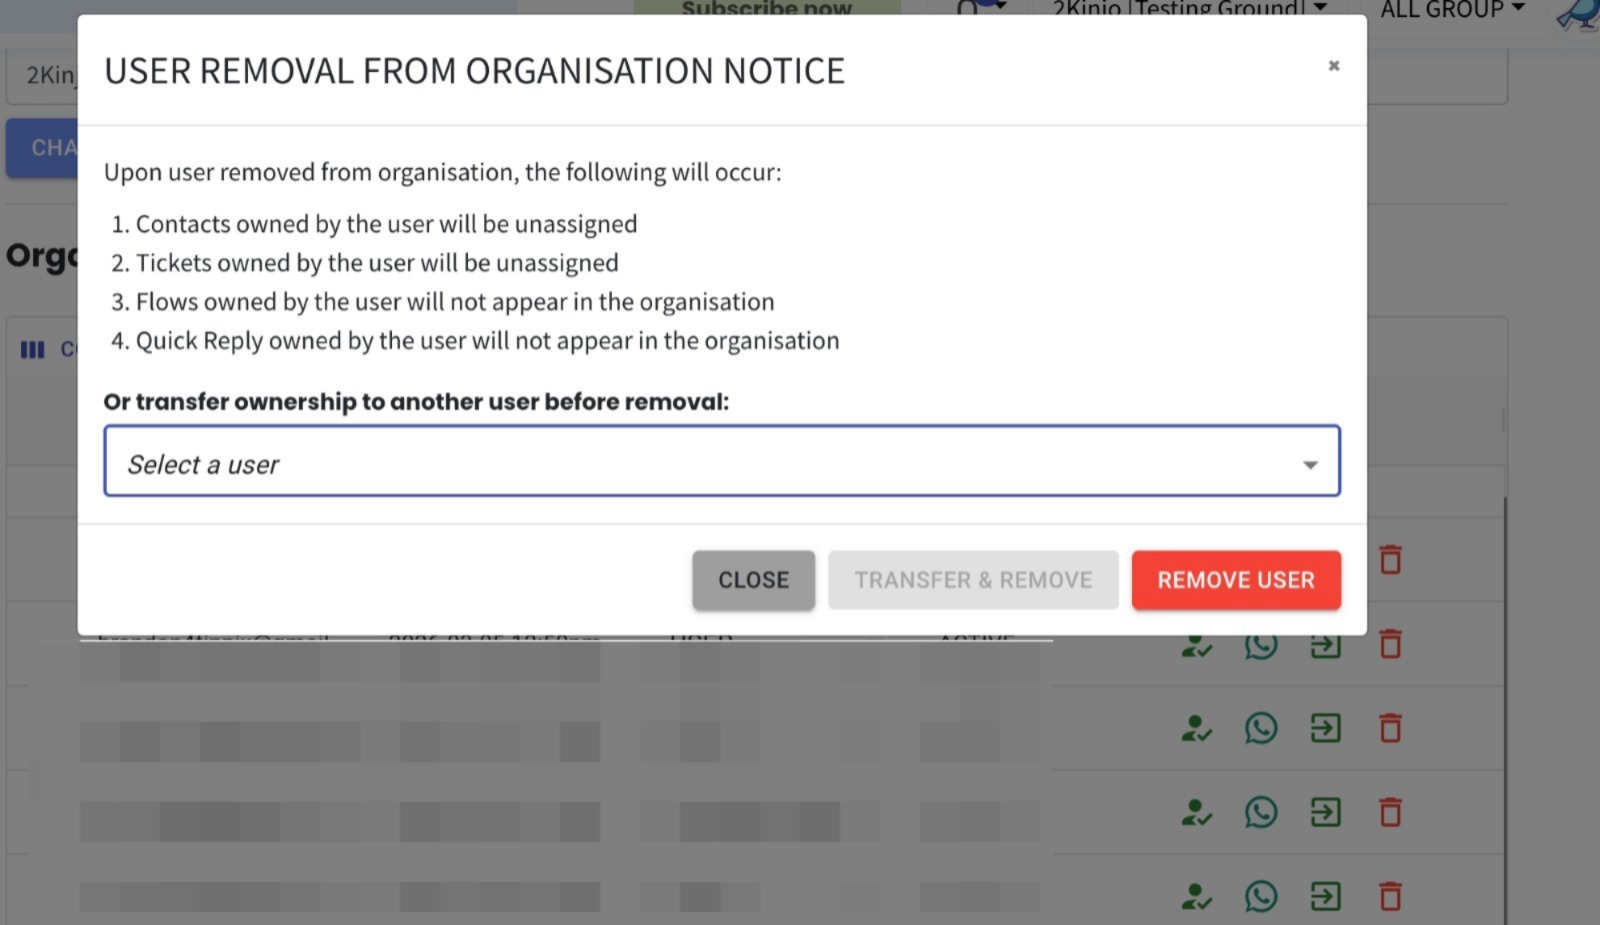
We’ve enhanced the user removal process to allow ownership transfer before a user is removed from the organisation.
Now, when removing a user, you can select another user to automatically inherit all associated contacts and tickets.
What it means to you:
No more unassigned contacts or tickets when a user leaves the organisation.
Ownership is seamlessly transferred to a selected user, ensuring continuity in customer management and task handling. ✨
This helps maintain better organisation, accountability, and workflow consistency.
How you can go about it:
Head over to the Account module and click Organisation.
Click on the bin icon and initiate the user removal process.
Before confirming removal, select a replacement user to take over ownership.
All contacts and tickets from the removed user will be automatically reassigned.
Click on the transfer & remove and the transfer will be completed instantly.
14. Message Timestamps Now Includes the Year 📅
What's New:
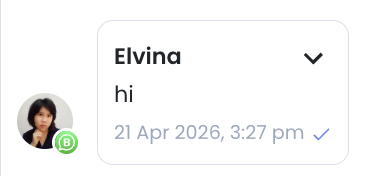
Incoming and outgoing messages now display the full date, including the year. You can clearly see when each message was sent, even for older conversations. 🗓️
What it means to you:
Scrolling through old messages is now clearer because you no longer have to guess which year a message was from.
There is no more confusion when a contact reaches out after a long time. This makes it easier to track conversation history at a glance. 📩🕐💡
How you can go about it:
Open any chat and scroll through the messages. The timestamp shown at the bottom of each message now includes the year. 📲
___________________________________________________________________
This wraps up the April 2026 update. We truly appreciate your continued support and trust in Strive. Stay tuned for more improvements coming your way in the next update 🙂