
Dear Strivers,
September is here, and it’s time to review our August 2024 update. Before diving into the August 2024 update, let’s take a moment to wish everyone a heartfelt Selamat Hari Merdeka! We’ve introduced some new features you won’t want to miss. Ready to find out more? Keep reading to find out all the updates!

New Feature
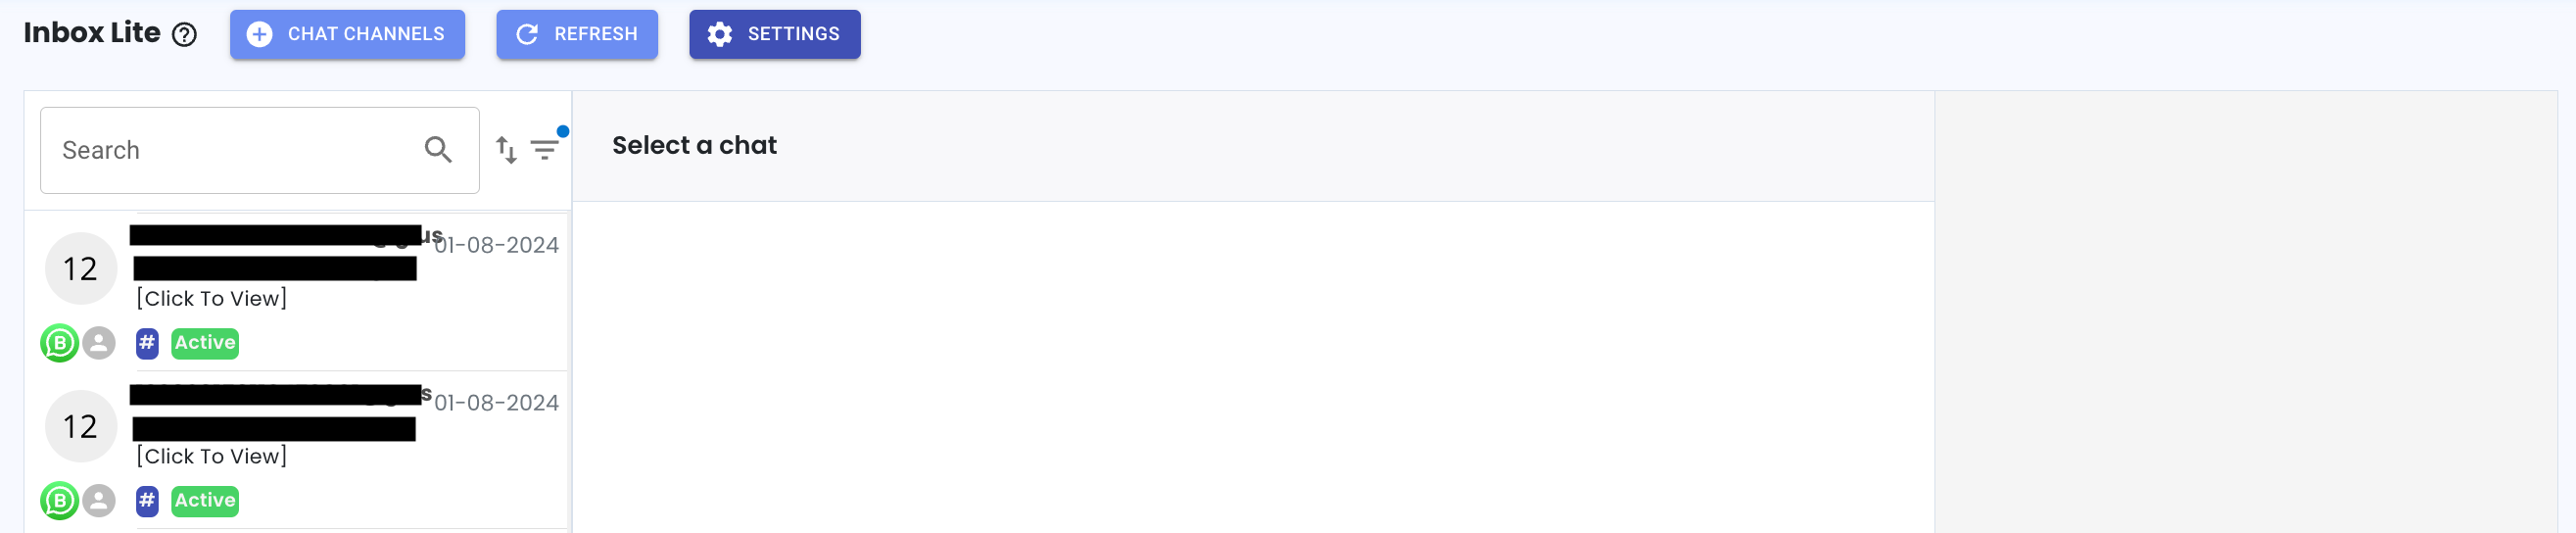
1. Introducing Inbox Lite 🚀
We’ve just launched Inbox Lite, a new version of your inbox designed for a quicker and more streamlined experience. Unlike the Inbox ticketing system, Inbox Lite displays all your tickets in one easy-to-view section, helping you manage your messages more efficiently.
Enjoy a much faster loading speed in this sub-module, ensuring you can access your chats without delay.
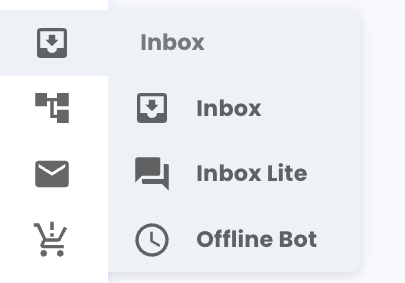
Where to access:

Sneak peak:
Features included:
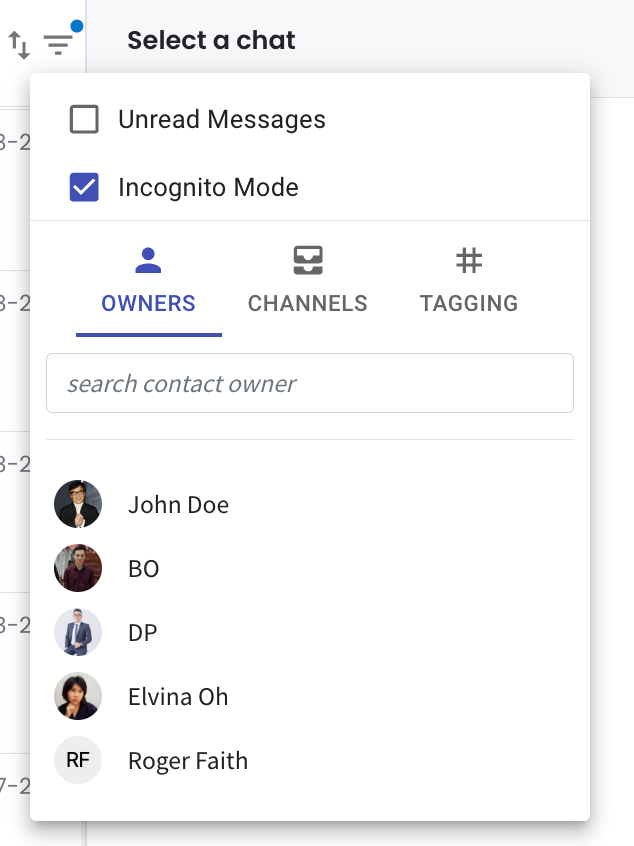
1. Filter Chats by Unread Messages 🔍
You can now easily filter your contacts to see only those with unread messages. This helps you quickly catch up on any important conversations you might have missed.
2. Incognito Mode 🕵️♂️
Inbox Lite includes an Incognito Mode where you can view tickets without marking them as read. Only when you reply to a message will it be marked as read and the unread count updated.
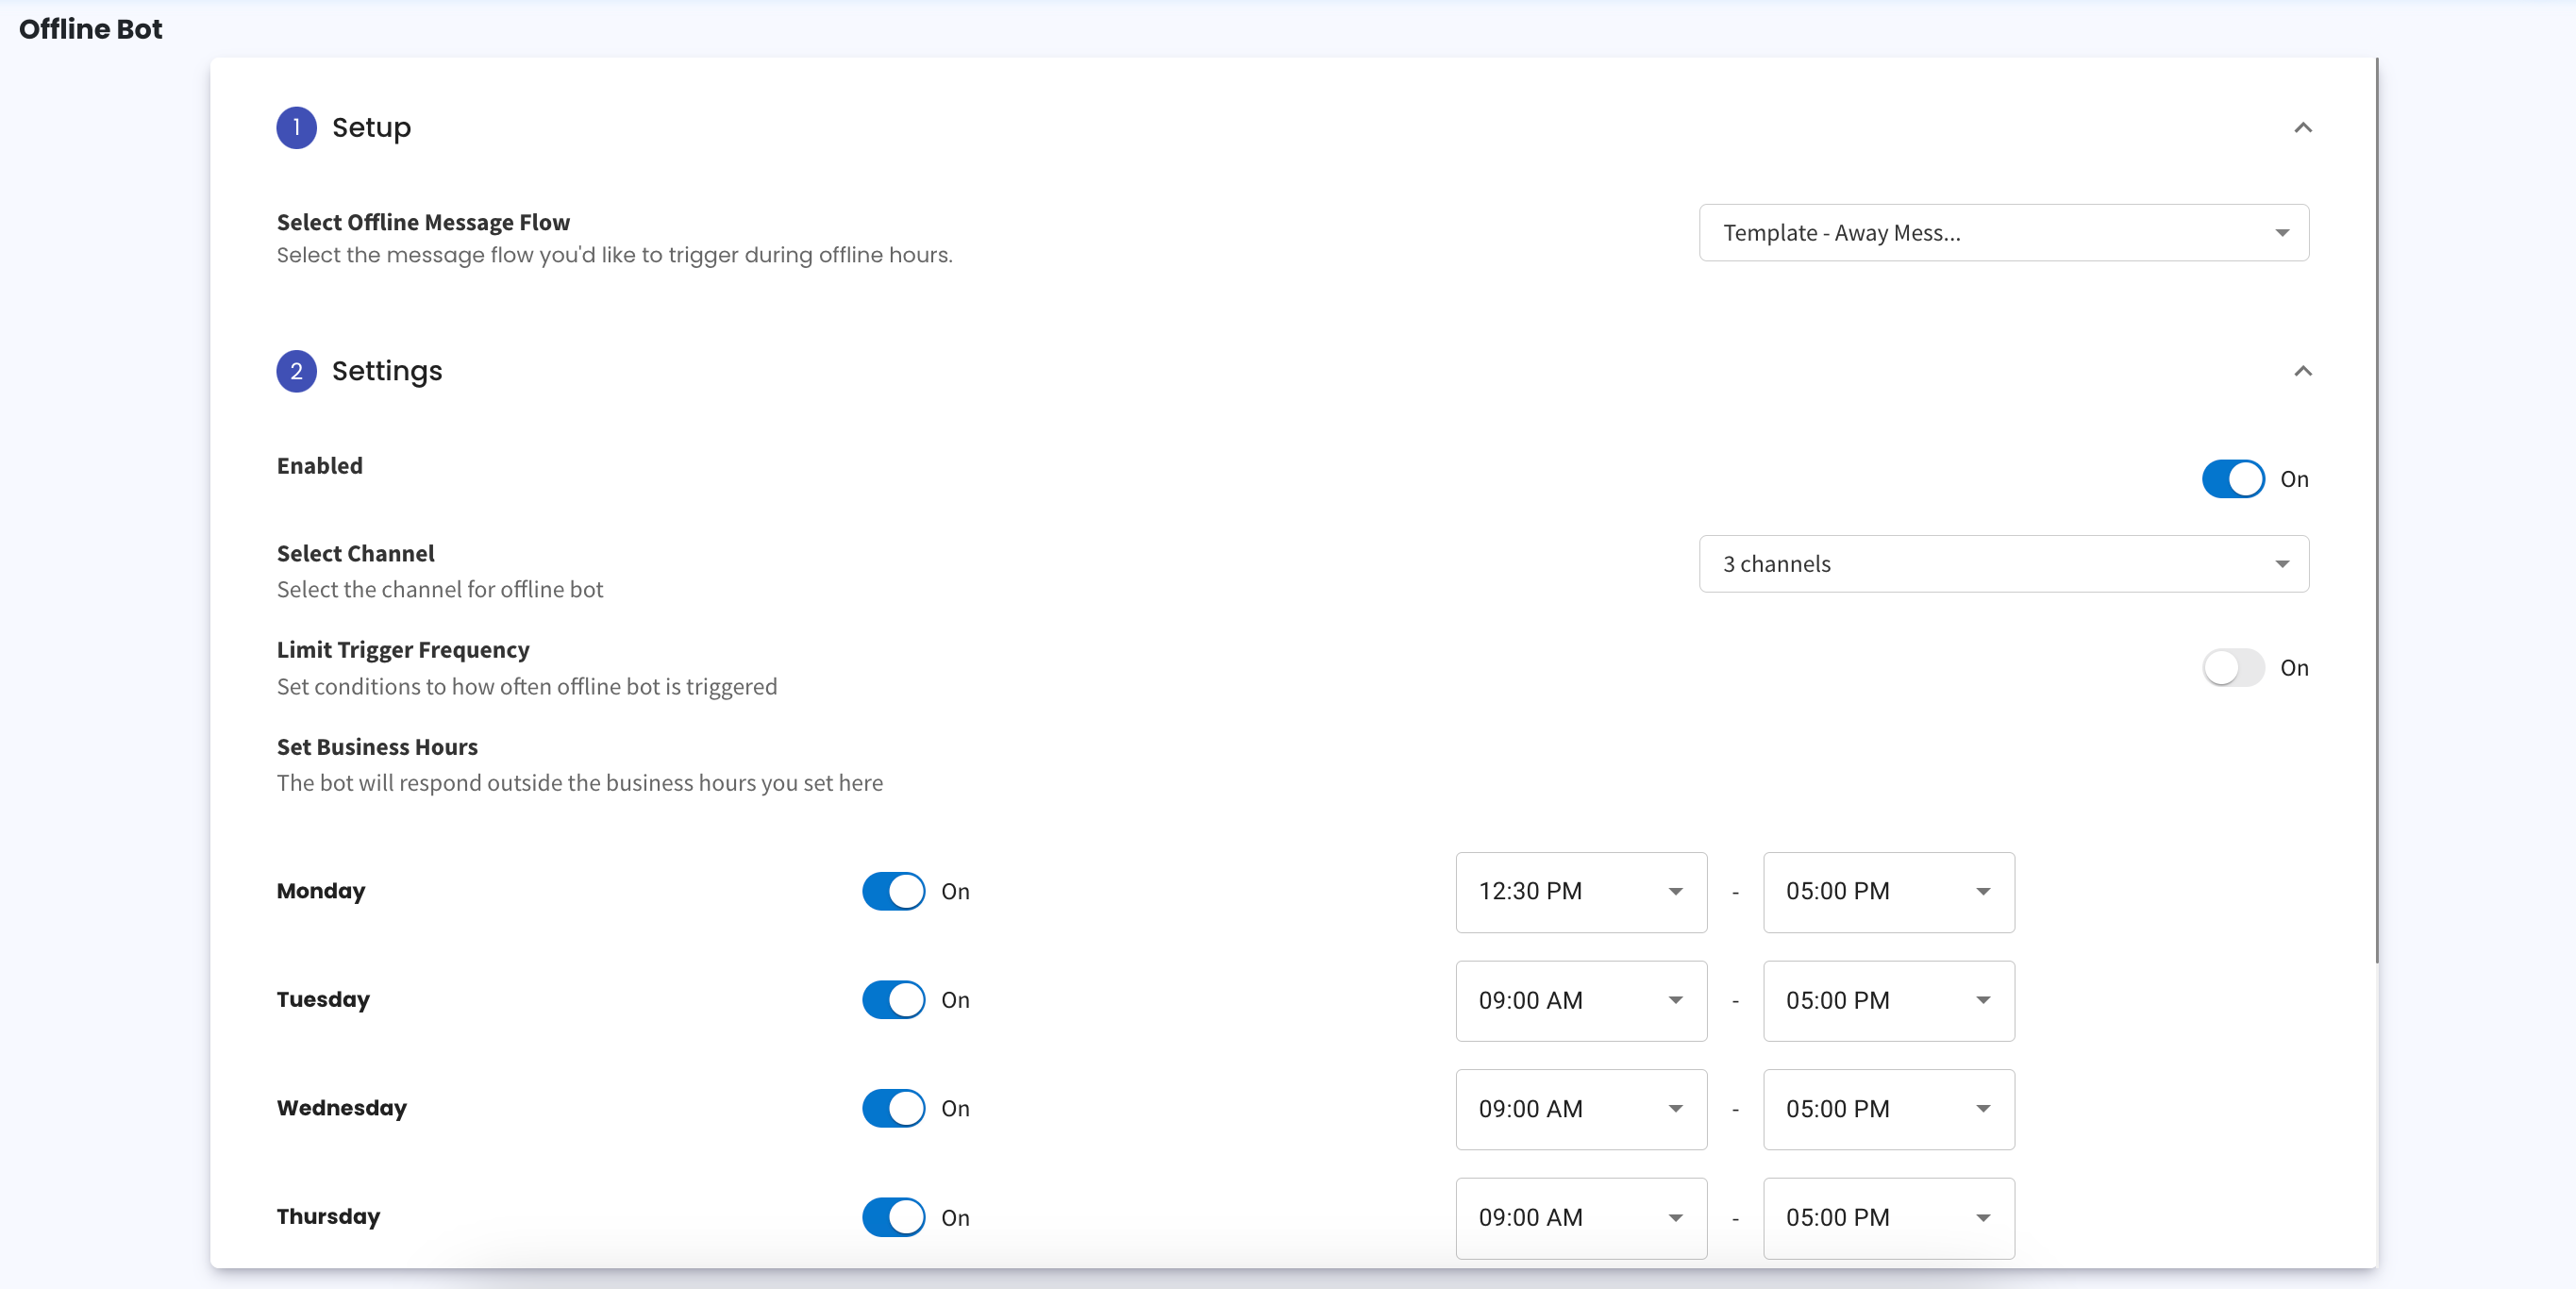
2. Say Hello to the Offline Bot 🤖
You can now set up an Offline Bot to handle messages received outside your business hours. This new feature lets you create automated responses for when your contacts reach out beyond the times you’re available.
How to Set Up the Offline Bot:
- Choose the flowbuilder you’ve created.
- Toggle the switch to enable the Offline Bot.
- Select the channel where you want the bot to be active.
- Set the days and business hours.
When your contact messages you on the selected channel outside of business hours, the flowbuilder will automatically trigger, ensuring your contacts always receive a response.
*Note: Only ONE Offline Bot can be configured in each organisation*
Enhancements
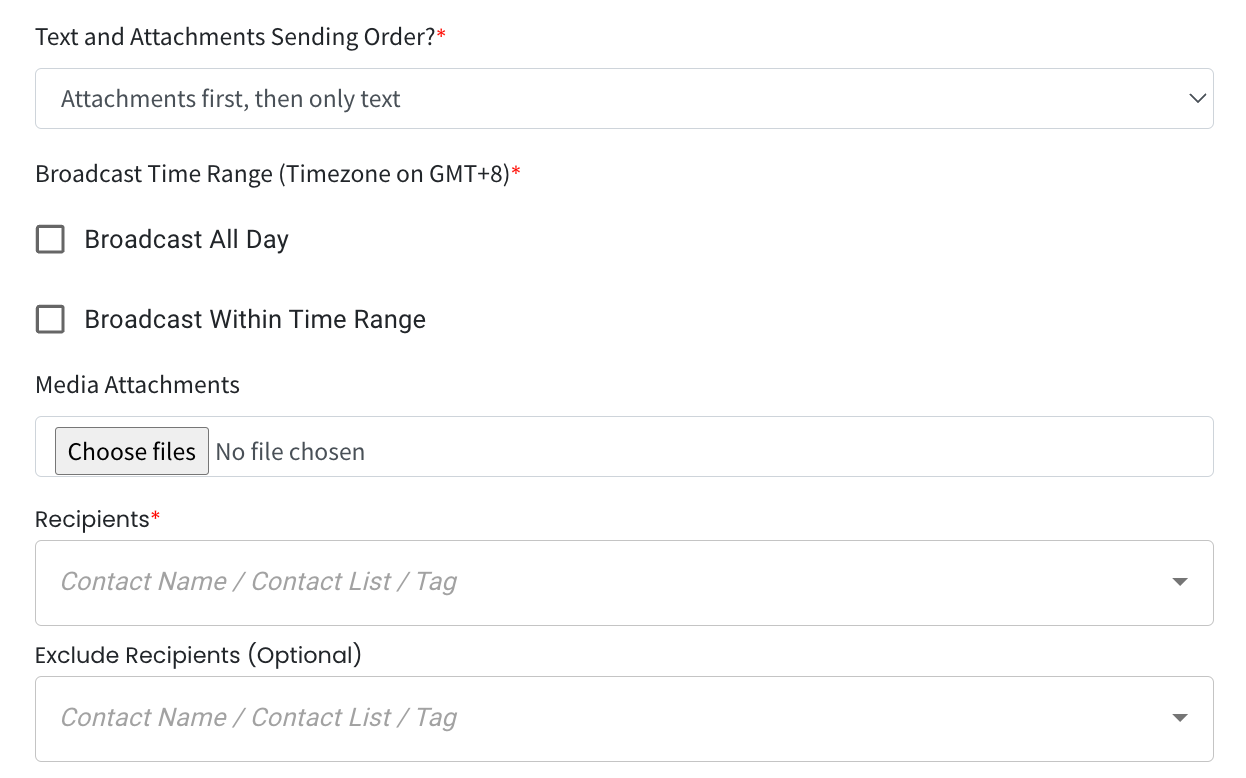
1. WA Personal Blaster Now Supports Multi-Message Broadcasts 📲
You can now send different messages to multiple contacts in one go! 🎉
To get started, download the template and fill in the details. You’ll notice a few new rows: “Sender Phone Number,” “Title,” and “Message.”
The “Sender Phone Number” is the route you’ll use for sending, so make sure your WA Personal device is connected. You can set different titles and messages for each contact.
After filling in the template, save it in UTF-8 CSV format. 📂

Next, click “Create Batch Broadcast” and attach your file. You can then set up the broadcast time range and sending speed. Once everything is set, click “Send Broadcast” to start sending your messages. 📅
Note: Make sure not to change the first column header labeled “Contact Number.”

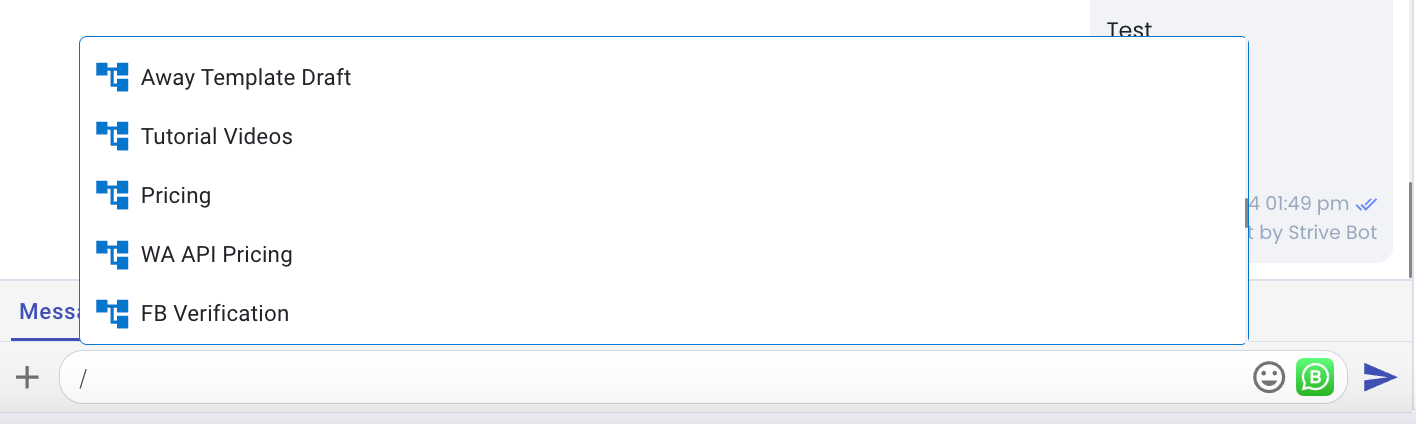
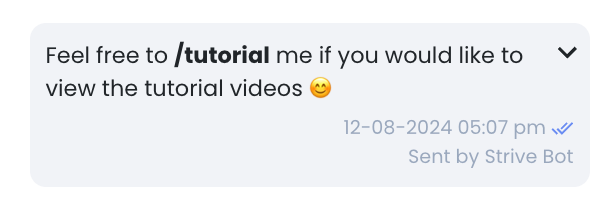
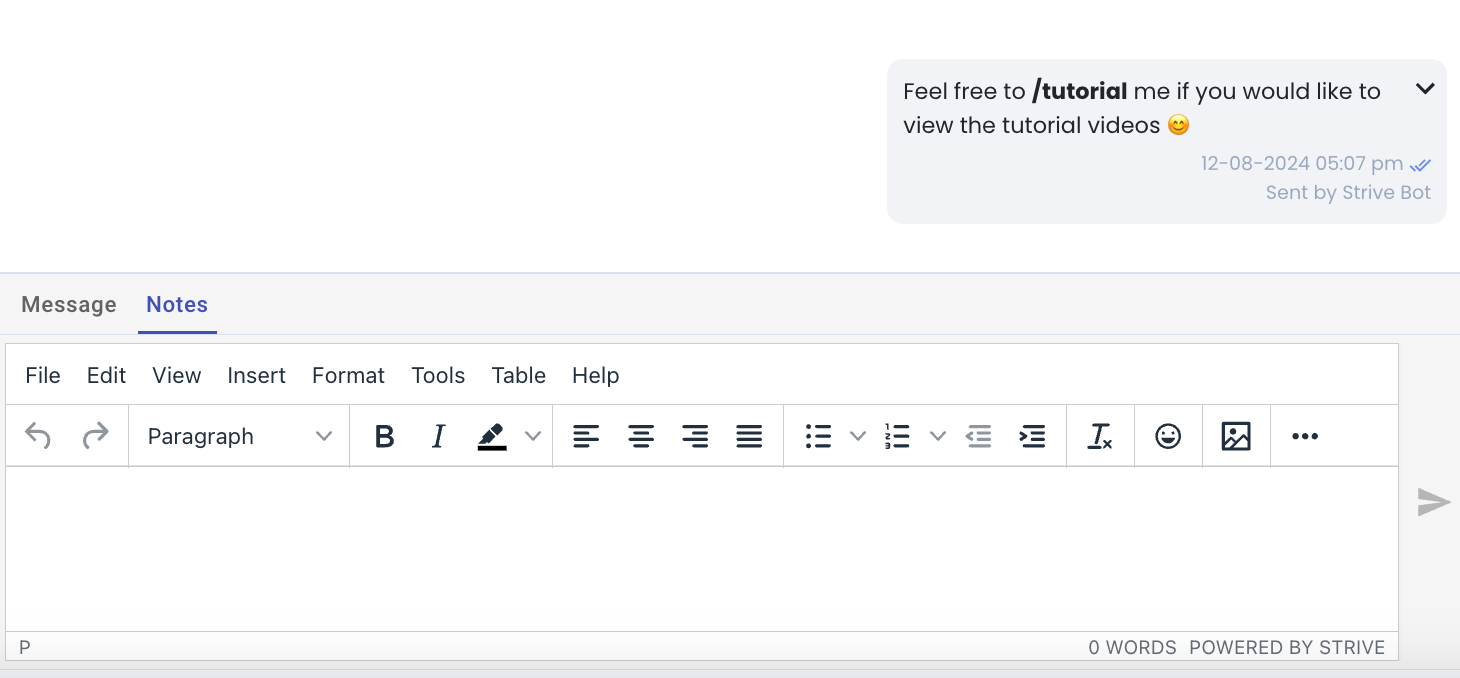
2. Trigger Flowbuilder Directly from Inbox/Inbox Lite 🚀
We’ve made it easier to trigger Flowbuilder directly from Inbox and Inbox Lite! Just type “/” to see a list of your quick replies and flowbuilders. Click on the flowbuilder name you want to trigger, confirm by clicking OK, and the flow will be triggered for your contact.
This allows you to conveniently initiate flows within your conversation. 💬
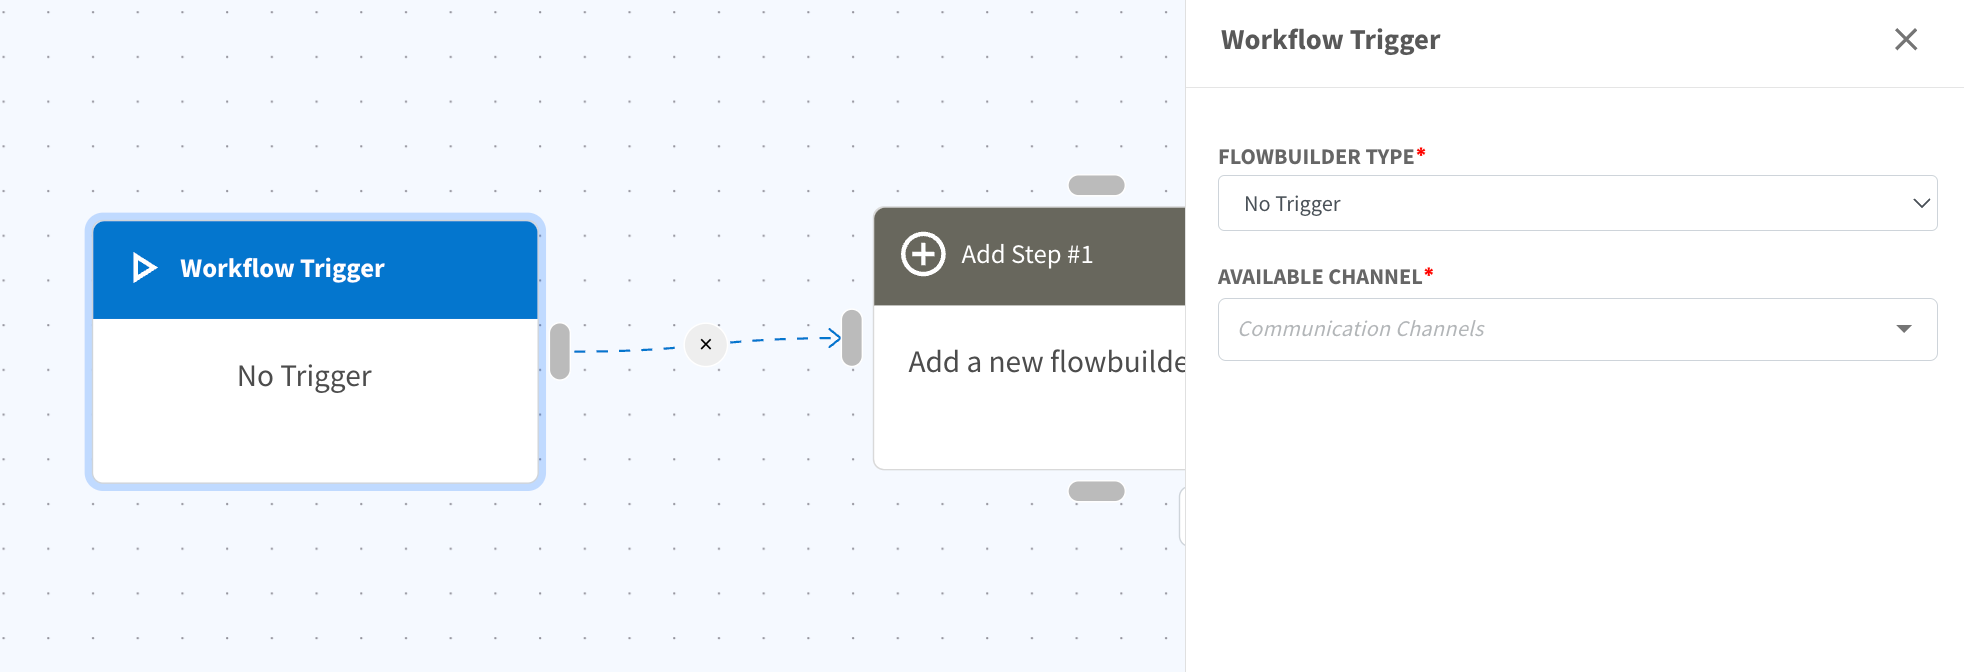
3. New Flowbuilder Trigger: No Trigger 🚫
We’ve added a new trigger called “No Trigger” in Flowbuilder! This allows you to create flows that won’t be accidentally triggered when a contact messages in.
With this feature, you can prevent unintended triggers from non-keyword flows or messages that match keyword-based flows.
This no trigger flowbuilder can be used/triggered in the Offline Bot, Broadcast from Flowbuilder in WA Personal Broadcast, Inbox and Inbox Lite. 🤖
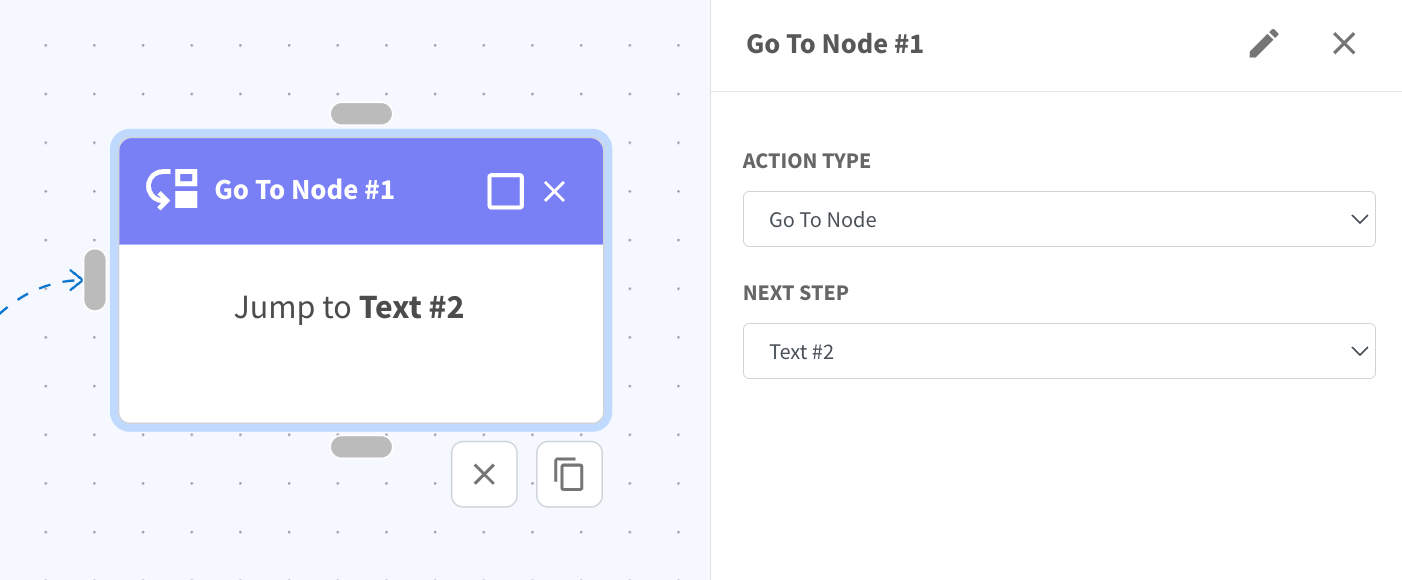
4. New “Go To Node” in Flowbuilder
We’ve added a new action called the “Go To Node” in Flowbuilder to make your workflows cleaner and more organized. 🚀
With this new node, you can easily direct the flow to another node without drawing extra edges between them.
Simply add a “Go To Node” to your flow, select the destination node where you want the flow to continue, and you’re all set!
Note: For now, you can only link to nodes within the current flow you’re working on. Nodes outside of the current flow aren’t selectable yet.
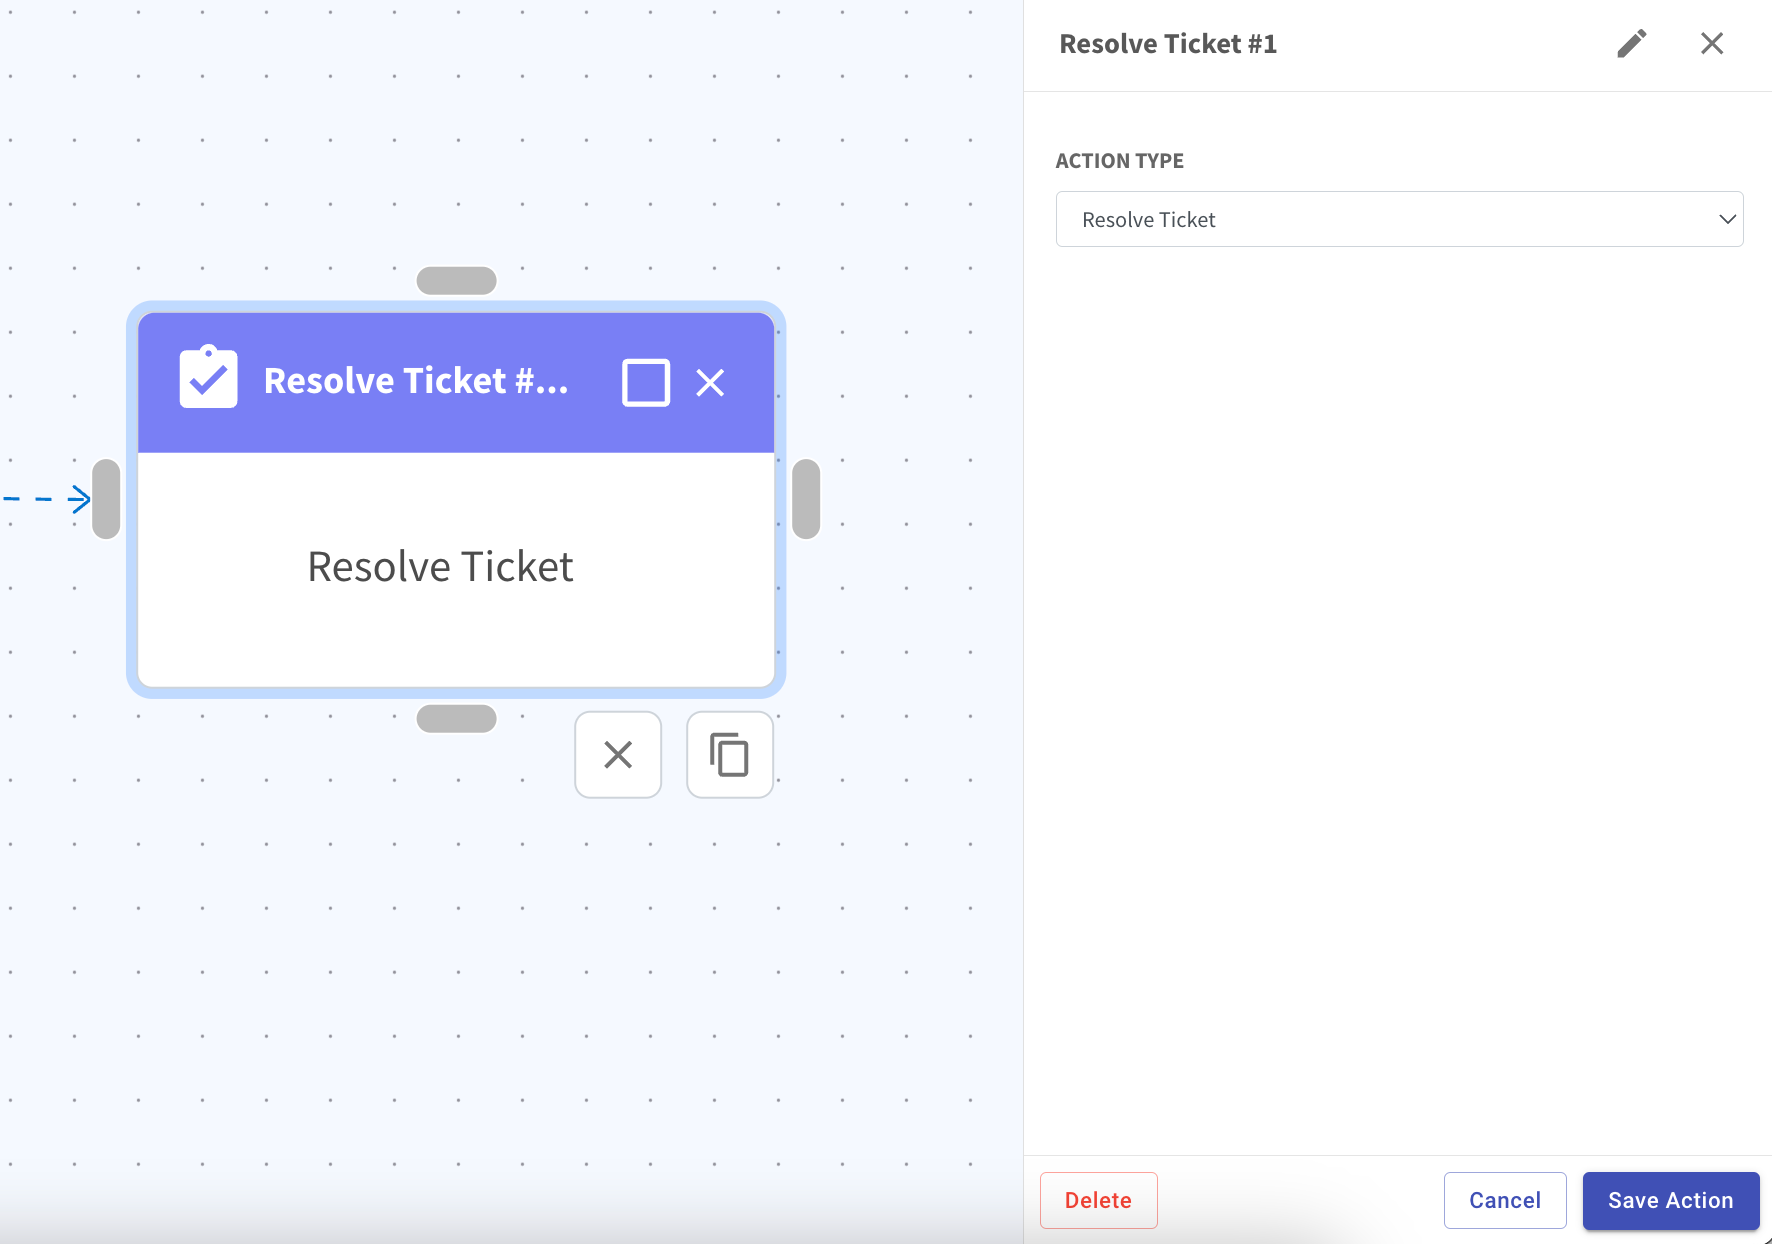
5. New “Resolve Ticket” Action in Flowbuilder 🎟️
We’ve added a new action to Flowbuilder called “Resolve Ticket.” Now, you can automate the process of resolving tickets based on how you set up your flow.
With this new addition, you can streamline your processes and ensure that tickets are resolved efficiently, saving you time and effort.
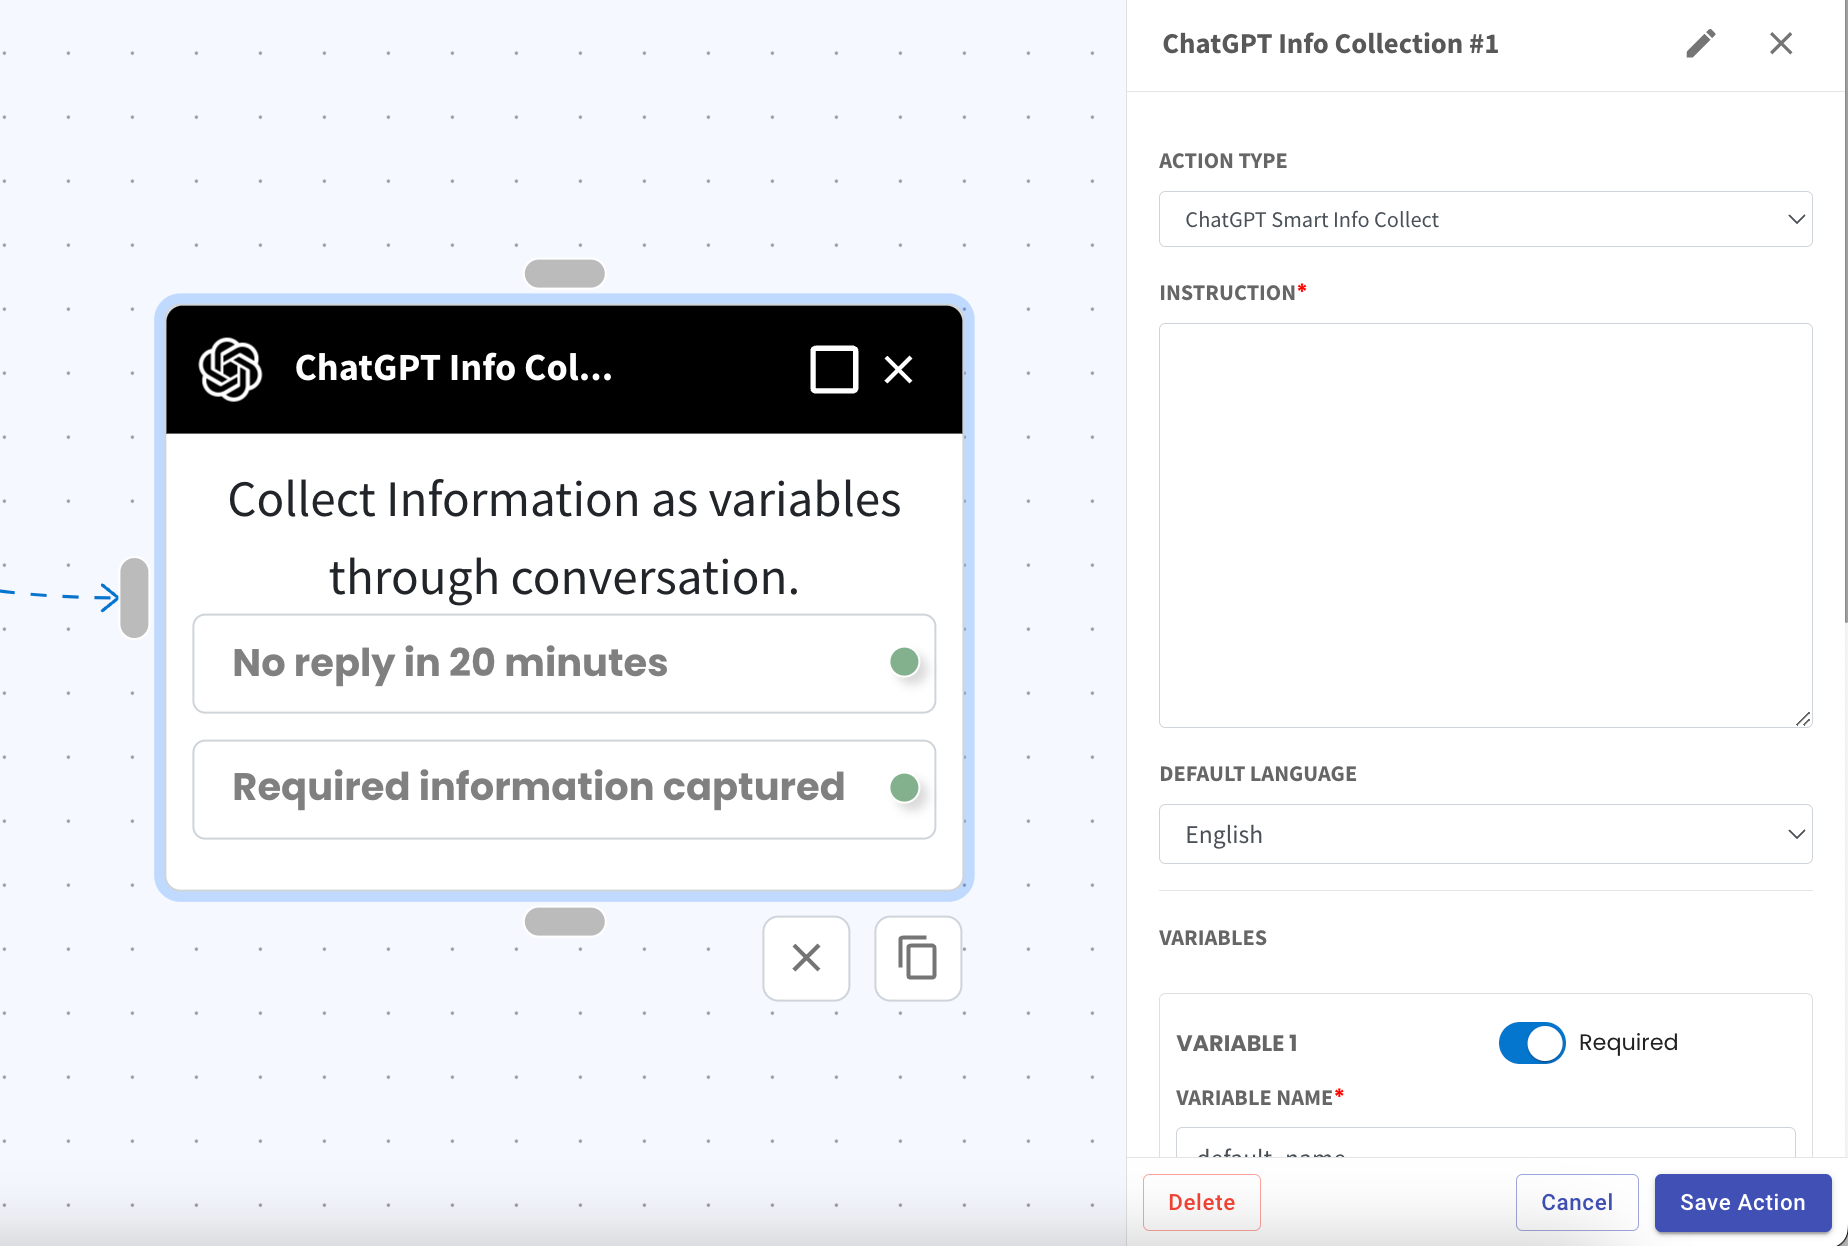
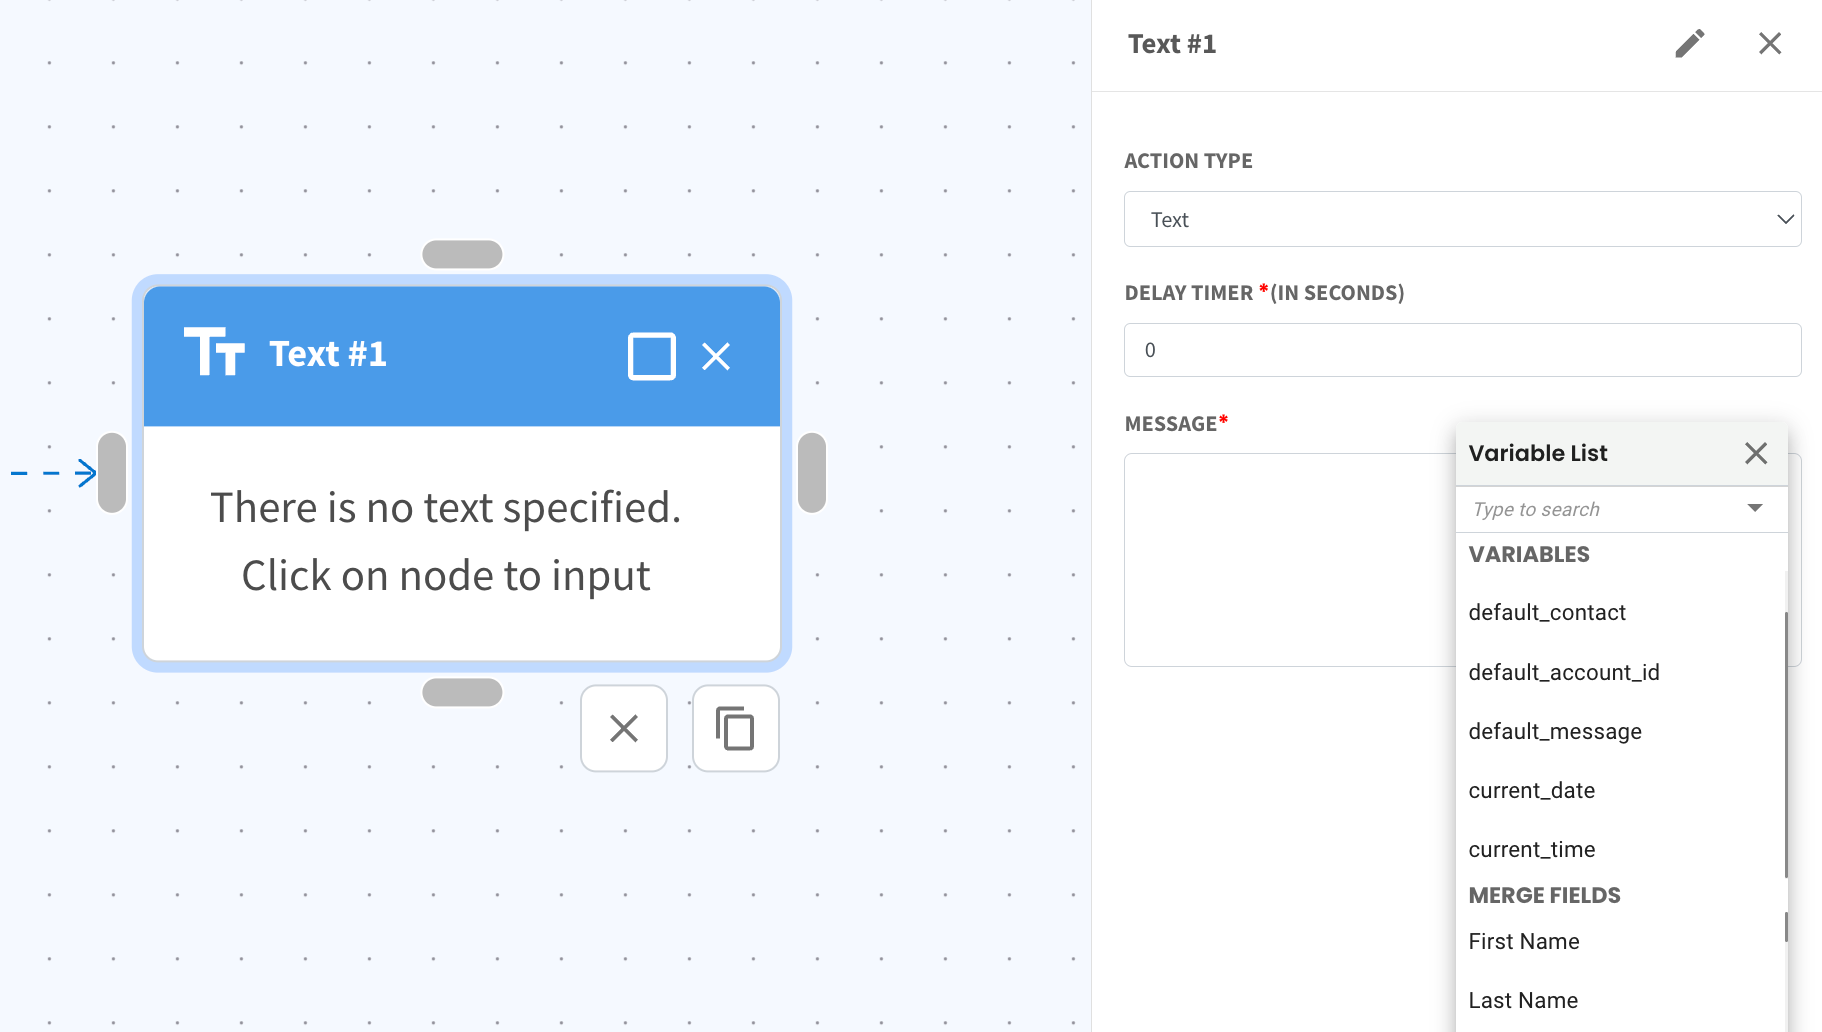
6. New AI Node in Flowbuilder: ChatGPT Smart Info Collect 🤖
We’ve introduced a new AI-powered node called ChatGPT Smart Info Collect! 🤖✨
This feature lets you gather multiple pieces of information from your contacts and save them as variables. You can then use these variables to output data or store it in Google Sheets or Google Docs. 📄
To use it, simply add the action “ChatGPT Smart Info Collect”, enter your instructions, and define the variables you want to capture along with their descriptions. You can also select whether each variable is required to be retrieved from the contact.
Once set up, make sure to test it out and tweak the instructions as needed to fit your requirements.
Note: Make sure your ChatGPT account is connected to Strive to access this feature.
7. Trigger Flowbuilder from WA Personal Broadcast 📤
Now, you can easily send Flowbuilder messages using WA Personal Broadcast!
Just head over to the WA Personal Broadcast module, click on “Broadcast from Flowbuilder,” fill in the required details, and select from the existing published Flowbuilder that you want to send to your audience.
Once you click on Send Broadcast, your contacts will be automatically enrolled in the Flowbuilder and scheduled to receive the flowbuilder messages that you have setup.
This makes it simple to automate your communication directly from WA Personal Broadcast! 🚀

8. Outgoing Messages Show Double Tick When Viewed ✔️✔️
Now, when you send a message to a contact and they view it, you’ll see a double tick icon on the right of the sent date and time.
This update helps you know when your contact has seen your message. 📤
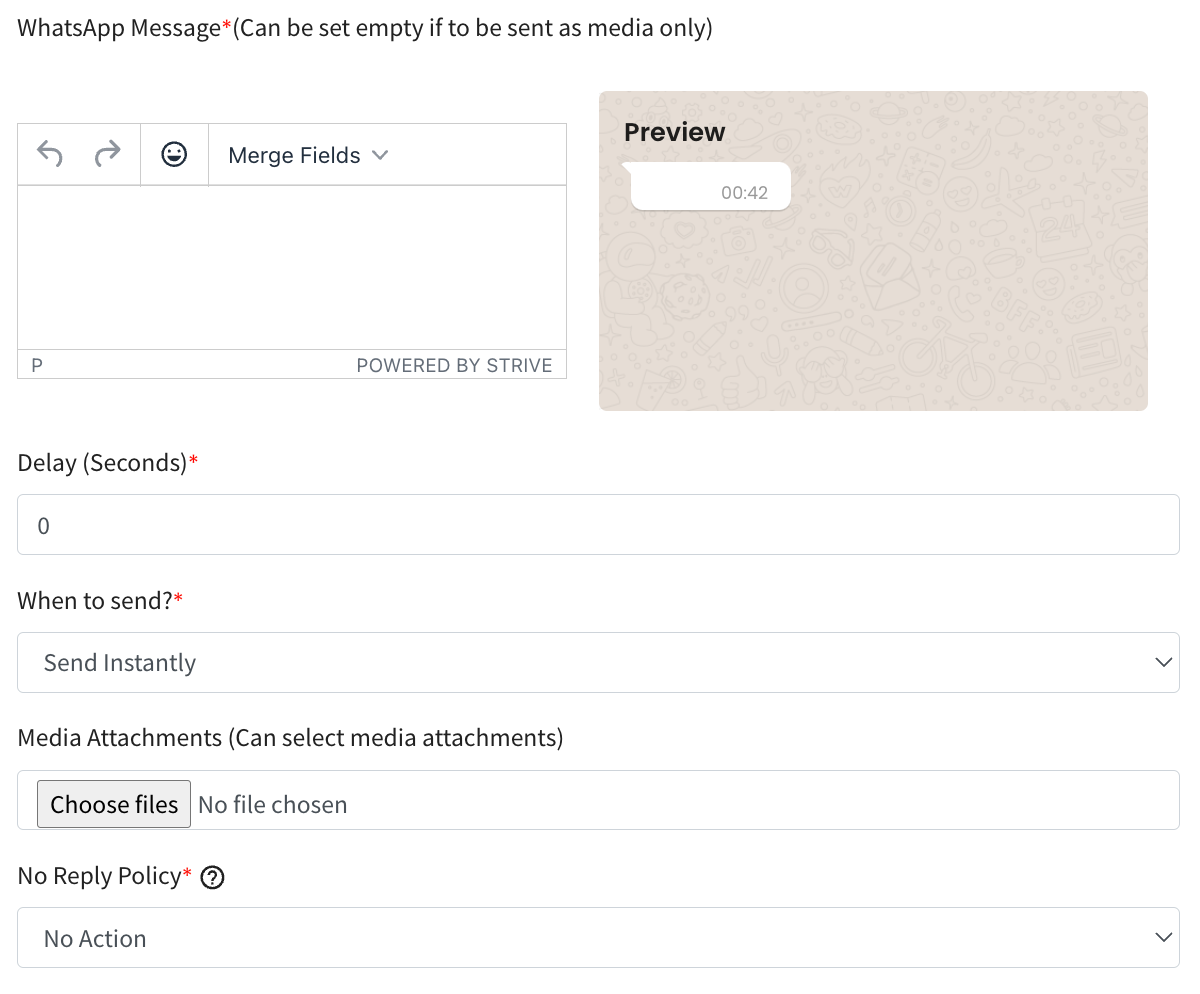
9. Send Voice Notes in WA Personal Broadcast and Campaign 🎵
You can now attach and send voice notes in your WA Personal Broadcasts or Campaigns. 🎤
When you click on “Choose files”, you can now select voice notes in mp3, ogg, or webm formats.
WA Personal Broadcast:
WA Personal Campaign:
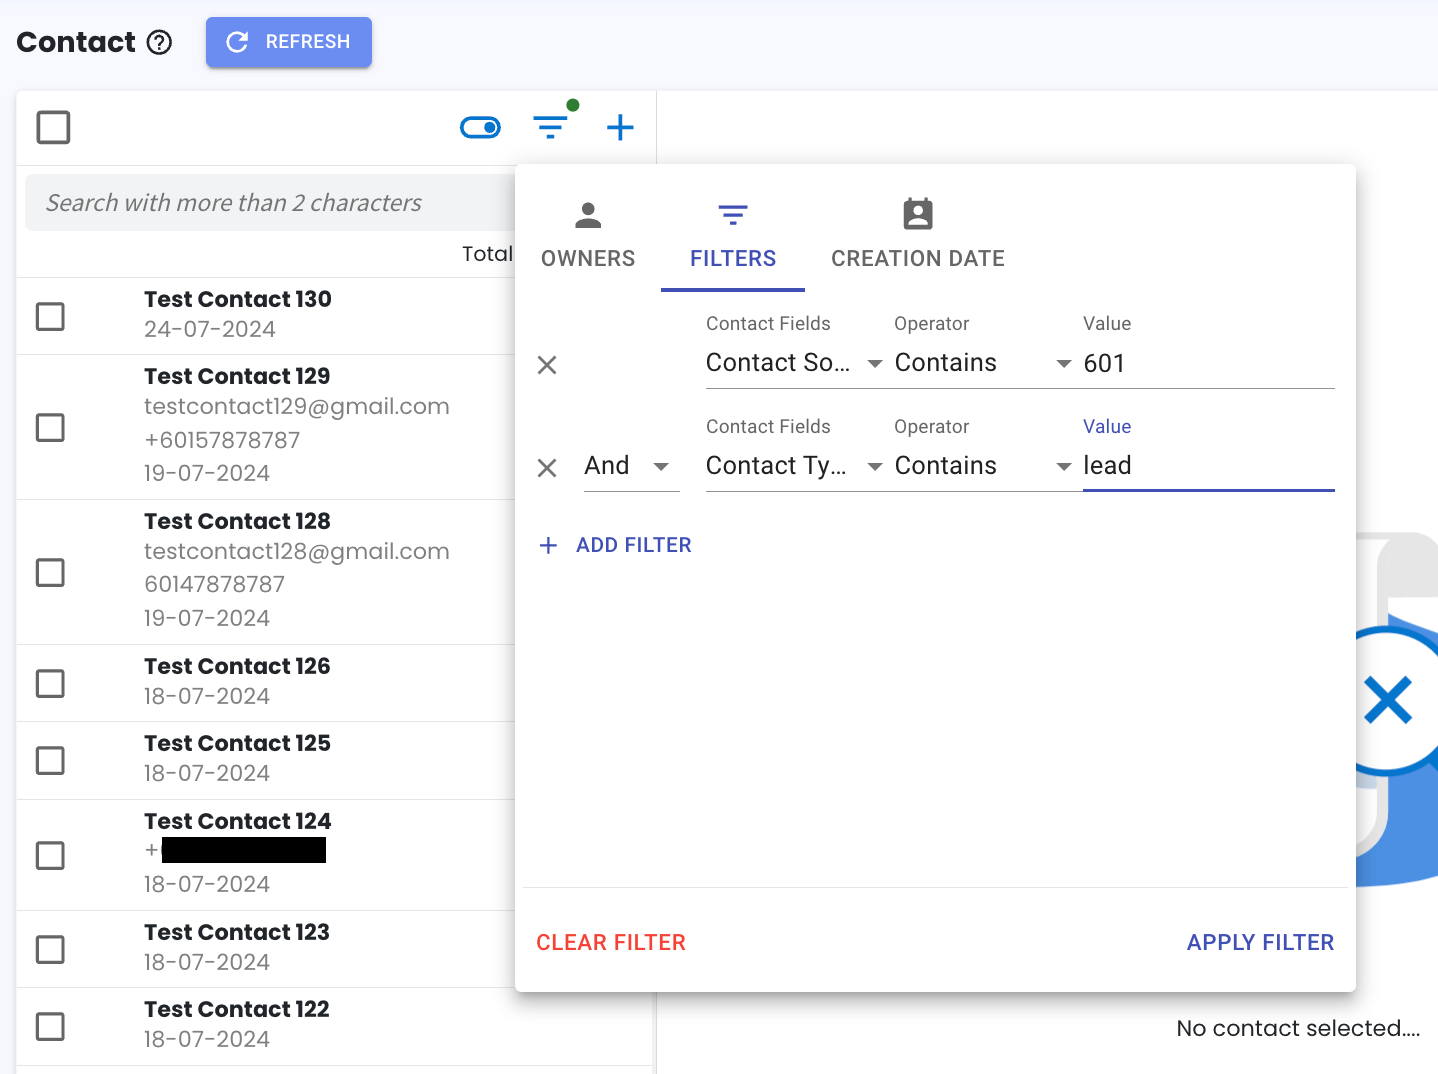
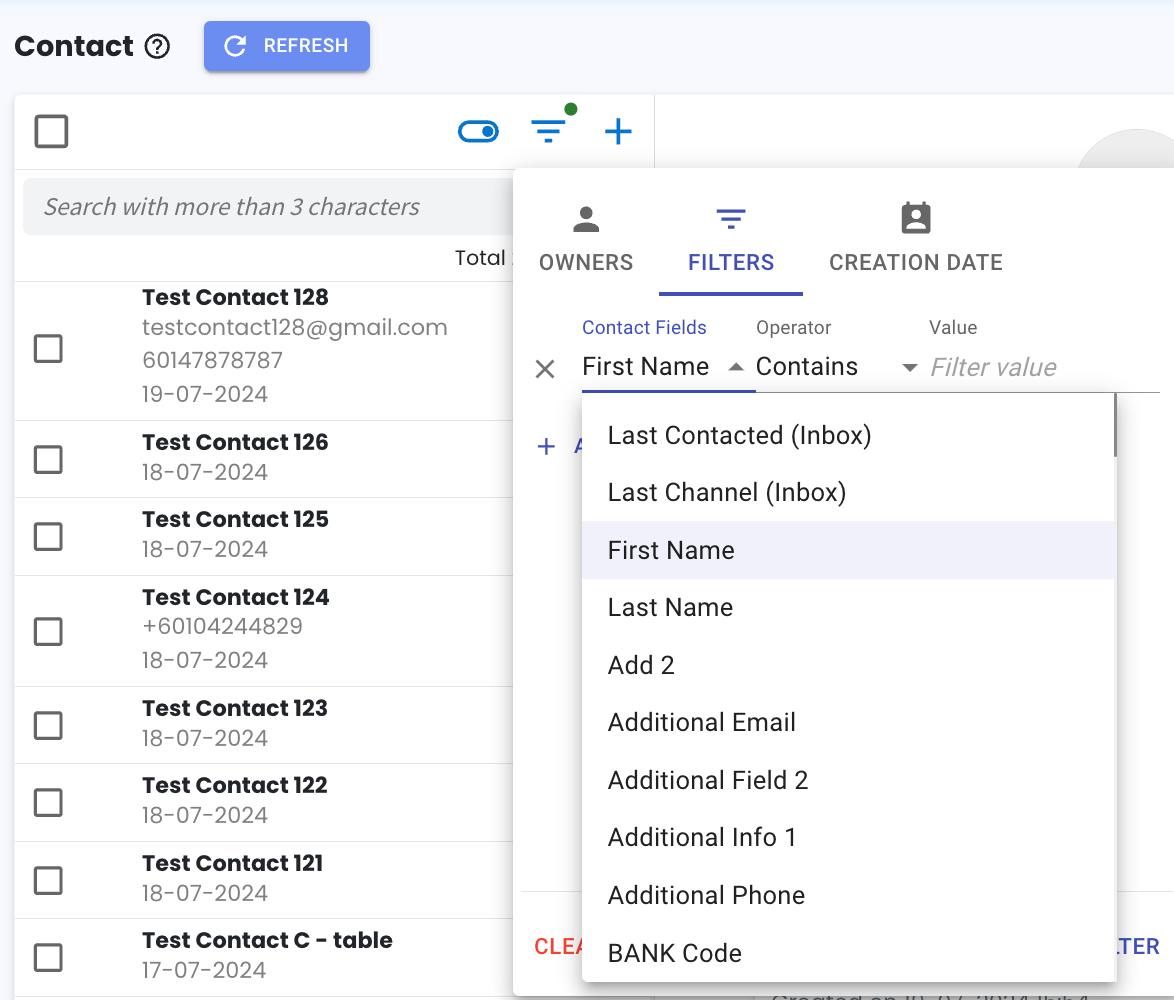
10. Enhanced Contact Filtering 🗂️
You can now easily filter contacts by multiple fields at once. 🔍
Click on “Add Filter” to include additional fields and choose between “And” or “Or.”
- And: Displays contacts that match all the selected fields.
- Or: Shows contacts that match any of the selected fields.
After selecting your fields and entering the values, click “Apply Filter” to filter the contacts.
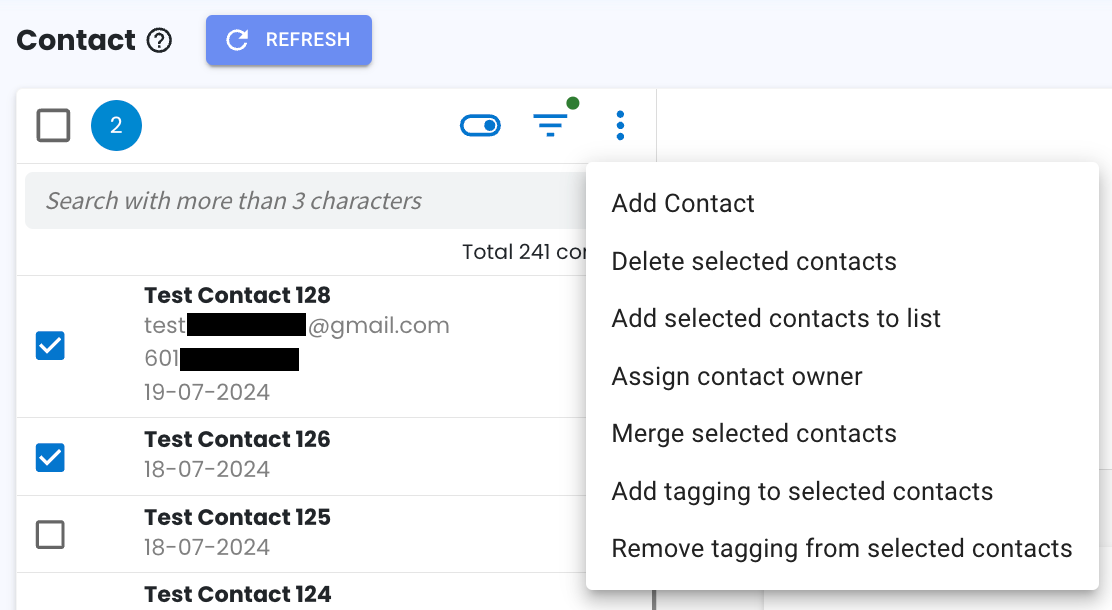
11. Easily Remove Tags from Multiple Contacts 🗑️
You can now delete tags from multiple contacts at once, making it easier to manage your contacts.
How to Remove Tags from Contacts:
- Check the boxes next to the contacts you want to update.
- Click on the three dots next to the filter icon.
- Select “Remove Tagging from Selected Contacts.”
- Search for and choose the tags you want to remove.
- Click “Remove Tagging”.
This feature makes it simple to manage your contact tags efficiently. ✨
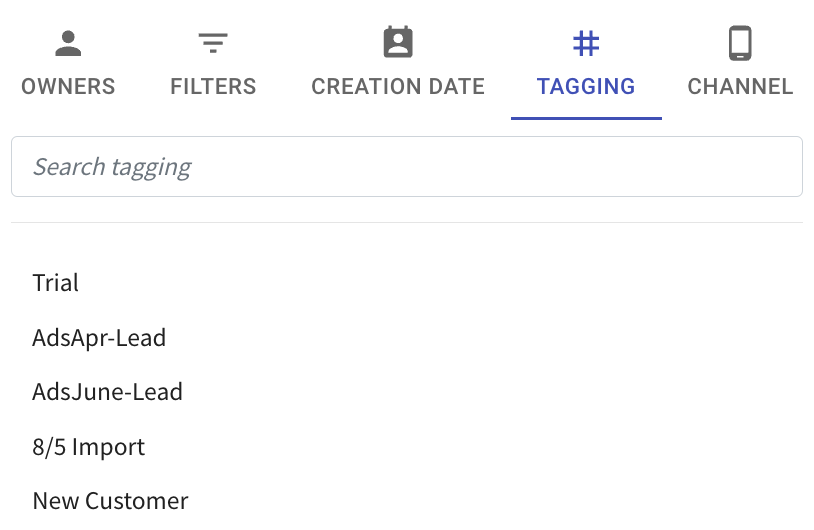
12. New Contact Filters Option for Tagging and Channel 📝
You can now filter your contacts more effectively by using the new Tagging and Channel options.
To use these filters, click on the filter icon in the Contact module. You’ll see the new options for Tagging and Channel. Simply select the filter and values that you want to filter, then click on “Apply Filter” to see the results.
This update makes it easier to find specific contacts based on tags or channels that they messaged in! 😊
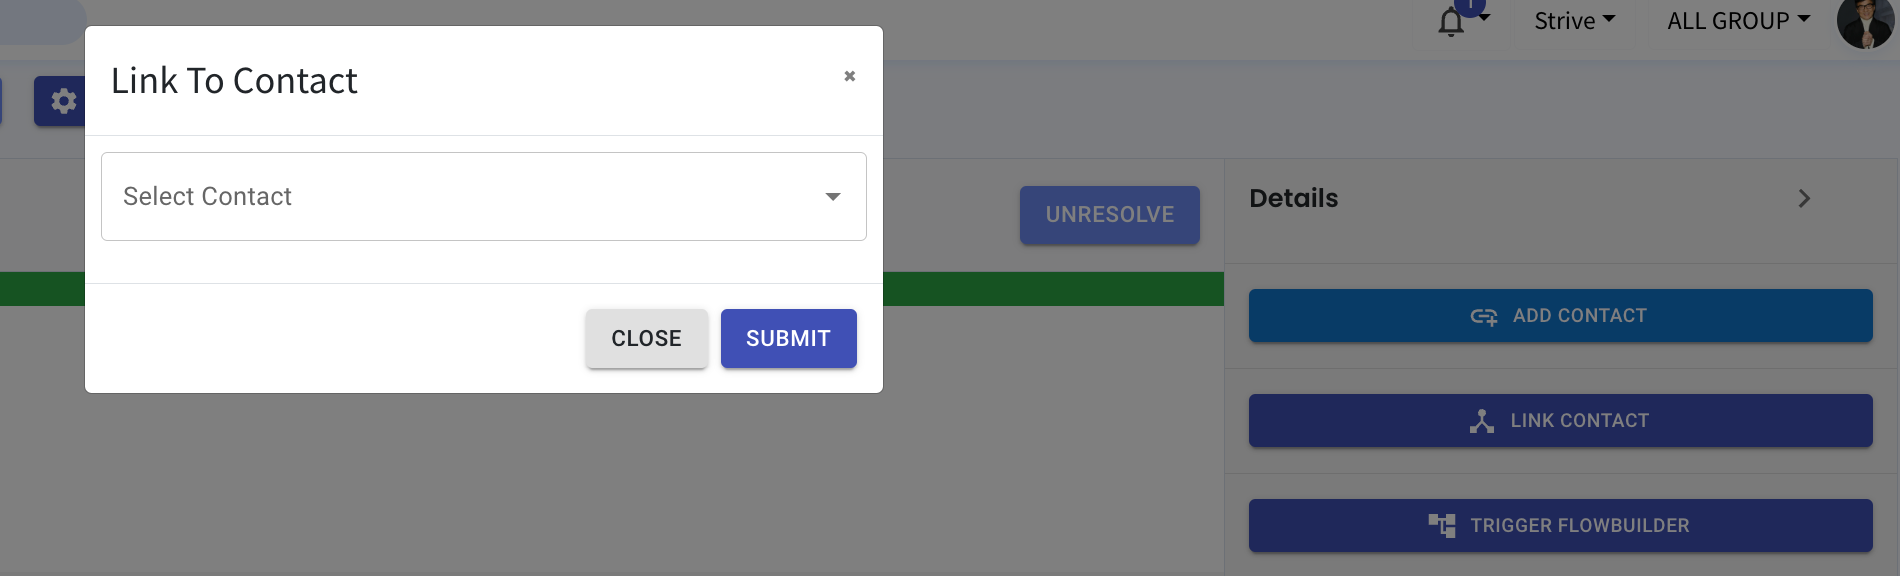
13. Easily Link Contact to Inbox Ticket 📎
Now, linking a contact to an Inbox ticket is easier!
Just type in the contact’s phone number, and any matching contacts will pop up. Simply click on the contact and hit “Submit” to link it to the ticket.
14. New Contact Filter Options: Last Contacted & Last Channel 🔎
We’ve added two new filters to help you find your contacts more easily! 🔍
📅 Last Contacted (Inbox): Allows you to filter contacts based on when they last sent a message. You can select a specific date from the options given or select range then determine the range of dates to narrow down your search.
📱 Last Channel (Inbox): Allows you to filter contacts based on the channel they last used to send a message. Just choose the channel, and apply filter to view the contact who last messed into the channel.
Note: You can now apply multiple filters at once! Just click on “Add Filter” to include more fields
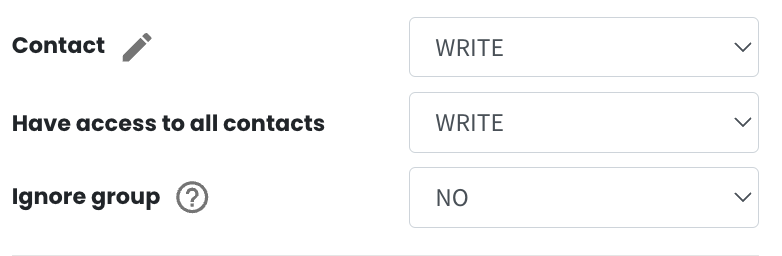
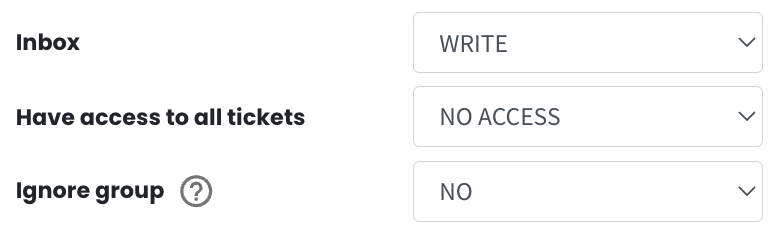
15. New “Ignore Group” Option for User Roles 👥
Now super admin can configure whether a user’s role should ignore or follow group settings for contacts and inbox tickets. 🎯
To set this up, go to Account > Role and either create a new role or edit an existing one.
If you select Ignore Group as “No,” the role will follow the group settings. For example, a user who is a group leader who has access to all contacts and tickets will see all contacts and tickets from the group, while a member will only see their own.
If you set Ignore Group to “Yes,” the role will ignore group settings and display the contacts and tickets based on the role’s access configuration.
Note: By default, “Ignore Group” is set to “No” for both contacts and inbox. If there are no groups in your organization, you can leave this setting as “No”.
Here’s what the settings look like:
👤 Contact ignore group section in the role:
💬 Inbox ignore group section in the role:
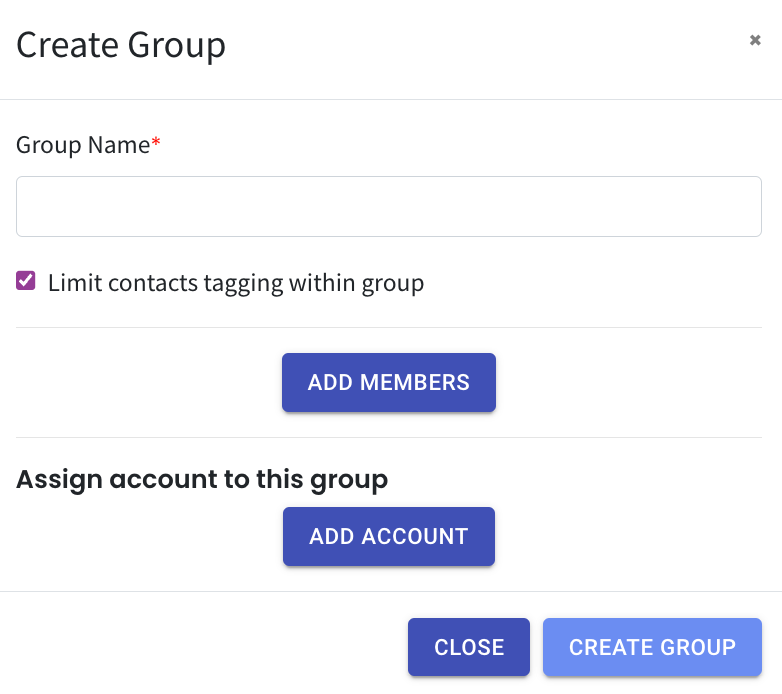
16. New Tagging Limits for Groups 📌
When a super admin creates or edits a group, there’s now an option to limit contact tagging within that group. This feature helps ensure that tags created within a group are only visible to members of that group. 🛠️
By checking the box, you can prevent users from viewing multiple tags from other groups, keeping things organized and relevant.
Note: Super admins can still view all tags for the contact.
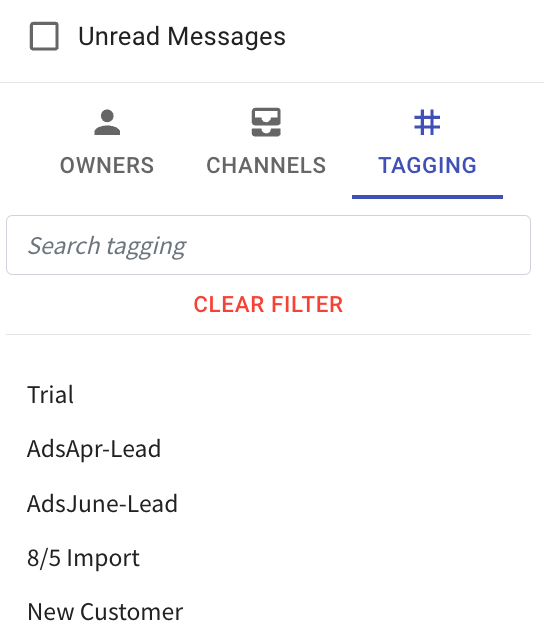
17. Filter Inbox Tickets by Contact Tagging 🏷️
You can now easily filter your inbox tickets based on the tags added to your contacts.
How to Filter:
- Click the filter icon on the left.
- Select “Tagging” from the filter options.
- Select the tags you want to filter by.
This makes it easier to find your inbox tickets based on your contact’s tagging. 📂
18. Inbox Lite Enhancements 💬
1. Channel Number Display 📱
We’ve added the channel number at the top right of the center column. This allows you to easily view the channel you’re currently chatting in.
2. Copy Contact Number/ID 📋
When you click on your contact’s chat, there will be a copy icon at the right of your contact’s phone number or ID. Just click on the icon to copy the information and use it if necessary.
3. Scroll Down Icon ⬇️
Scrolled up and want to jump back to the latest message? Just click the down arrow at the bottom right to instantly scroll to the most recent message.

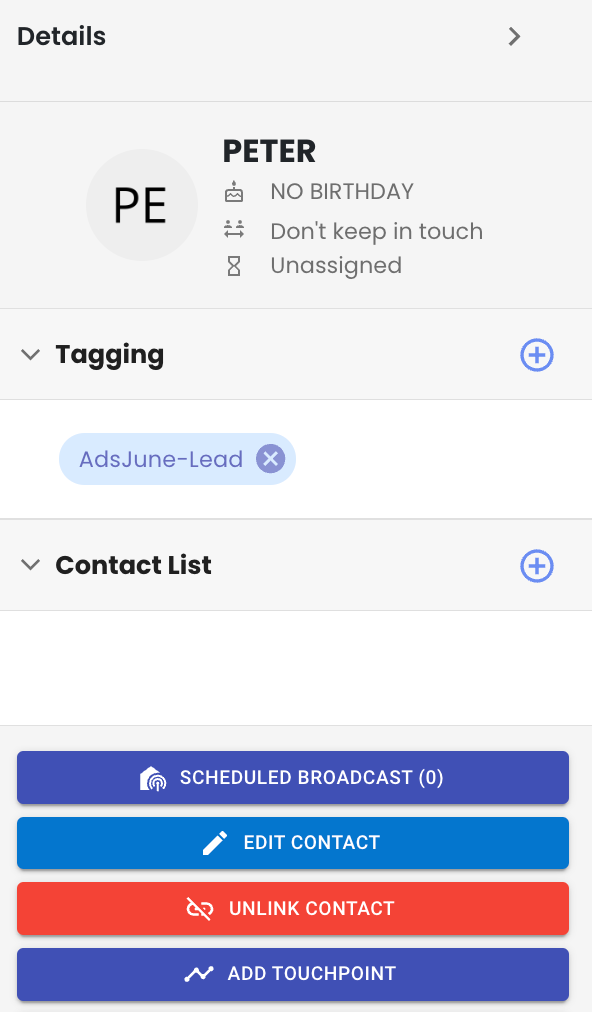
19. Easily View Contact Inbox Notes 📋
Now, when the contact is linked to the Inbox ticket, you can easily view the contact’s tags, contact list, and a new notes section all in one place!
With this update, you no longer need to click a button to view notes. The notes are now visible, making it easier to stay organized.
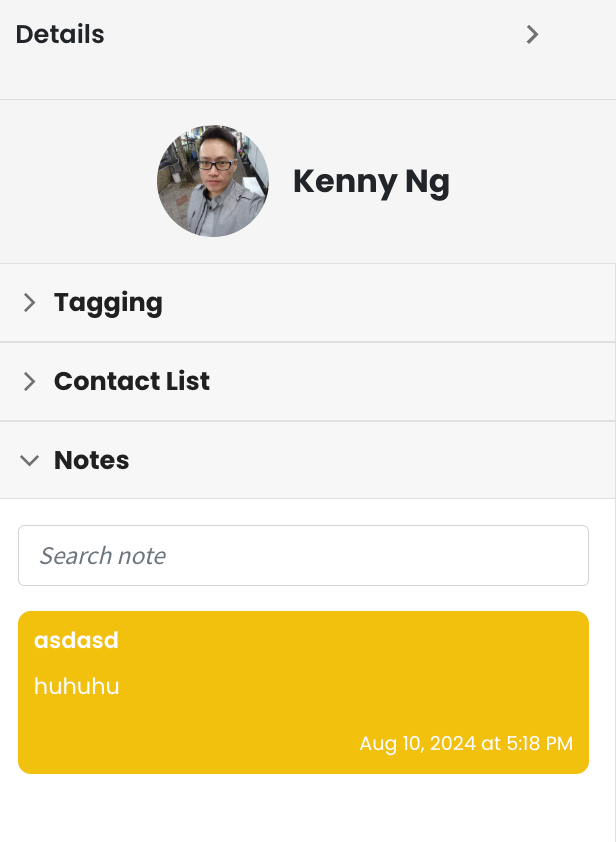
How to add note:
Just click on the “Notes” section at the bottom of the center area. Type in your note and click the “Send” icon. The note will be sent to the contact 📝
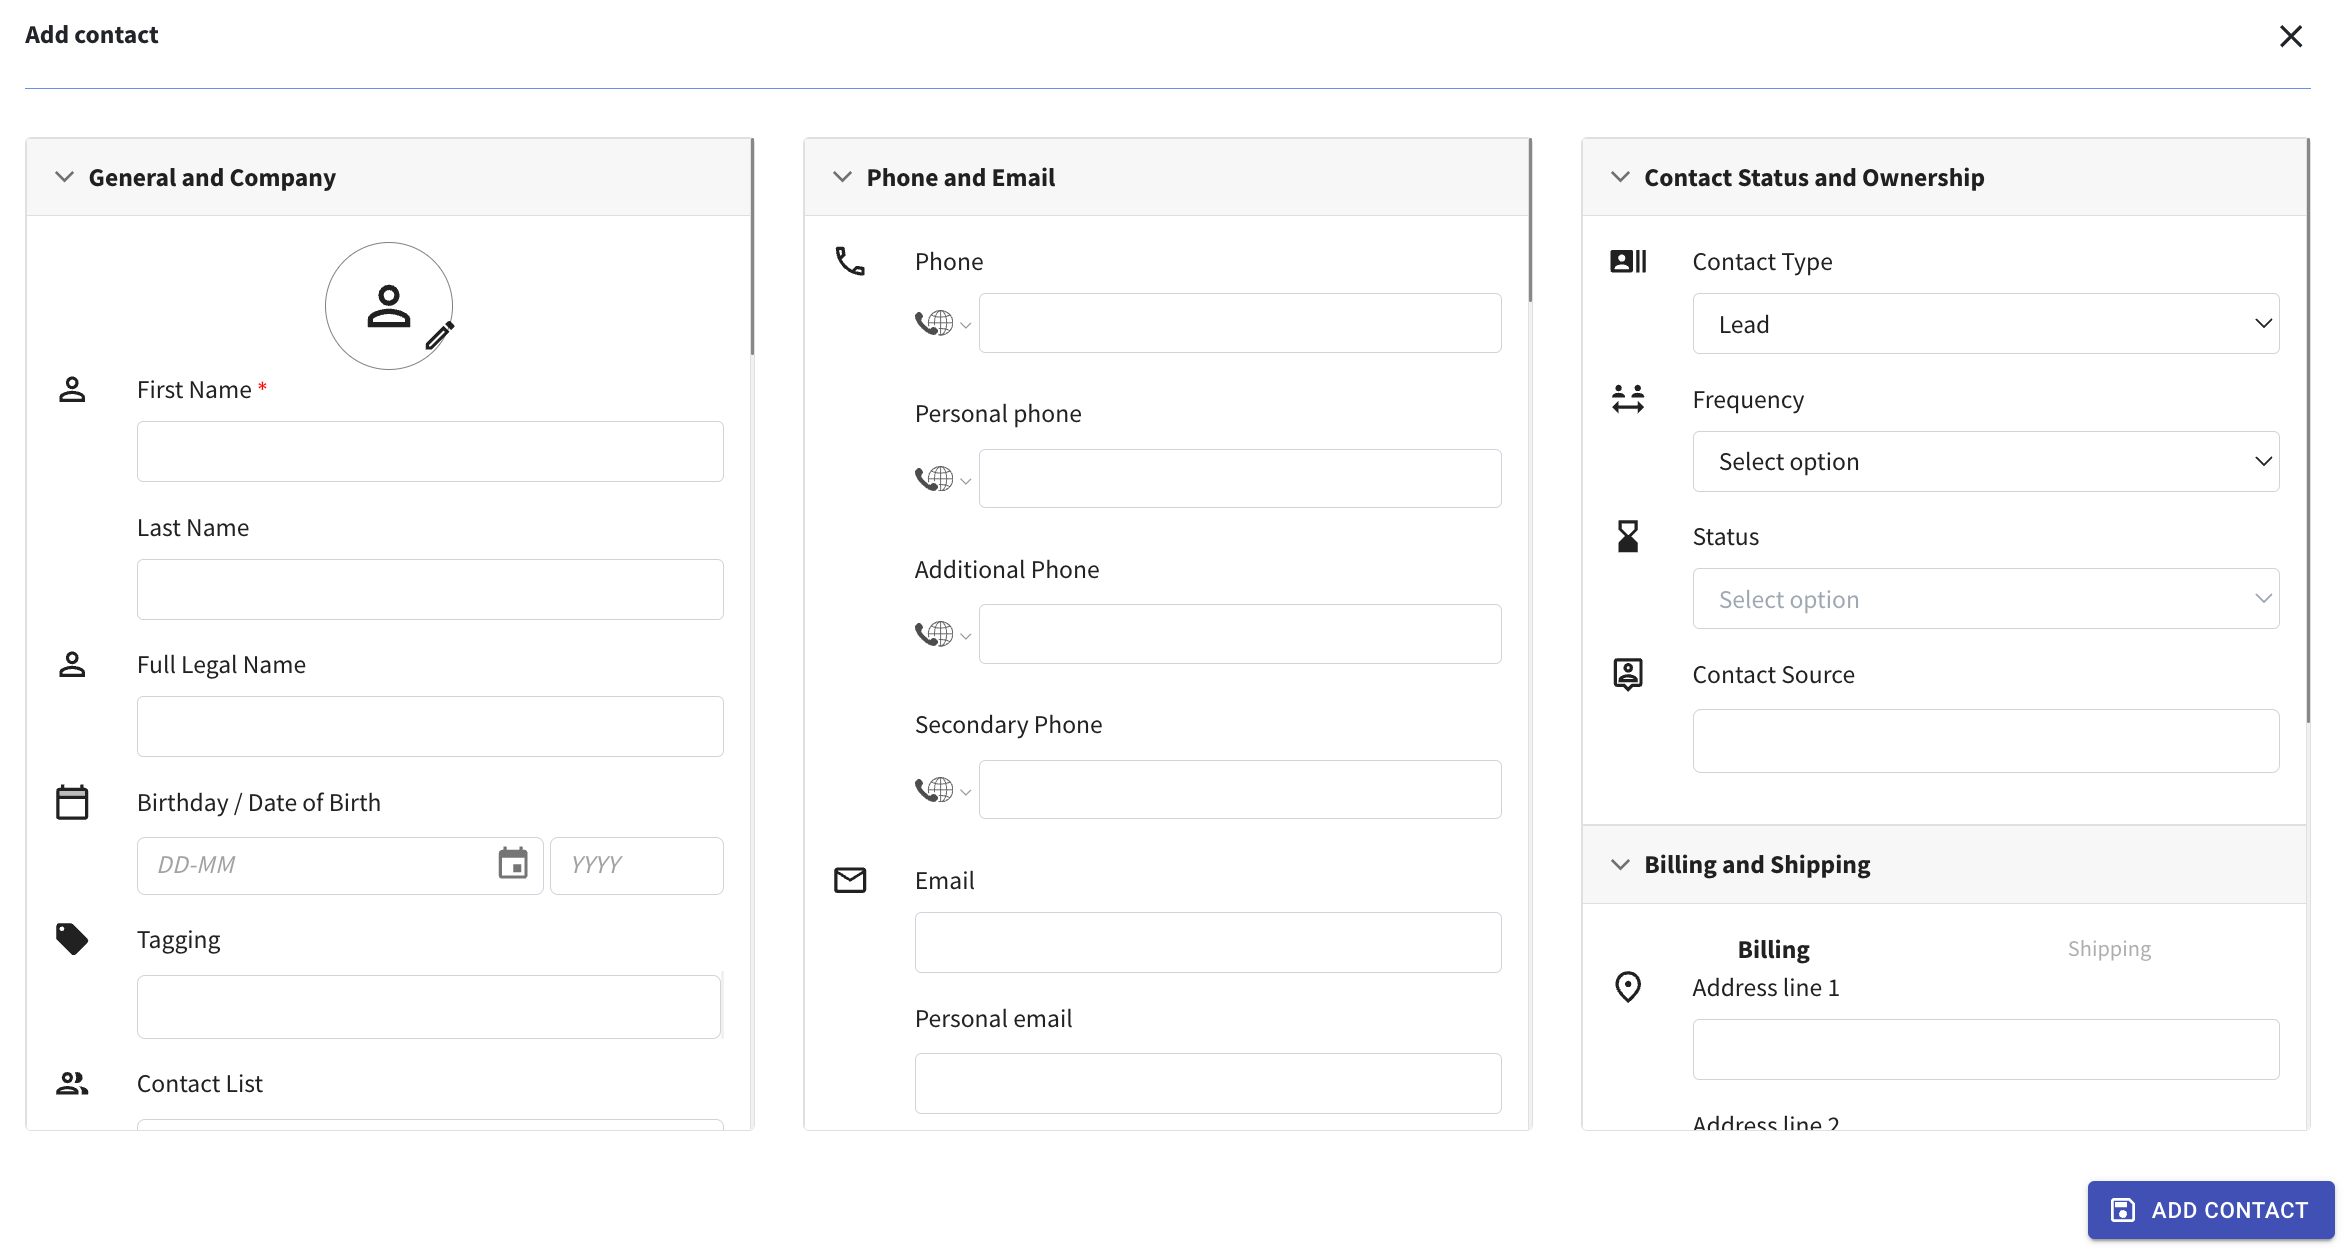
20. Updated Contact Fields Layout 📋
We’ve made some enhancements to the Contact Fields section to improve your experience.
The “Contact Status and Ownership” section have been moved to the right column for easier access.
Additionally, we’ve renamed “Additional Custom Fields” to simply “Custom Fields” to keep things straightforward.
Note: If your organization uses fields the “Customer Ranking,” “Customer Value,” or “Strategic Information,” you can now find them under the “Custom Fields” section.
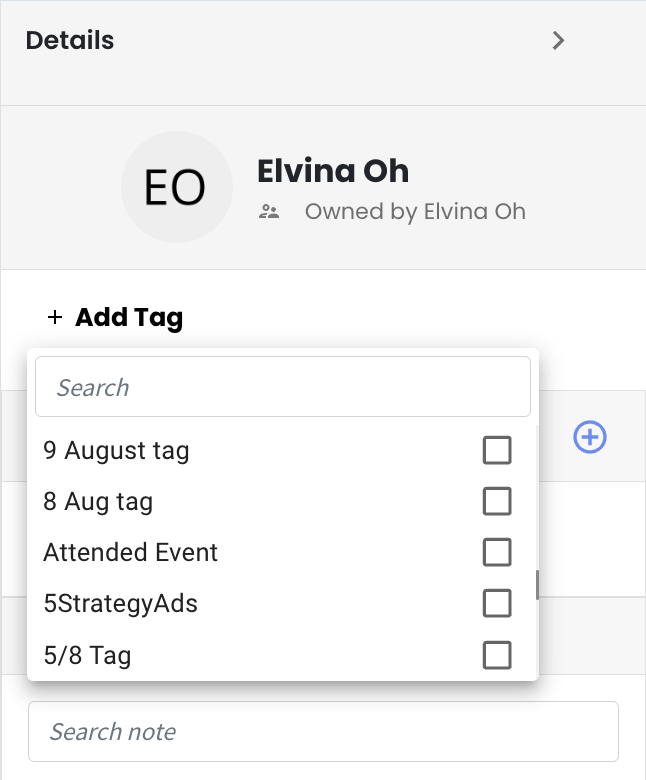
21. Enhanced Inbox Tagging 🏷️
We’ve updated the way you add and remove tag(s) in Inbox and Inbox Lite.
🏷️ Adding Tag(s):
Just click on “Add Tag,” search for an existing tag, or type a new tag name then select the tag name to add it to your contact.
🗑️ Removing Tag(s):
To remove the tag(s), click “Add Tag”, search for the tag you want to remove, and unselect it.
22. New Flowbuilder Variables: “current_date” and “current_time” 🗓️
We’ve introduced two new variables in Flowbuilder to help you enhance your workflows.
📅 current_date: Contains the current date in the format DD/MM/YYYY.
⏰ current_time: Contains the current time in 24-hour format.
You can now use these variables to personalize messages, notify users, or for any other purposes where you need the current date or time. 🕒
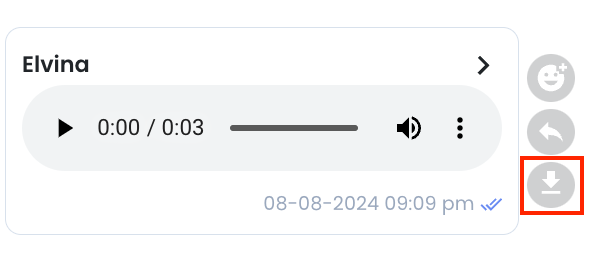
23. Auto Redownload for Inbox Attachments and Media 📥
If you receive an attachment or media in your inbox that isn’t visible or playable, it will now automatically redownload for you. This means you should be able to see or play the content right after it re-downloads.
If the media or attachment is still not viewable after some time, don’t worry! Simply click the down arrow next to the message and then tap the download icon to manually redownload it. 💾
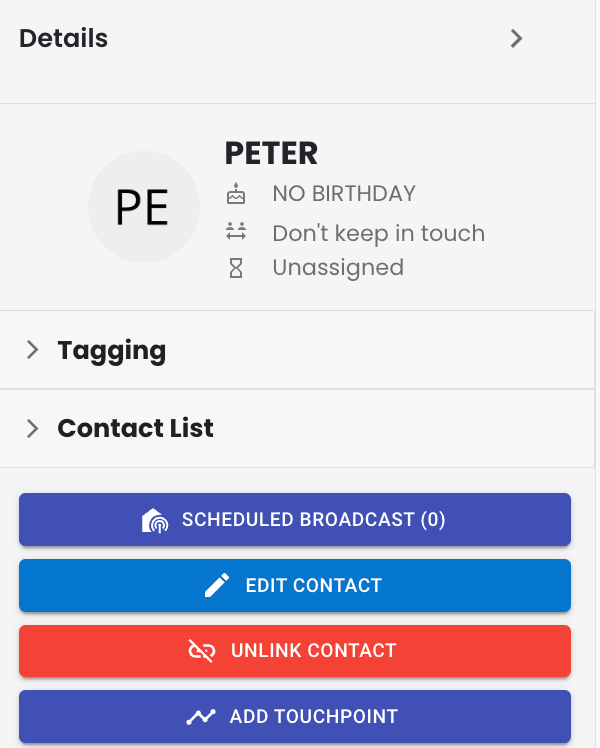
24. Collapsible Tagging and Contact List for Inbox Contacts 👤
Now, when you open an inbox ticket linked to a contact, you’ll see that the tagging and contact list on the right column can be collapsed. 🎉
This means you can easily hide or show these sections based on your needs, making your view more organized.
Just click the respective section to collapse it if you don’t need them. If you want to add a tag or a contact list, just expand the section, click the “+” button, type in the tagging or contact list name and select it.w
Note: If you log out and log back in, the tagging and contact list will reset to being open by default.
Here is how it looks when the tagging and contact list is collapsed:
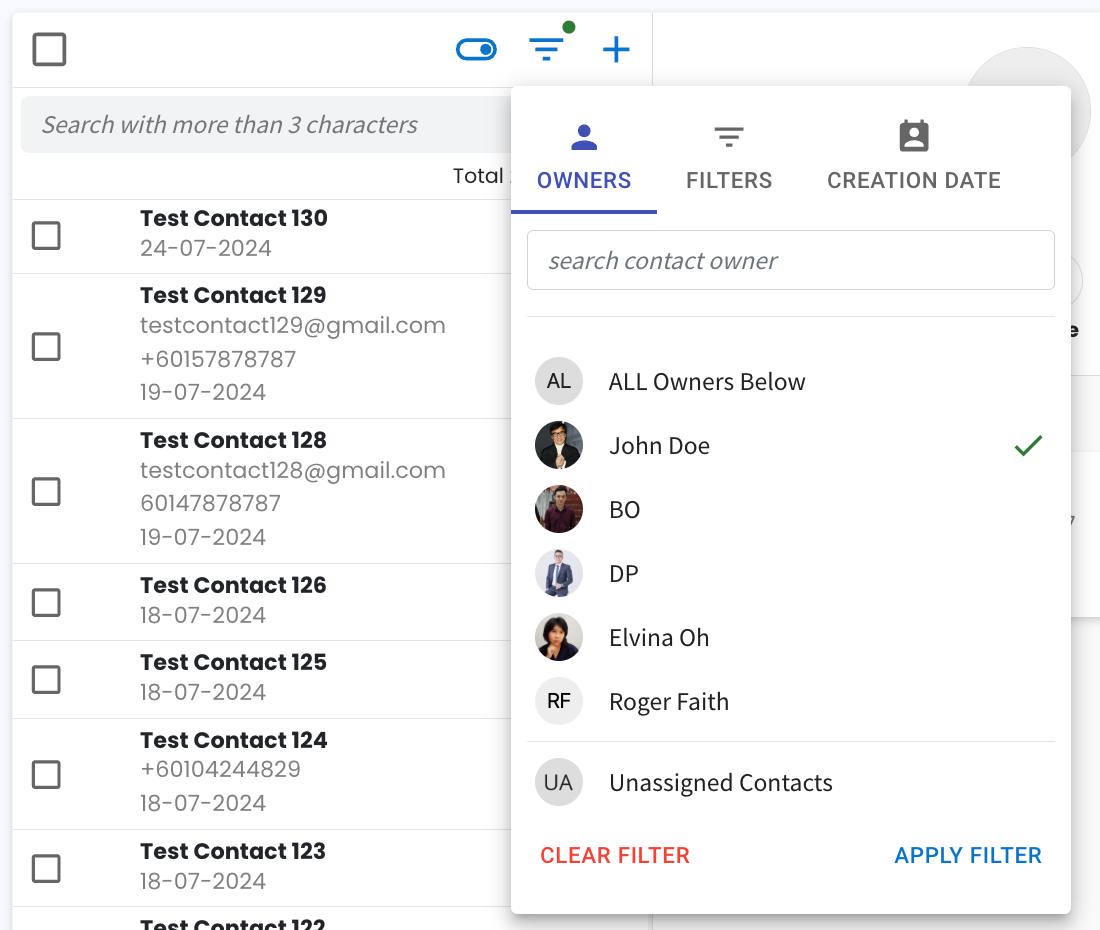
25. Filter “All Owner” Updated to “All Owners Below” 📋
We’ve updated the filter name from “All Owners” to “All Owners Below” to make it clearer. 🎯
This change makes it clear that if you click on filter “All Owners Below” , it includes all owners listed in your current view excluding Unassigned Contacts.
26. Faster Inbox Ticket Loading 🚀
We have enhanced the loading speed of your inbox tickets!
Now, tickets load much faster when you search or apply filters, allowing you to find what you need quicker and efficiently. ✨
27. Faster Duplicate Checking During Contact Import 🚀
We’ve made importing contacts smoother by speeding up the process of checking for duplicates.
Now, after you attach your file and click “Import Contact,” it will take a shorter time to scan for any duplicate in the CSV file and in your contact. 😊
28. Sound Notifications Based on Filtered Channel 🔔
When you filter your inbox tickets by a specific channel, you’ll only receive sound notifications for that channel.
Note: If you don’t apply any filters, you will continue to receive sound notifications for all channels as usual.
29. Improved Search Speed for Inbox Tickets 🔍
We’ve made searching for tickets in your inbox quicker and more efficient! Whether you’re looking by ticket owner, channel, or tagging, the loading speed has been optimized.
This enhancement makes it easier and quicker for you to find the tickets you need, helping you manage your inbox more efficiently. 🚀
That’s all for our August 2024 update. Do try out the features and let us know what you think. Stay tuned for more updates coming your way!