Strive July 2026 Updates 🚀
July 2026 Update
Dear Strivers,
As we step into August, here’s a quick recap of what we released in July 2026. We hope everyone had a productive and meaningful month. Over the past few weeks, we’ve rolled out several enhancements designed to improve your daily experience and make the platform even more seamless and efficient to use. Read on to explore what’s new.
____________________________________________________________________________
Enhancements
1. Facebook Trigger Now Supports Start Button & Messenger Ads 🚀
What's New:
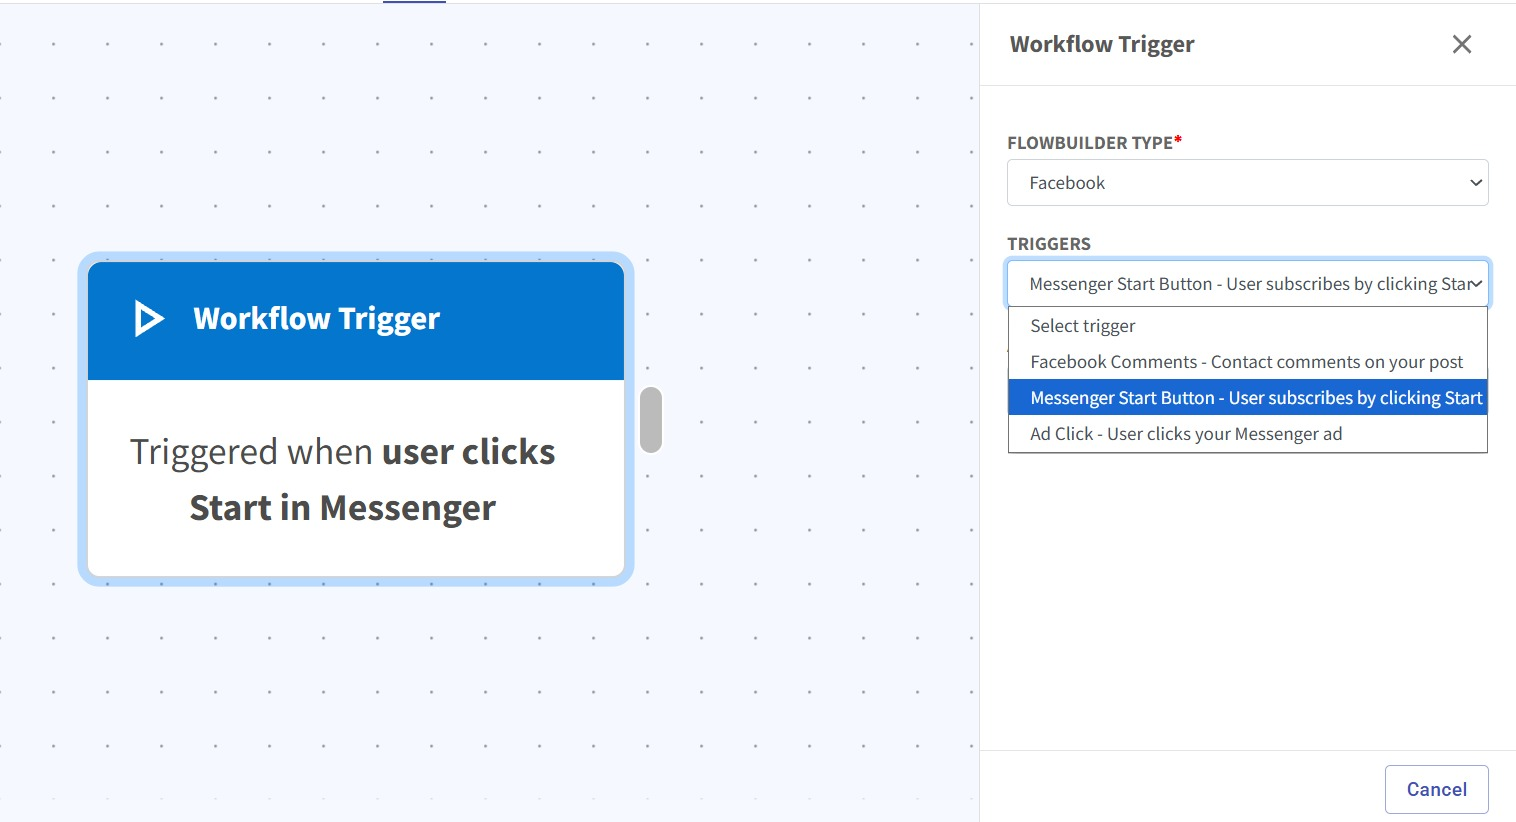
Flowbuilder now supports two new Facebook triggers: User Clicks Start in Messenger and User Clicks on Messenger Ad 🎉
What it means to you:
You can now start automations when users begin a Messenger conversation or click on your Messenger ads, making it easier to engage customers from the very first interaction ⚡
With this enhancement, you can:
✅ Trigger flows when users click Start in Messenger
✅ Trigger flows when users click on a Messenger Ad
✅ Automate conversations from the first touchpoint
✅ Build more engaging Facebook Messenger experiences 🚀
How you can go about it:
Go to the Flowbuilder Module and create or edit a flow.
Click on the first node (Workflow Trigger).
Select Facebook as the trigger type.
Choose either User Clicks Start in Messenger or User Clicks on Messenger Ad.
Complete your flow and save it 🎉
2. Create Media Card Carousel Marketing Templates 🖼️
What's New:
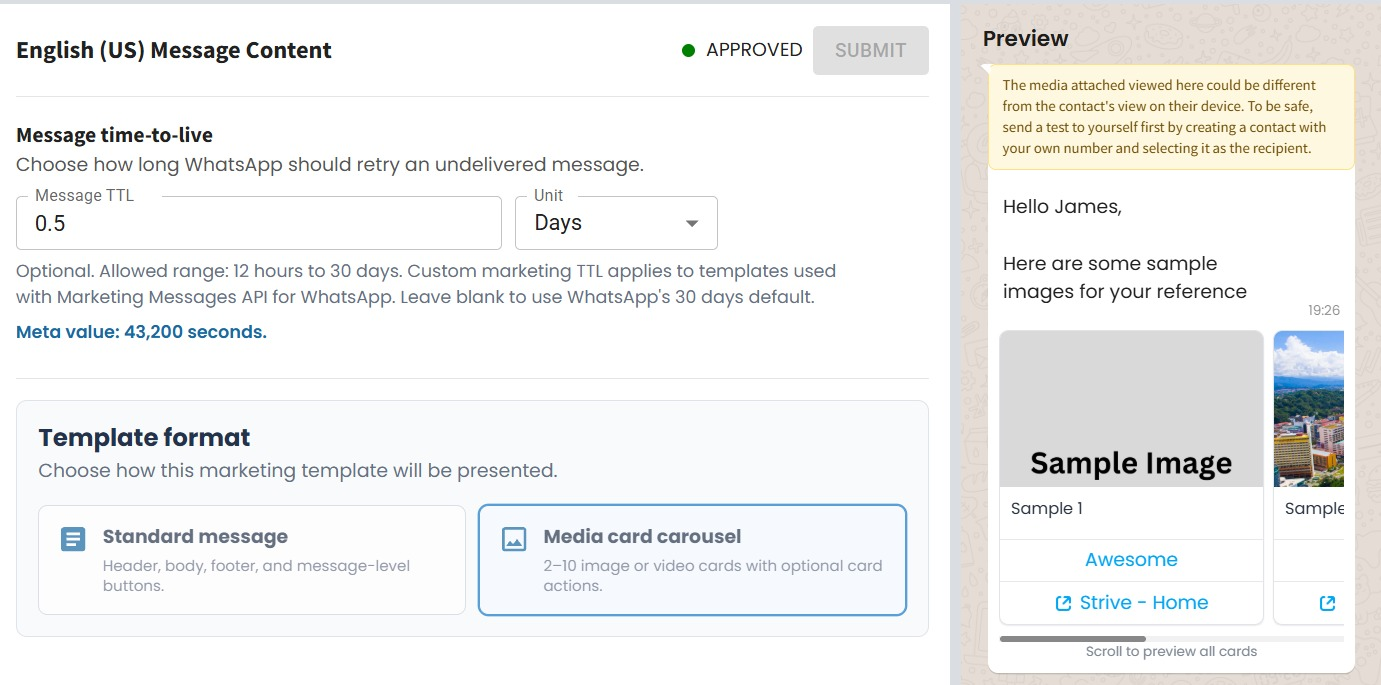
You can now create Media Card Carousel templates for WhatsApp API Marketing Templates. Each carousel supports up to 10 images or videos, allowing you to showcase multiple products or promotions in a single message. 🚀
What it means to you:
Present more content in one marketing message with an interactive carousel format. Whether you're promoting multiple products, highlighting different offers, or telling a visual story, you can deliver a richer experience to your customers. ✅
How you can go about it:
Go to WA API Template.
Click Create Template.
Select Marketing as the template category.
Choose Media Card Carousel as the template format.
Add up to 10 images or videos to your carousel template.
Learn how to create a Media Card Carousel template:
3. Add Time-to-Live (TTL) for WhatsApp Marketing Templates ⏱️
What's New:
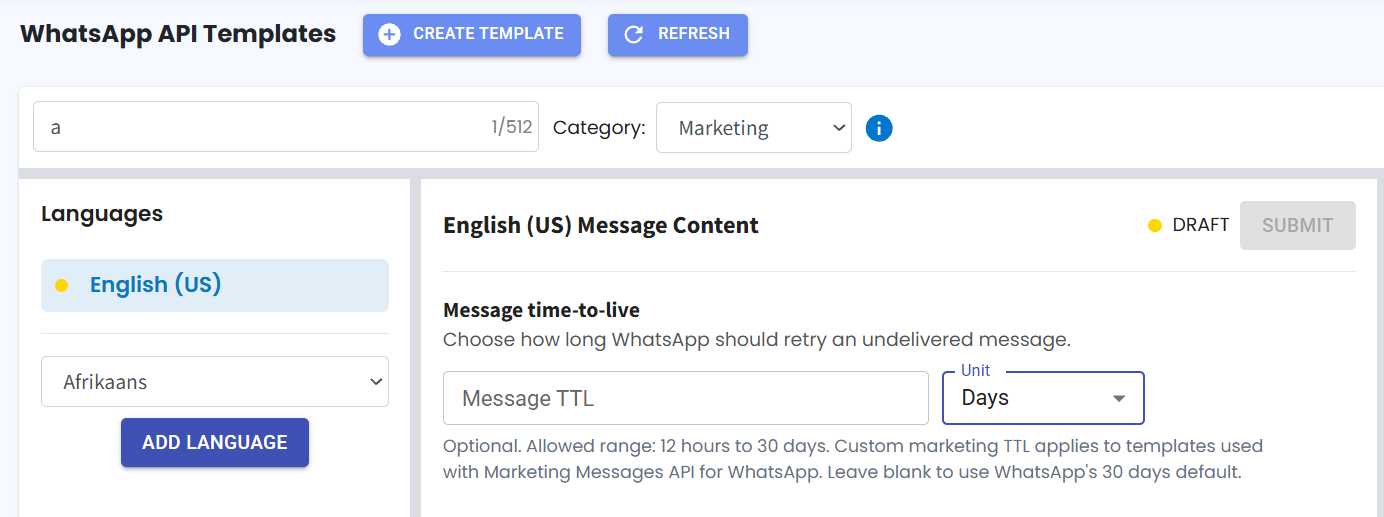
You can now set a Time-to-Live (TTL) for WhatsApp API Marketing Templates used in Broadcasts. ⏳
What it means to you:
TTL lets you define how long WhatsApp should keep trying to deliver a marketing template message. If the message isn't delivered within the configured time, it will automatically be marked as Failed instead of remaining pending indefinitely. This gives you a more accurate delivery status and makes it easier to monitor broadcast performance. ✅
How you can go about it:
Go to WA API Template.
Create a new template.
Select Marketing as the template category.
Set your preferred TTL (Time-to-Live) before submitting the template.
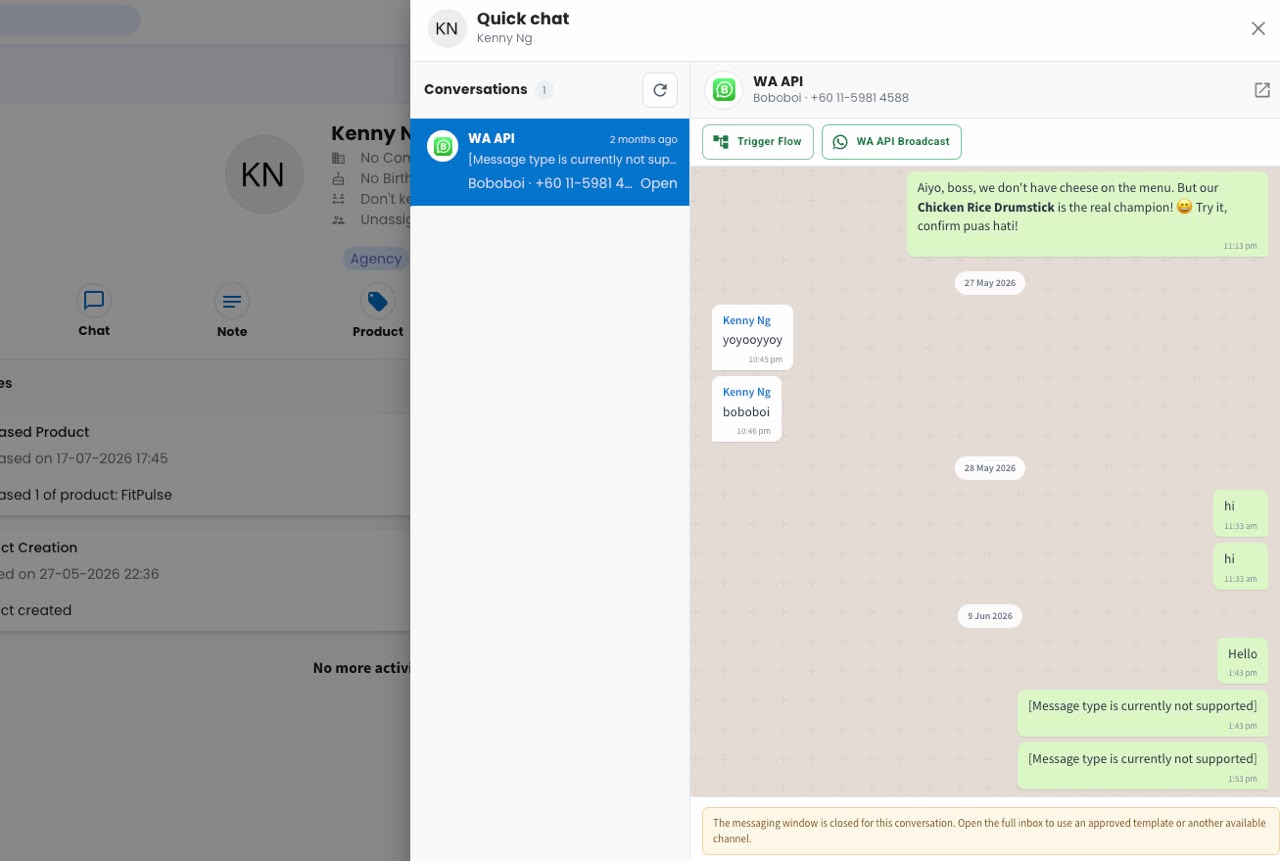
4. Quick Chat in Contact Module 🚀
What's New:
You can now open a Quick Chat directly from the Contact Module. From there, you can chat with the contact, trigger a flow, or send a WhatsApp API message. 💬✨
What it means to you:
Access conversations faster and take action with fewer clicks. Reply to contacts instantly, trigger a flow when needed, or send a WhatsApp API message—all from the Quick Chat. ⚡🎯
How you can go about it:
Go to the Contact Module. 📇
Select a contact. 👤
Click on the Chat button.💬
Use the Quick Chat to chat with the contact, trigger a flow, or send a WhatsApp API message. 🚀
5. Trigger Flows Faster with a New Inbox Shortcut 🚀
What's New:
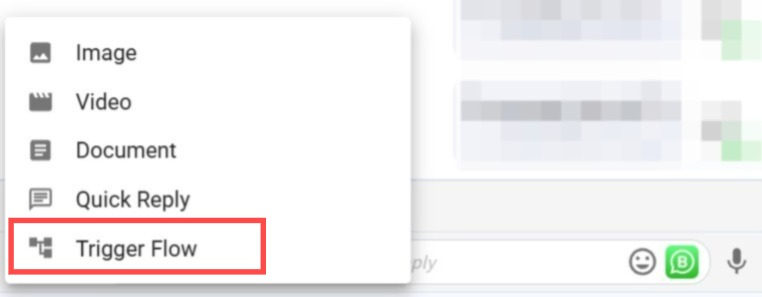
We added a new shortcut to trigger flows directly from the + icon in the Inbox. 🎯
What it means to you:
You now have one more quick way to trigger flows directly from Inbox, making it easier to start a flow when needed. ✅
How you can go about it:
Open any chat in the Inbox module.
Click the + icon at the bottom left.
Select Trigger Flow and choose the flow you want to send.
6. Quick Edit Contact Name ✏️
What's New:
You can now edit a contact's name directly next to their name in the Inbox module. 🚀
What it means to you:
Editing contact names is now quicker and more convenient. Instead of scrolling to the bottom right to access Edit Contact, you can update the name directly beside it. 👍
How you can go about it:
1. Open any conversation in the Inbox module.
2. Click the pencil icon beside the contact's name.
3. Type the new name and click on save changes. Done! 😊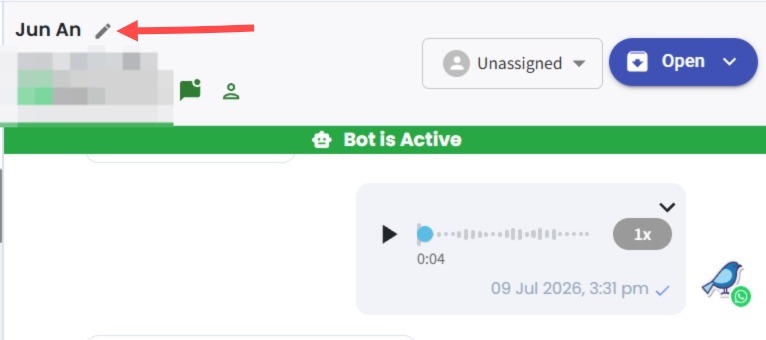
7. Quick Reply Filters Added 🔍
What's New:
We added a new filter option for Quick Replies. You can now filter based on ownership. 🎯
What it means to you:
Quickly find the Quick Replies you need by filtering them based on ownership. This makes it easier to manage your Quick Replies and keeps your workflow organized. ✅
How you can go about it:
1. Open any chat in the Inbox module.
2. Click the + icon at the bottom left and select Quick Reply.
3. Use the Quick Reply Owner filter to view the Quick Replies you need.
You can now find the right Quick Reply faster. 🚀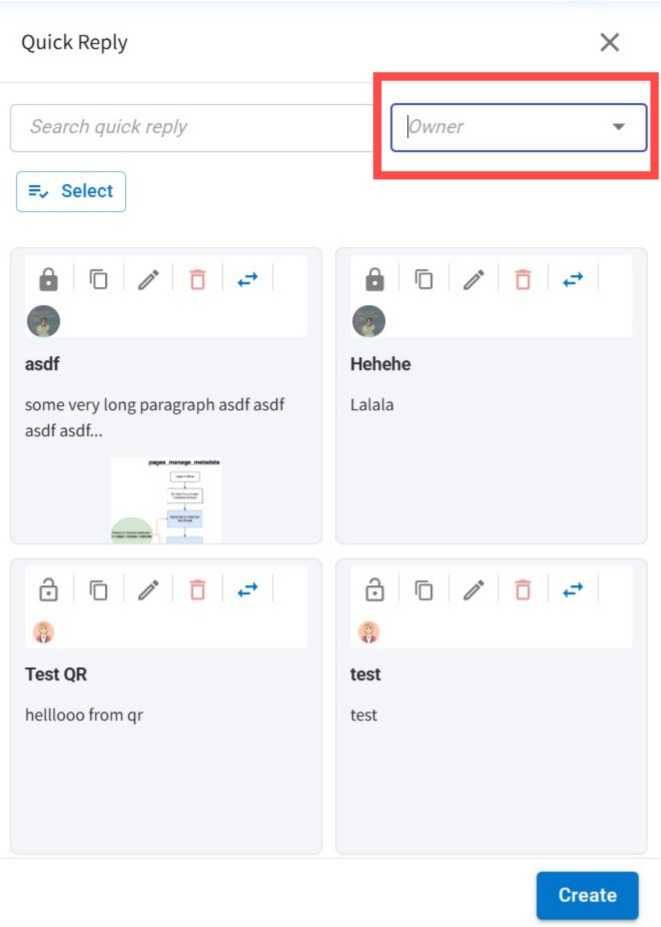
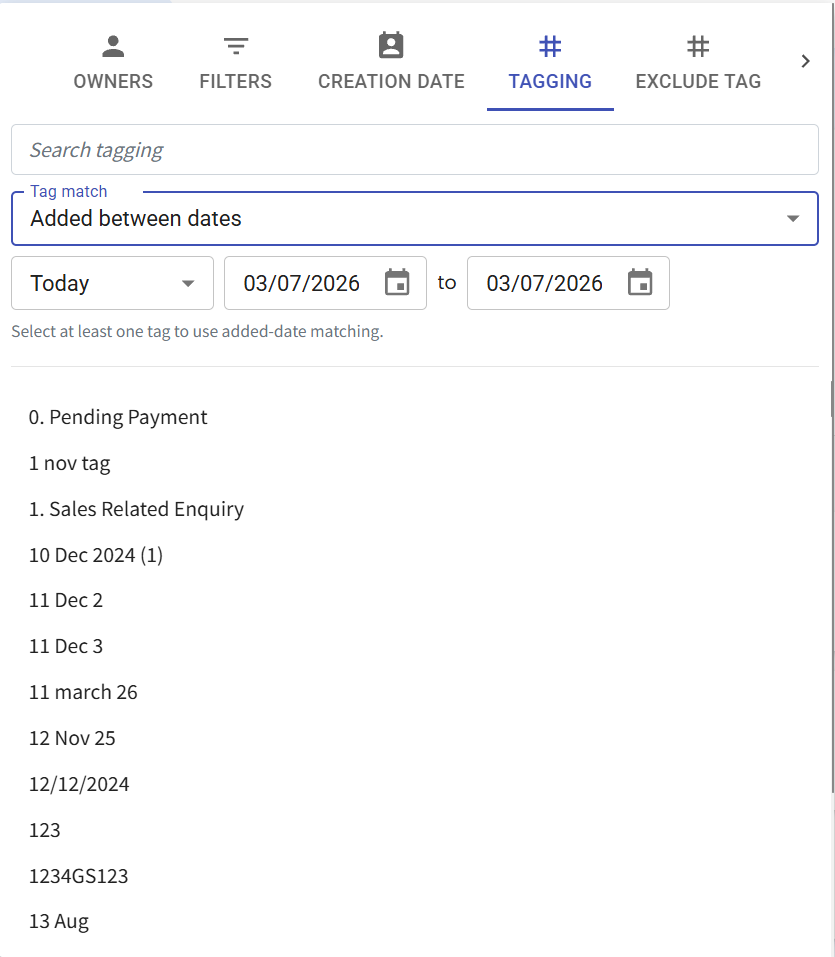
8. New "Tag Added Date" Filter in Contact Module 🏷️📅
What's New:
We've added a new Tag Added Date filter in the Contact Module 🎉
What it means to you:
You can now filter contacts based on when a specific tag was added, making it easier to build more targeted contact lists for broadcasts and campaigns ⚡
With this enhancement, you can:
✅ Filter contacts by tag added date
✅ Create more precise audience segments
✅ Improve broadcast targeting
✅ Build better contact lists for campaigns 🚀
How you can go about it:
Go to Contact Module.
Click on the Filter icon.
Click on Tagging.
Select a tag and select "Added Between Dates" under Tag match option.
Select the date range via date range presets or custom a date range.
Apply the filter to view matching contacts 🎉
9. Filter Contacts by All Selected Tags 🎯
What's New:
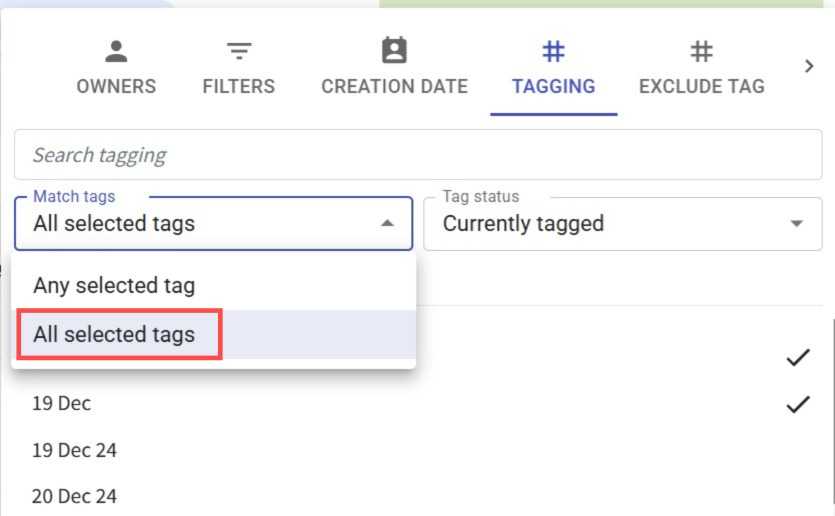
You can now filter contacts that match all selected tags in the Contact Module. 🎯
What it means to you:
Easily find contacts with specific tag combinations and improve the accuracy of your contact segmentation. This makes it easier to manage targeted audiences for your workflows and campaigns. ✅
How you can go about it:
Go to the Contact Module.
Click Filter.
Select Tagging and choose your tags.
Click the Match tag dropdown.
Select All selected tags and click on Apply Filter to display contacts that contain all selected tags. 🚀
10. Exclude Specific Posts from FB/IG Comment Flow 🚀
What's New:
You can now apply the Facebook and Instagram comment flow to all posts at once, with the ability to exclude specific posts you don't want to include. ✨
What it means to you:
Save time by setting up your comment flow for multiple posts in one go, rather than selecting them one by one. This reduces manual effort and streamlines your workflow. 🎯⚡
How you can go about it:
1. Go to Flowbuilder Module.
2. Create or edit a flow.
3. Click on the first node (Workflow Trigger) and select FB/IG as flowbuilder type.
4. Select Comments as trigger type, then select any post and either exclude a specific post.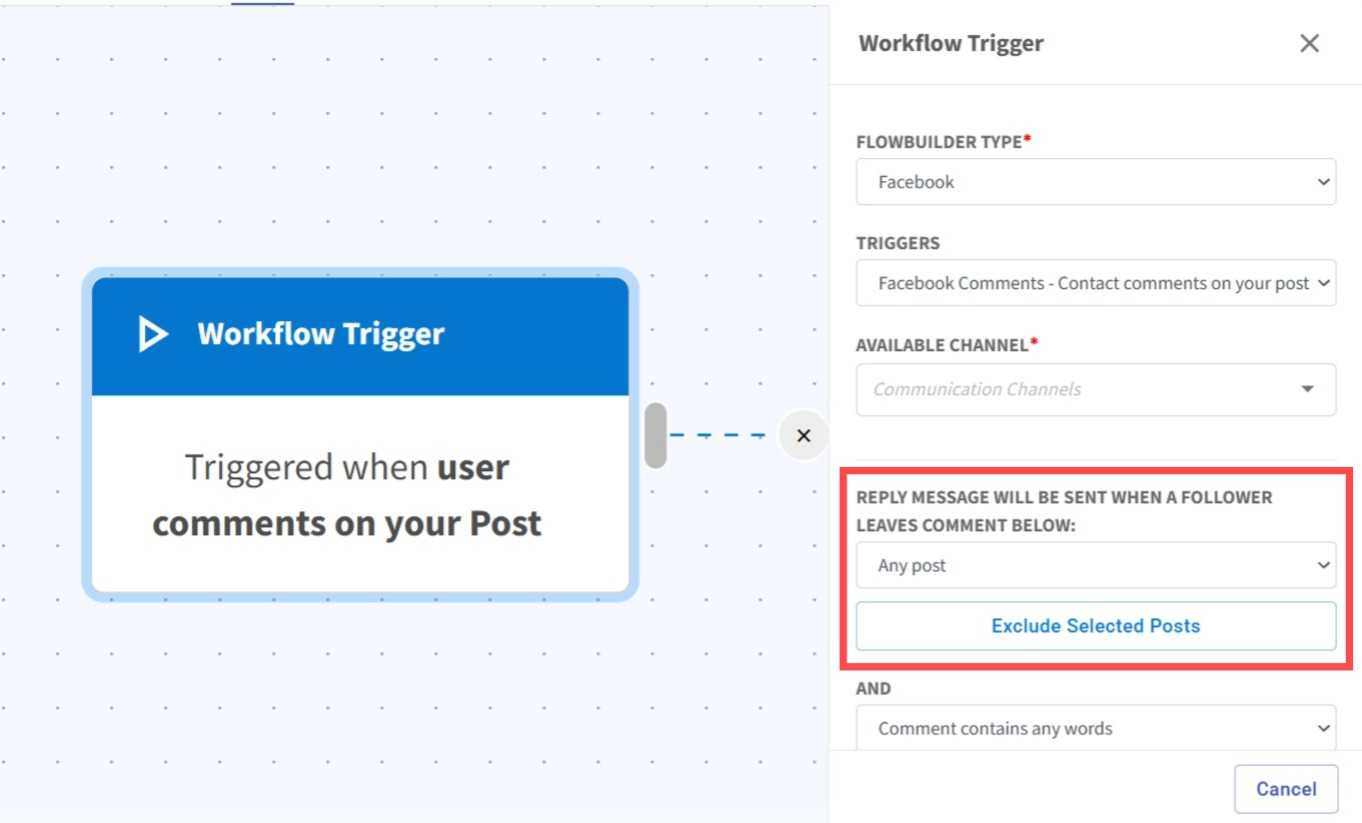
11. Flowbuilder Condition Now Supports Last Purchase Date 🛒⏱️
What's New:
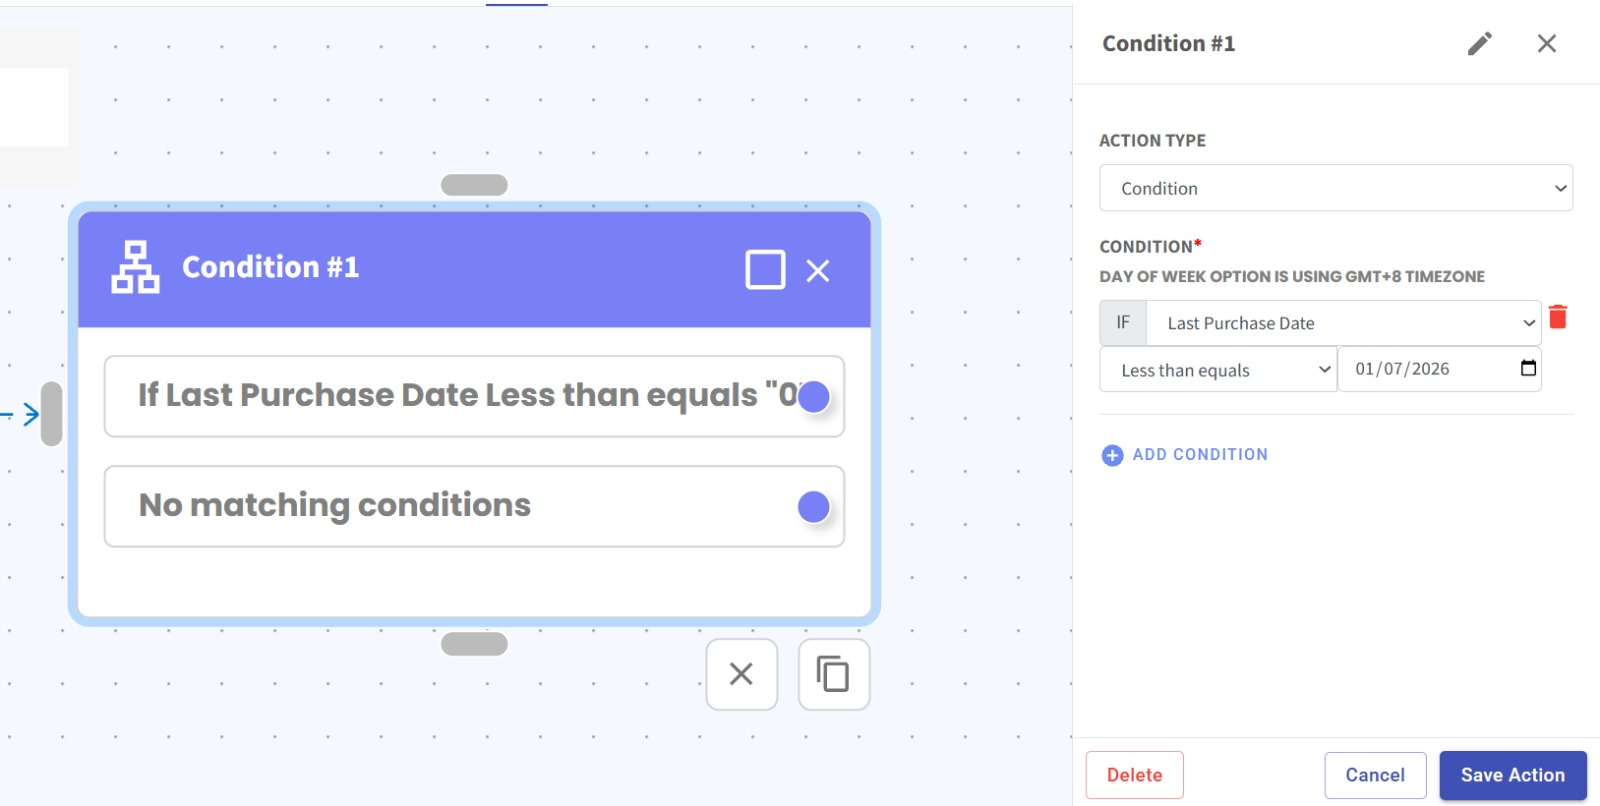
Flowbuilder Condition now supports Last Purchase Date duration 🎉
What it means to you:
You can now build conditions based on how long it has been since a contact’s last purchase, allowing you to trigger more targeted automations based on customer activity ⚡
With this enhancement, you can:
✅ Check last purchase date in Flowbuilder Condition
✅ Set rules based on number of days since last purchase
✅ Trigger different flow paths based on purchase recency
✅ Build more advanced customer lifecycle automations 🚀
How you can go about it:
Go to Flowbuilder Module and create or edit a flow.
Add a Condition step in your flow.
Select Last Purchase Date as the condition field.
Set the duration rule (e.g. more than equals / less than equals X date).
Configure your flow actions based on the condition outcome.
Save and activate your flow 🎉
12. Smarter Node Connections in Flowbuilder 📝
What's New:
You can now drag to connect a new node even when another node is already linked. A confirmation prompt appears before the connection changes 🚀
What it means to you:
This saves you time by removing the need to delete old connections first. Your workflow stays smooth and uninterrupted ✨
How you can go about it:
1. Drag a new node toward the target node in your flow
2. A confirmation prompt will appear asking to replace the existing connection
3. Click confirm to complete the new link
Enjoy faster flow building 🎯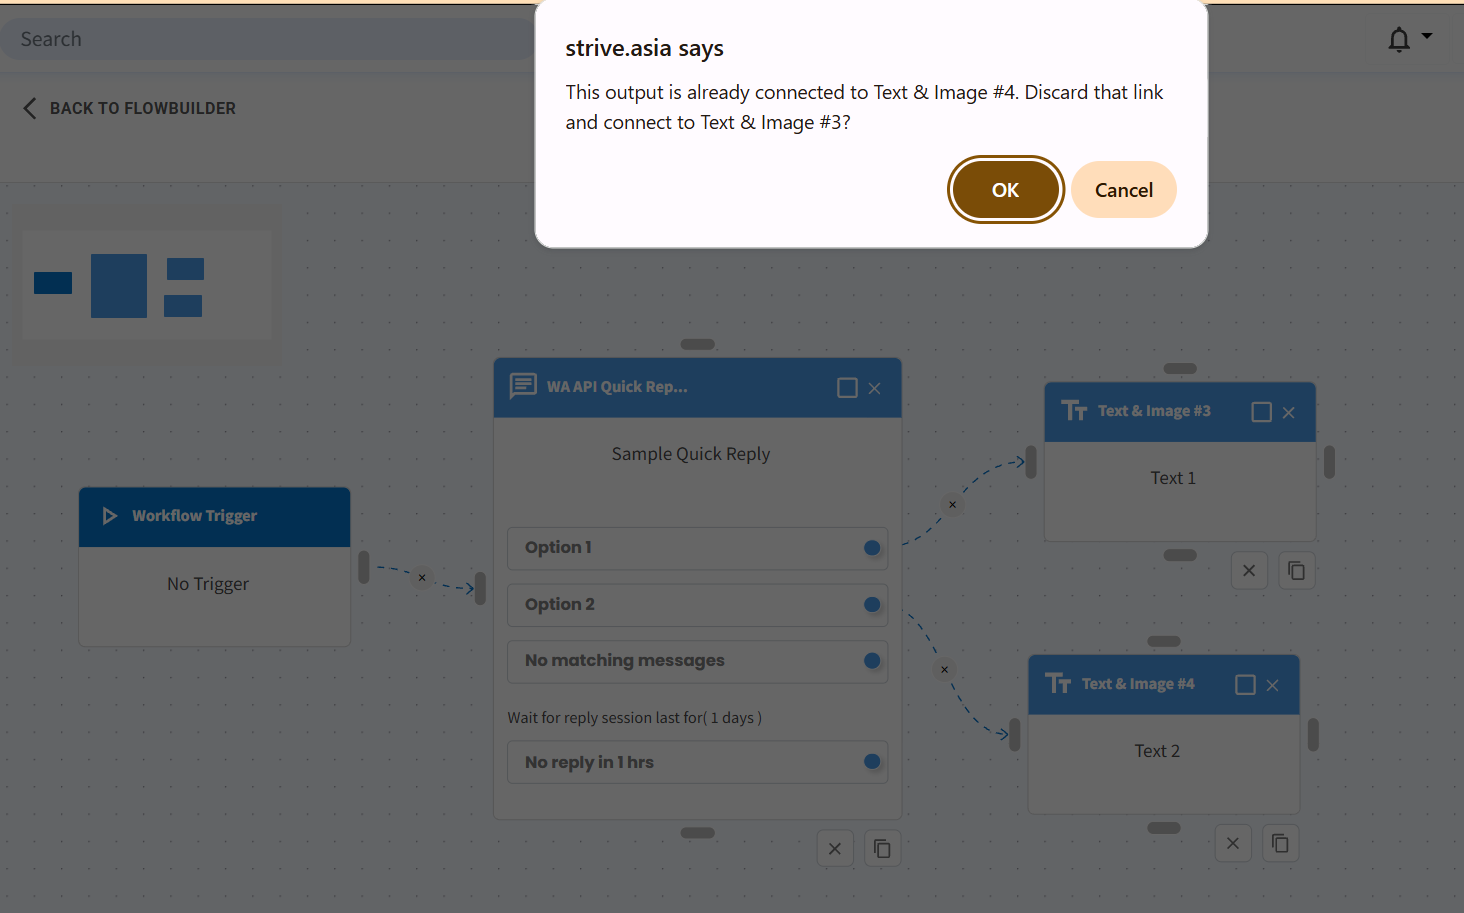
13. Workflow Trigger Prompt Interval Now Supports Hours & Days ⏱️
What's New:
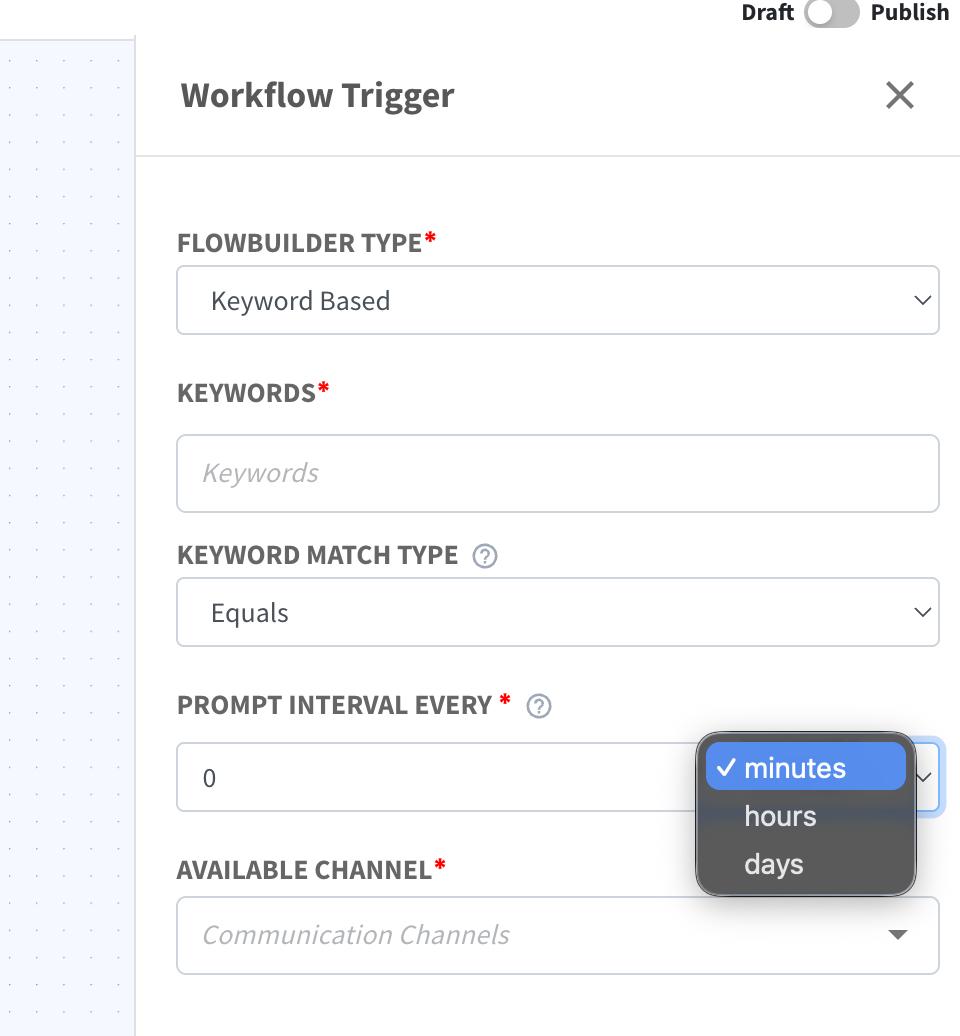
The Prompt Interval in Workflow Trigger now supports Minutes, Hours, and Days 🎉
What it means to you:
You can now configure a more flexible cooldown period to control when a contact can re-trigger the same flow. This helps better manage flow frequency and avoid repeated triggers ⚡
With this enhancement, you can:
✅ Set prompt interval in minutes, hours, or days
✅ Control re-entry timing for contacts in flows
✅ Reduce unnecessary repeated triggers
✅ Build more flexible automation logic 🚀
How you can go about it:
Go to Flowbuilder Module and create or edit a flow.
Click on the first node (Workflow Trigger).
Select your preferred unit (Minutes, Hours, or Days) and set the duration.
Save and publish your flow 🎉
14. Channel Filter Added to Conversion Module 📊
What's New:
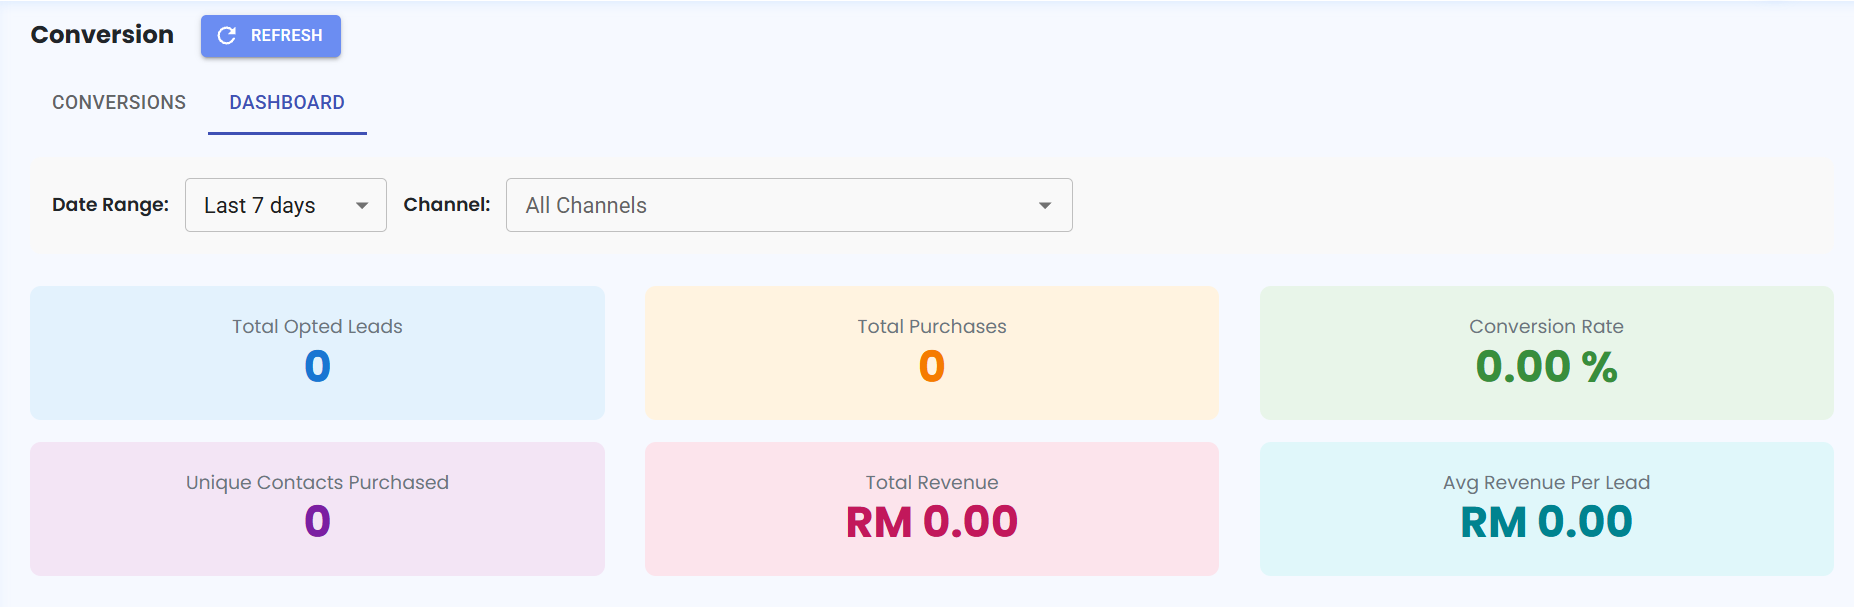
We've added a new Channel filter in the Conversion Module 🎉
What it means to you:
You can now filter conversion data by channel, making it easier to analyze campaign performance, leads, purchases, and revenue for each individual channel. This gives you clearer insights when managing multiple channels ⚡
With this enhancement, you can:
✅ Filter conversion data by channel
✅ Analyze leads, purchases, and revenue for each channel
✅ Compare campaign performance across channels
✅ Gain more accurate conversion insights 🚀
How you can go about it:
Go to the Conversion Module.
Click on Dashboard.
Select the Channel you want to analyze.
View the conversion metrics and ad performance for the selected channel 📊
15. Company Industry Now Visible in Contact Info 🏢📇
What's New:
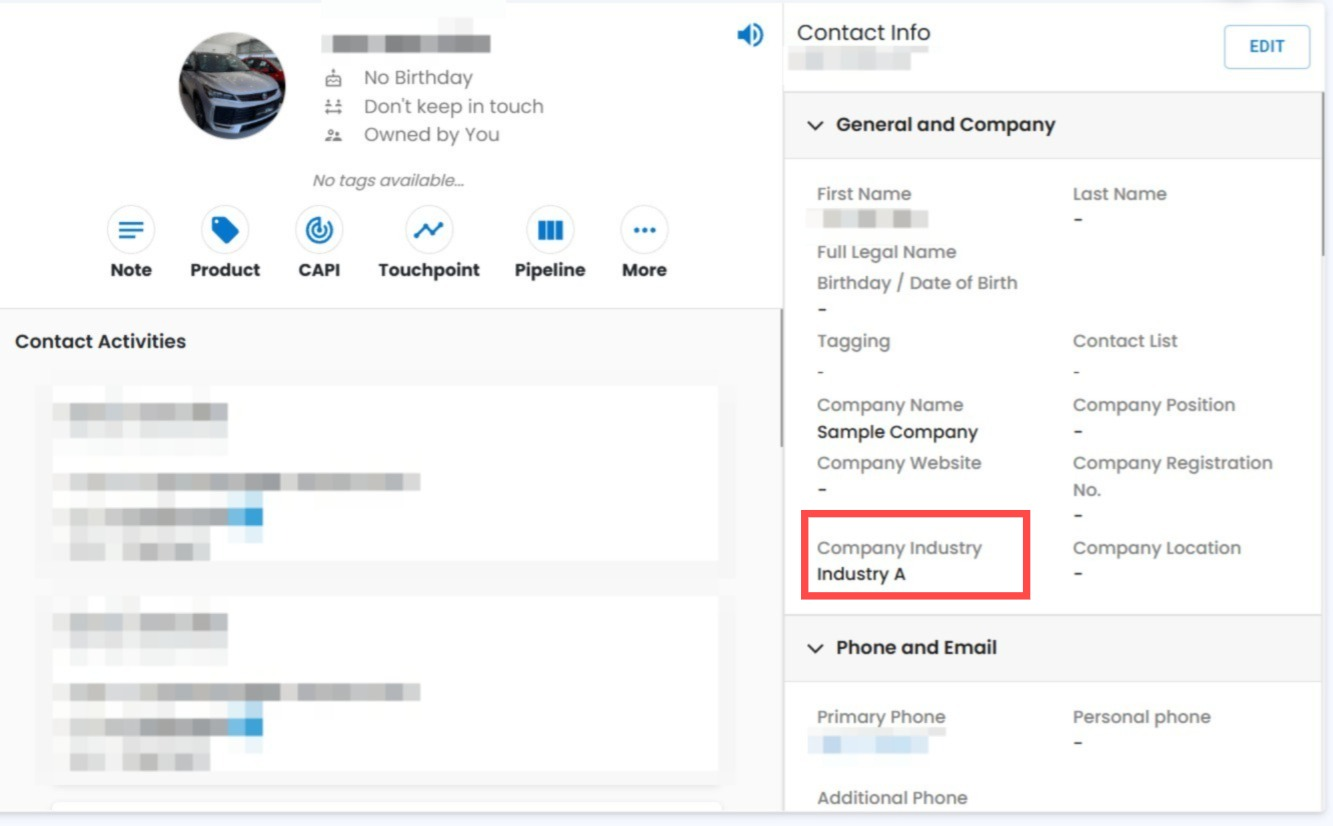
Company industry is now displayed in the Contact Info section within the Contact Module 🎉
What it means to you:
You can now easily view a contact’s company industry directly from their profile, helping you better understand and segment your customers. Kindly note that this field is managed from the Company Module only.
With this enhancement, you can:
✅ View company industry in Contact details
✅ Gain better context about your contacts
✅ Improve segmentation and targeting
✅ Centralize industry management in Company Module 🚀
How you can go about it:
Go to Contact Module.
Click on a contact profile..
View the Company Industry field on the right side.
To edit it, go to the Company Module and update the company details 🎉
____________________________________________________________________________
This wraps up the July 2026 update. We truly appreciate your continued support and trust in Strive. Stay tuned for more exciting improvements coming your way in the next update 🙂