Strive June 2026 Updates 🚀
June 2026 Update
Dear Strivers,
As we step into July, here’s a quick recap of what we released in June 2026. We hope everyone had a productive and meaningful month. Over the past few weeks, we’ve rolled out several enhancements designed to improve your daily experience and make the platform even more seamless and efficient to use. Read on to explore what’s new.
____________________________________________________________________________
Enhancements
1. Strive has just added MCP ! 🤖🔗
What's New:
Strive now supports MCP (Model Context Protocol) 🎉
What it means to you:
You can now connect Strive to AI platforms such as Claude, ChatGPT, and Manus via MCP, allowing your AI assistant to interact with Strive more seamlessly 🚀
With this updates, you can:
✅ Access contact information and metadata
✅ Manage WhatsApp templates and media
✅ Create and update Flowbuilder automations
✅ Test and manage AI Agents
✅ Retrieve reports and conversion data
How you can go about it:
Check out the link below for a guide to setup (claude link) 🚀
https://scribehow.com/o/Fs8ozAjrTmmTVSASY4x3XQ/viewer/How_to_Connect_Strive_to_Claude_MCP__iem-u3ncSseETju2-z9RoA?referrer=workspace
2. TikTok Channel is Now Available in Strive 🎵📩
What's New:
You can now connect your TikTok channel directly to Strive 🎉
What it means to you:
You can manage TikTok conversations alongside your other channels in a single inbox, helping your team respond faster and streamline customer communication 🚀
With this enhancement, you can:
✅ Connect your TikTok account to Strive
✅ Receive TikTok messages in Inbox
✅ Improve response time and customer engagement ⚡
How you can go about it:
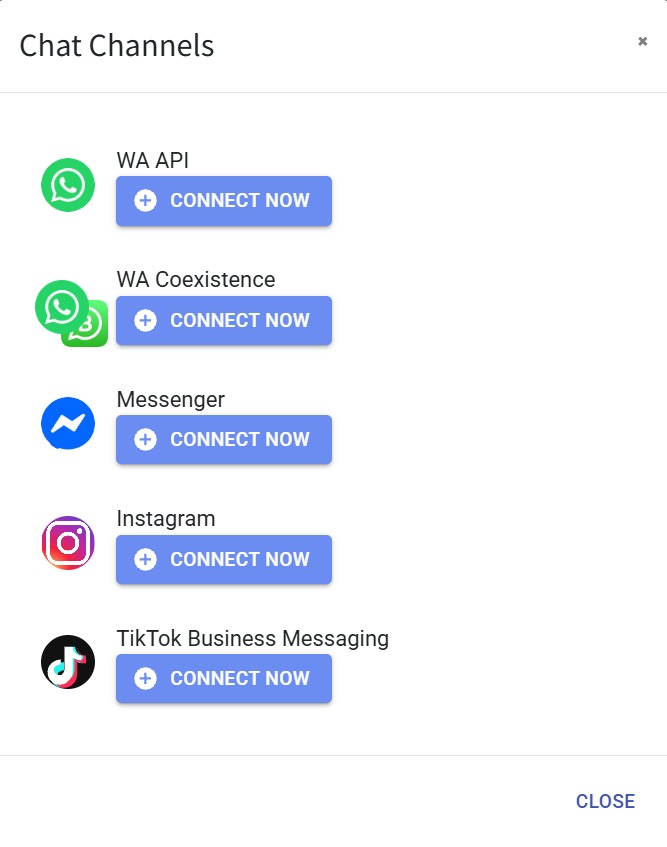
Go to Inbox Module > click on Chat Channels on top left
Select Connect Now for TikTok.
Log in your TikTok account.
Start managing your TikTok conversations directly from Inbox 🎉
3. Flowbuilder Now Supports Segment Trigger 🚀
What's New:
Flowbuilder now supports Segment Trigger, allowing contacts to be automatically enrolled into flows when they match segment conditions 🎉
What it means to you:
You can now trigger automations directly from contact segments, making it easier to build targeted and dynamic workflows without manual enrolment ⚡
With this enhancement, you can:
✅ Trigger flows based on segment conditions
✅ Automatically enroll contacts into flows
✅ Reduce manual steps in automation setup
✅ Build more dynamic audience-based workflows 🚀
How you can go about it:
1. Go to the Flowbuilder Module and create or edit a flow.
2. Click on the first node (Workflow Trigger).
3. Select Segment as the trigger type.
4. Choose the segment you want to use as the trigger.
5. Continue building and configuring your flow.
6. Save and publish your flow 🚀
Guide on how to segment your data :
https://scribehow.com/o/Fs8ozAjrTmmTVSASY4x3XQ/viewer/How_to_Segment_Your_Data__BfJf7lHTRaWxODTyAVyhJg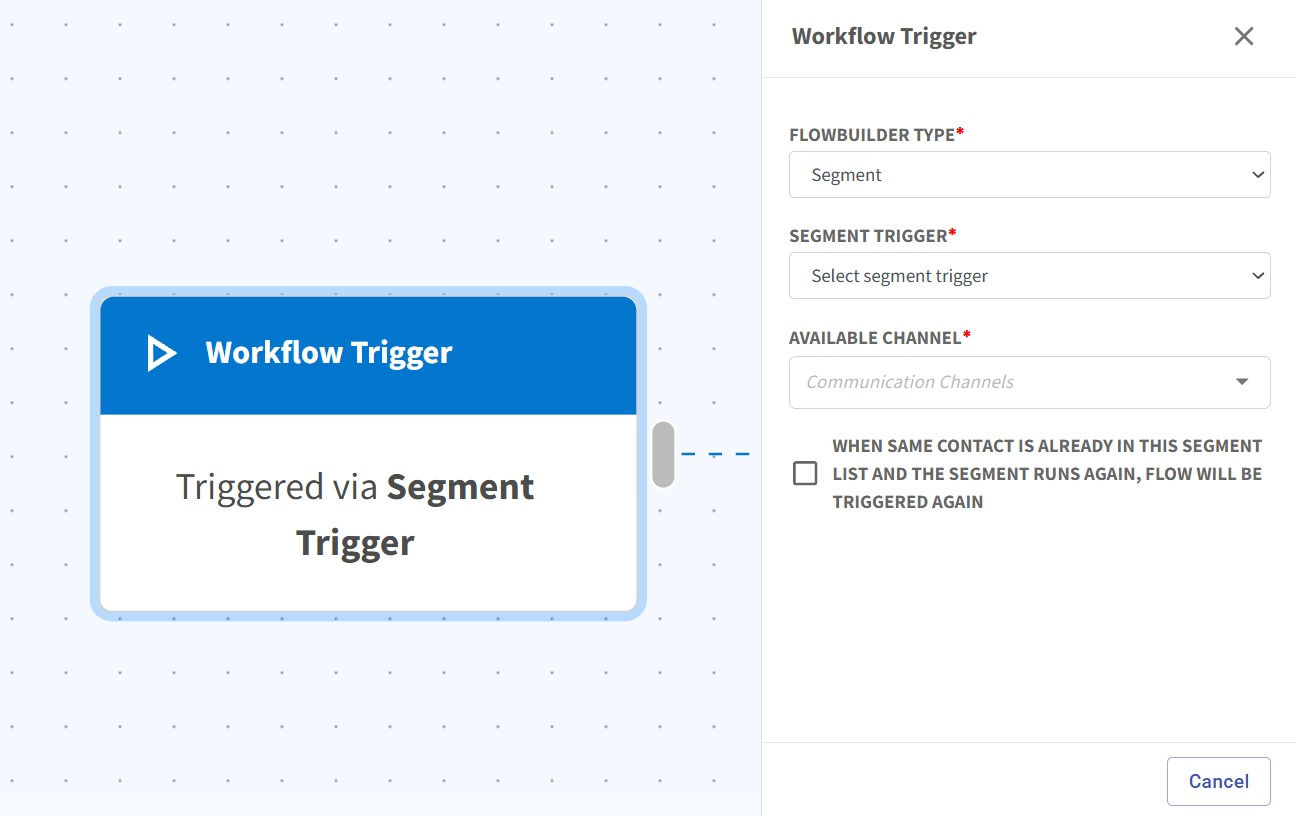
4. New Typeform Trigger in Flowbuilder 🌐
Created: Jun 8, 2026
What's New:
We’ve introduced a new Typeform Trigger in Flowbuilder 🎉
What it means to you:
You can now directly use Typeform as a trigger in Flowbuilder to start automations based on form activity, giving you more powerful and flexible workflow automation ⚡
With this enhancement, you can:
✅ Trigger flows from Typeform submissions
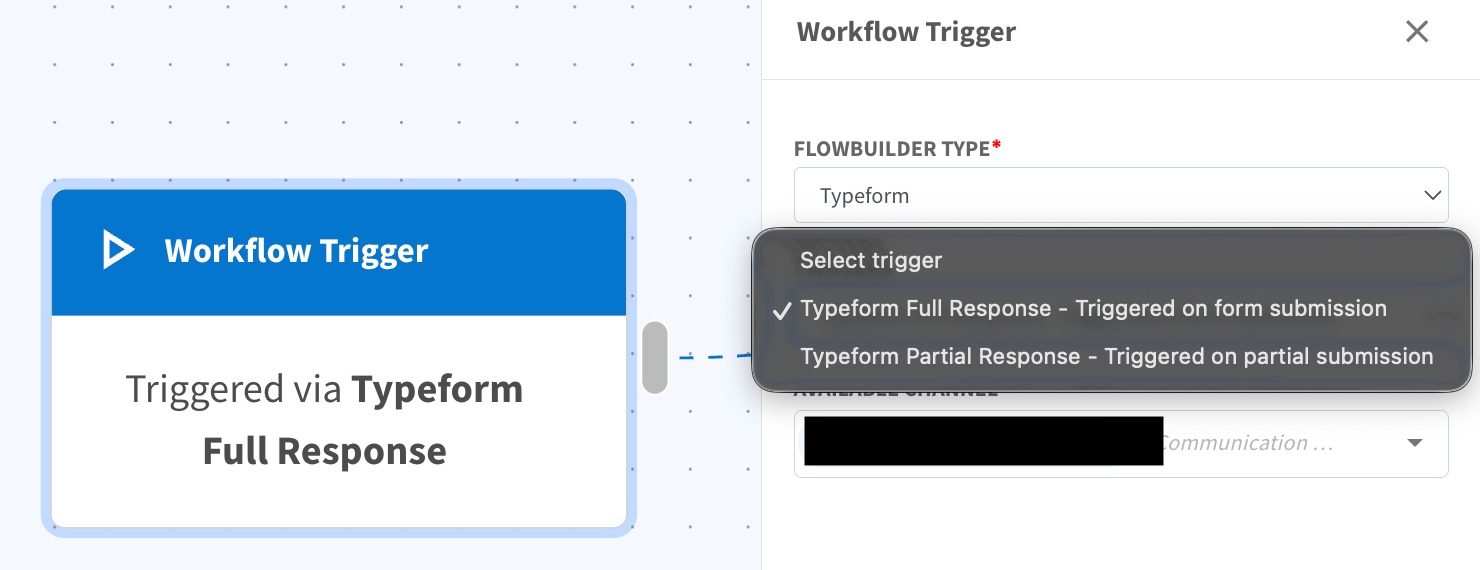
✅ Choose between Full Response and Partial Response triggers
✅ Capture both completed and in-progress leads
✅ Build more advanced Typeform-based automations 🚀
How you can go about it:
Go to Account → Connections and connect your Typeform account.
Then go to Flowbuilder and create or edit a flow.
Select Typeform Trigger as your trigger type.
Choose your mode:
Full Response (trigger on form submission)
Partial Response (trigger on partial submission)
Configure your flow and activate it 🚀
5. Facebook Comment Trigger Now Supports Dark Posts 🎯
What's New:
You can now select Dark Posts when configuring a Facebook Comment Trigger in Flowbuilder 🎉
What it means to you:
This allows you to automate responses for comments on Dark Posts, expanding your Facebook comment automation beyond organic posts 👍
With this enhancement, you can:
✅ Select Dark Posts in Facebook Comment Triggers
✅ Automate responses for comments on Dark Posts
✅ Create engagement flows for Facebook ad campaigns
✅ Manage comment automation more effectively 🚀
How you can go about it:
Go to Inbox Module > Chat Channels > Connect Now and reconnect your Facebook page.
Go to Flowbuilder and create or edit a flow.
Select Facebook as the trigger.
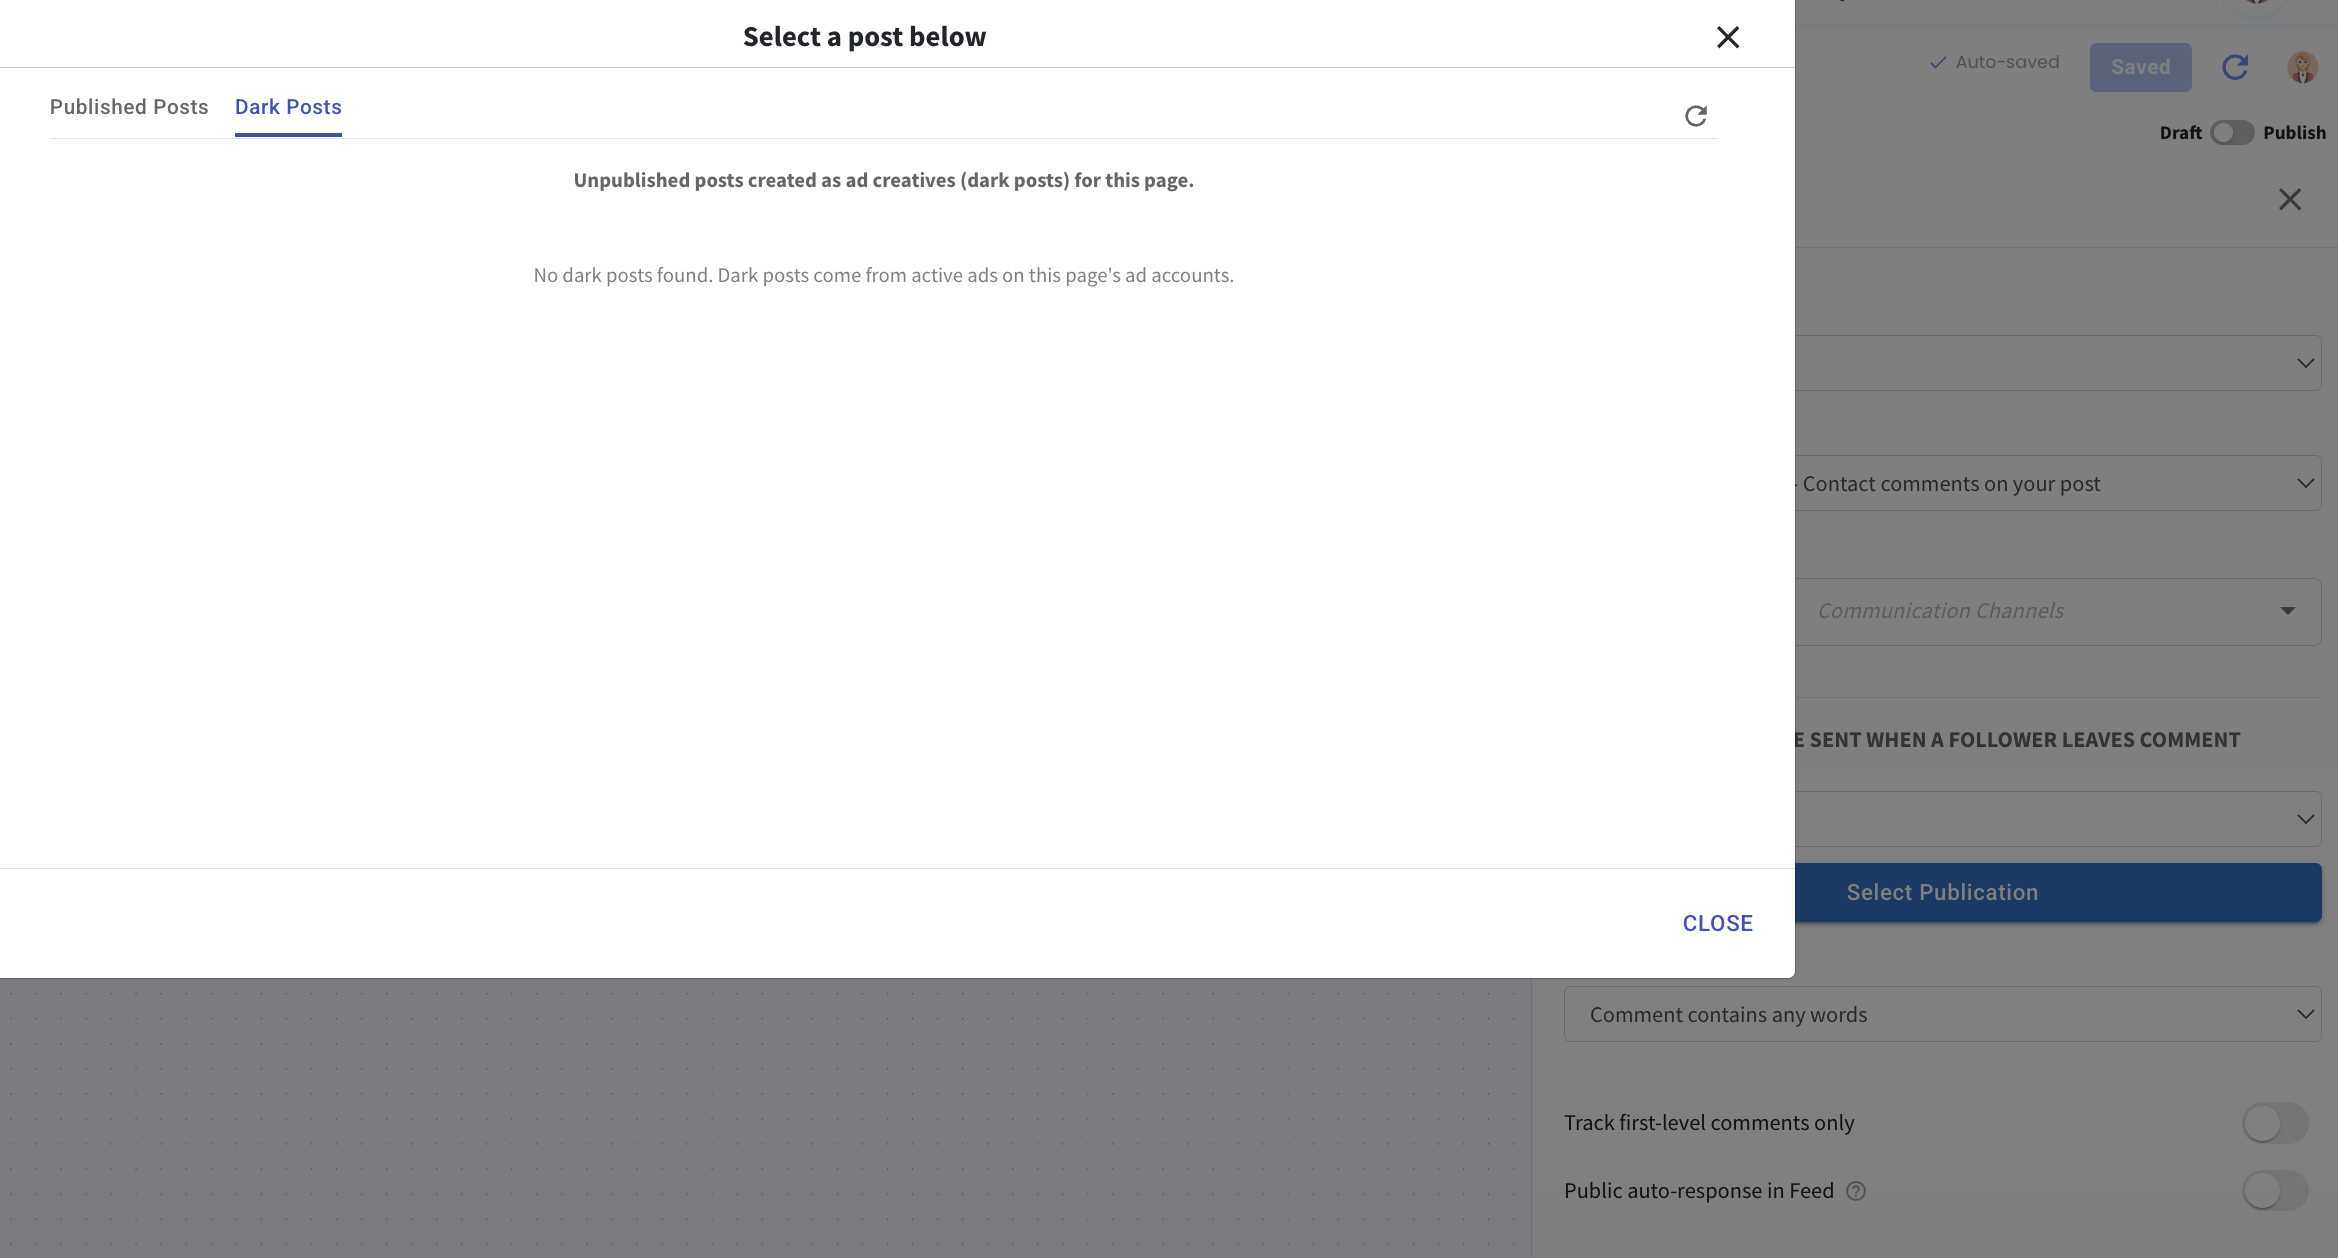
Choose Post, then navigate to the Dark Posts tab.
Select your Dark Post and configure the flow.
Save and publish your flow 🚀
6. FB/IG Channels Now Support CAPI Event Logging 📊🔥
Created: Jun 24, 2026
What's New:
FB/IG channels now support logging Meta CAPI events 🎉
What it means to you:
You can now send purchase events to Meta, improving conversion tracking and ad optimization accuracy 👍
How you can go about it:
Go to Inbox Module.
Open a chat.
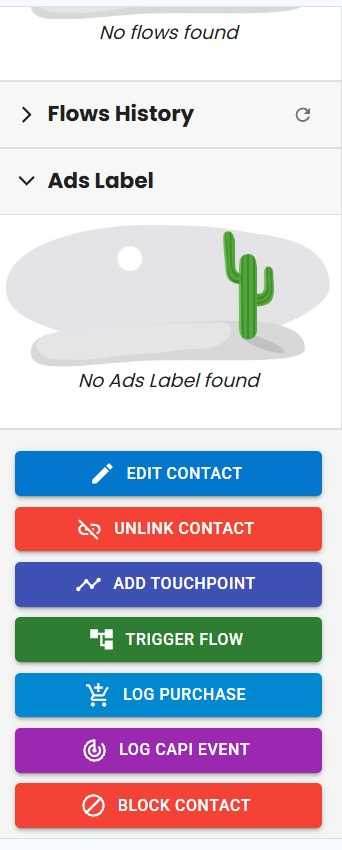
Scroll to the bottom right panel and select Log Purchase.
Fill in the Purchase Details and send the Meta CAPI event.
Kindly note:
Event name must be Purchase
Action source must be Business Messaging
Purchase value must be more than 0 🚨
7. Messenger Broadcast Opt-In Requests 📩
What's New:
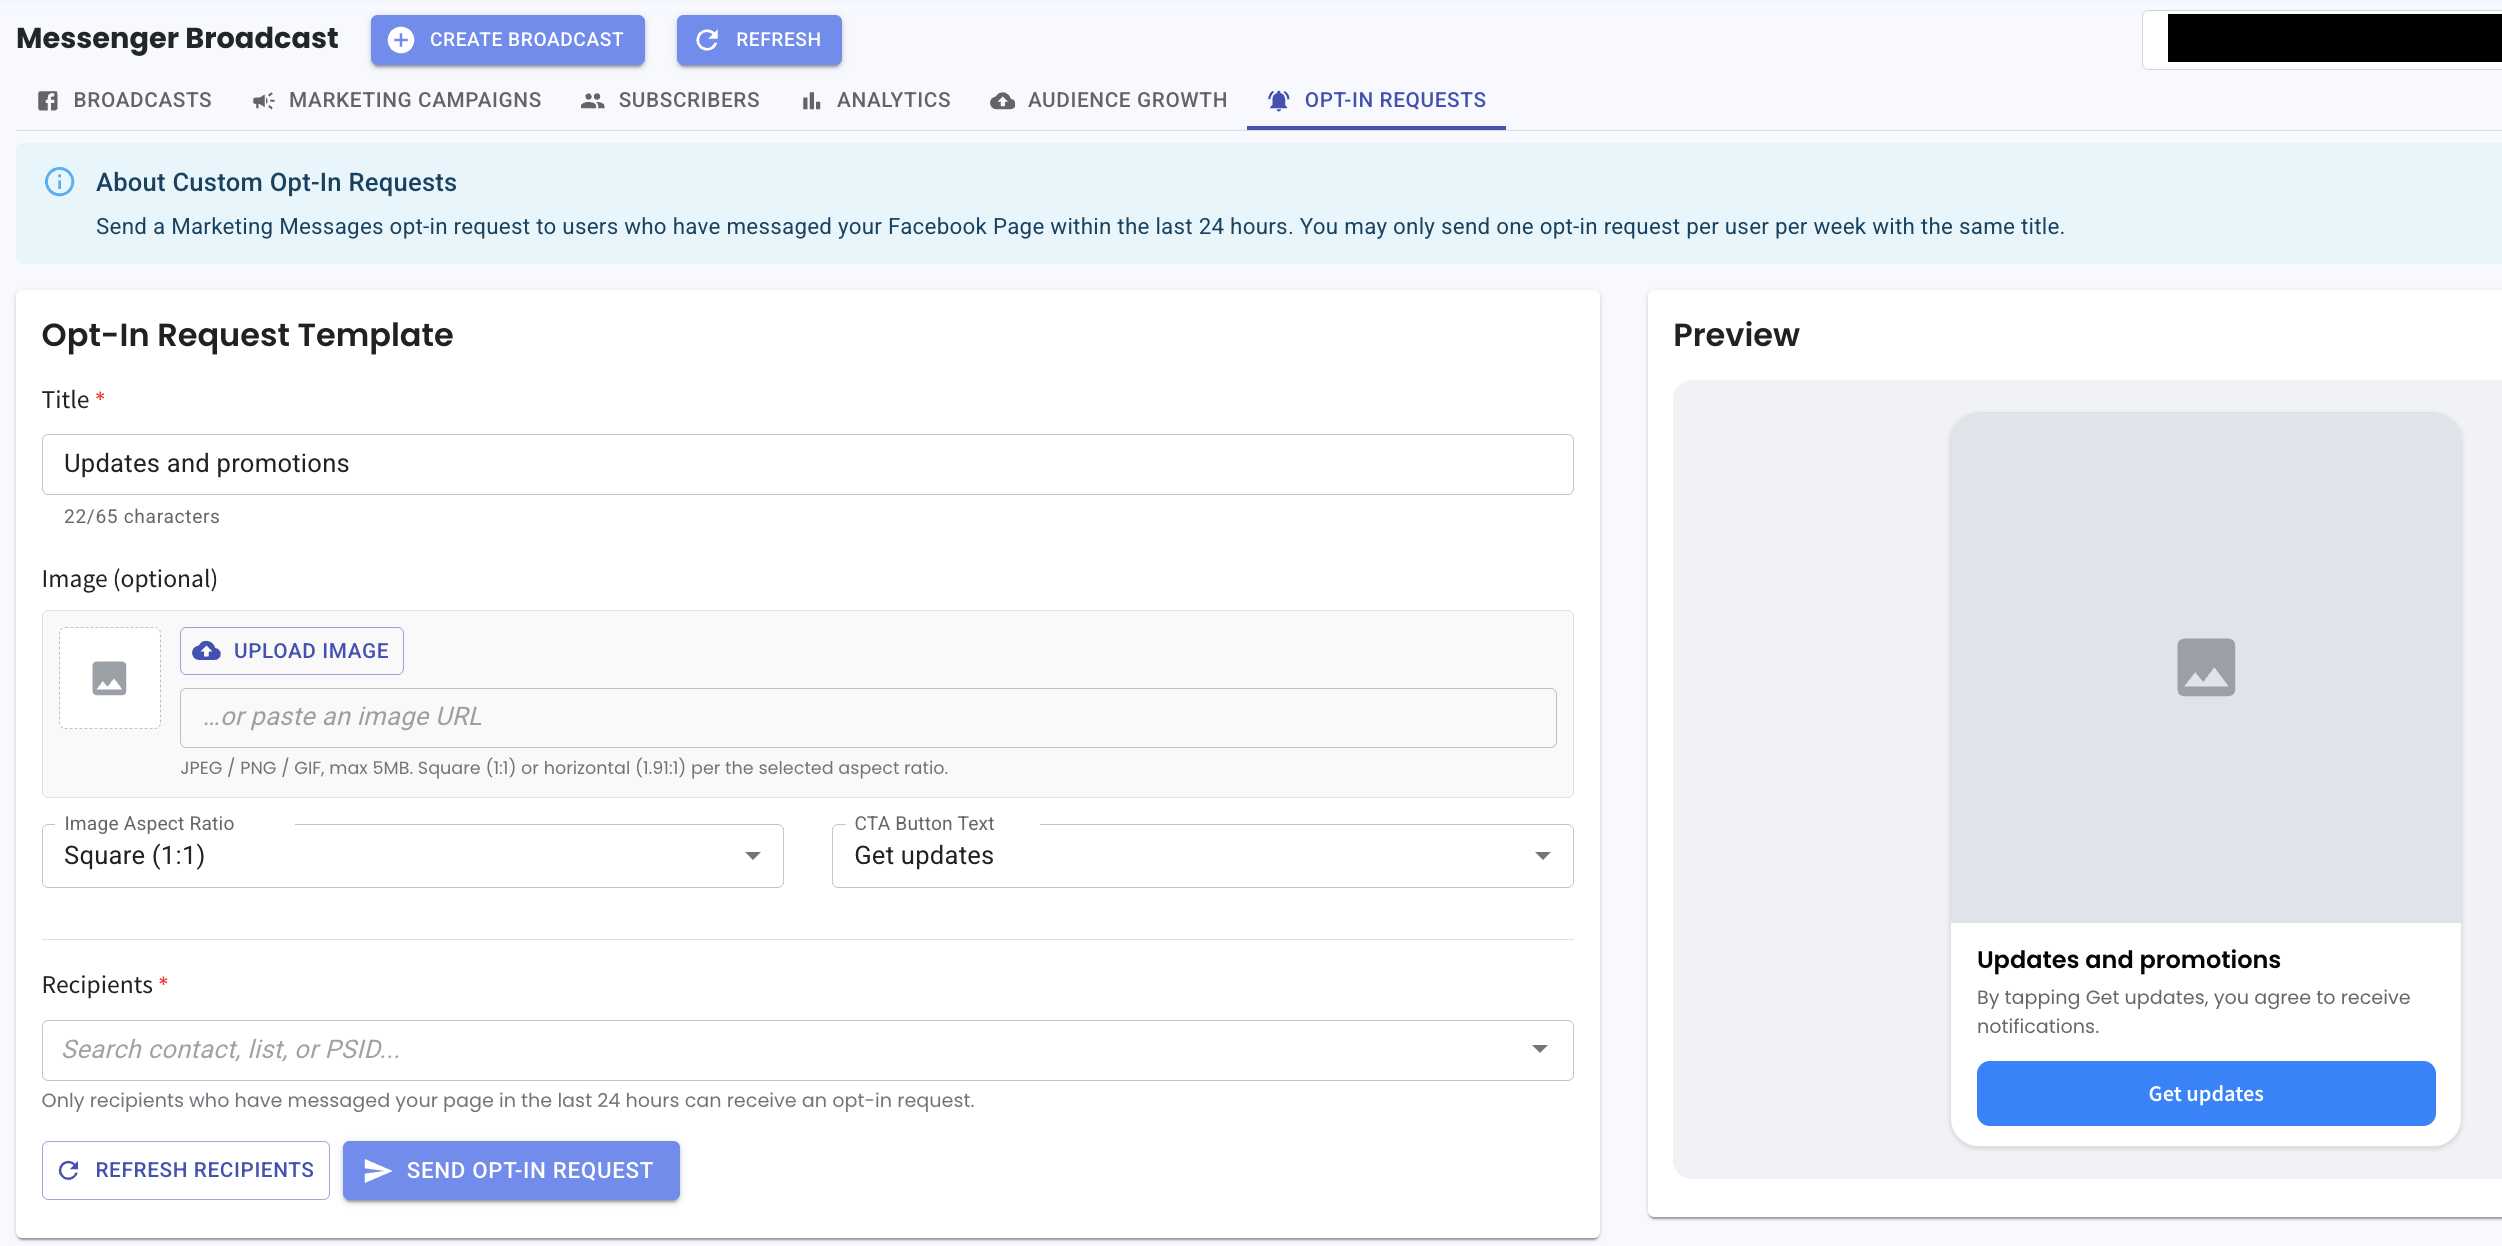
You can now send opt-in requests to your contacts to subscribe them to Messenger Broadcast 🎉
What it means to you:
Easily grow your broadcast audience by requesting users to opt in directly through Messenger, helping you build a more engaged subscriber base ✨
There is no cost to send opt-in requests.
How you can go about it:
Go to Messenger Broadcast.
Select Opt-In Requests.
Create your request (image is optional).
The content will be reflected based on the CTA button you choose.
Send your opt-in request to eligible contacts 🚀
Kindly note:
Only contacts who have messaged your page within the last 24 hours are eligible
You can only send one opt-in request per user per week with the same title
8. Pin Your Important Chats 📌
What's New:
You can now pin important chats to the top of your chat list in the Inbox module in Strive Web 🎉
What it means to you:
Easily access and prioritize your most important conversations without scrolling through the entire list 👌
How you can go about it:
1. Navigate to the Inbox Module.
2. Click on the " v " icon on the right of the chat conversation window
3. Click "Pin Chat" and the chat will stay pinned to the top ✅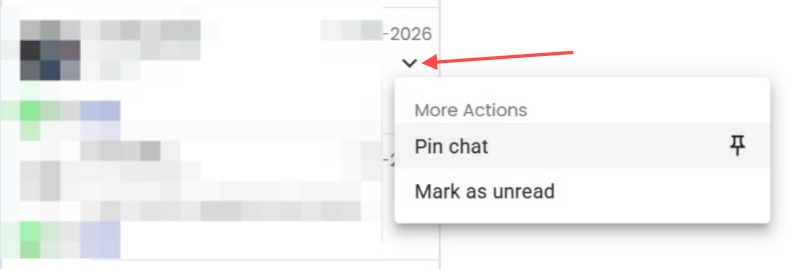
9. Pin Important Messages in Strive Go 📌
What's New:
We have added the pin message feature to the Strive Go App. 🎉
What it means to you:
You can now pin key messages in your chats, just like on the web version. This keeps important info easy to find. 🚀
How you can go about it:
1. Navigate to Inbox Module in Strive Go.
2. Long press on a message you want to pin.
3. Select the pin option from the menu. 📍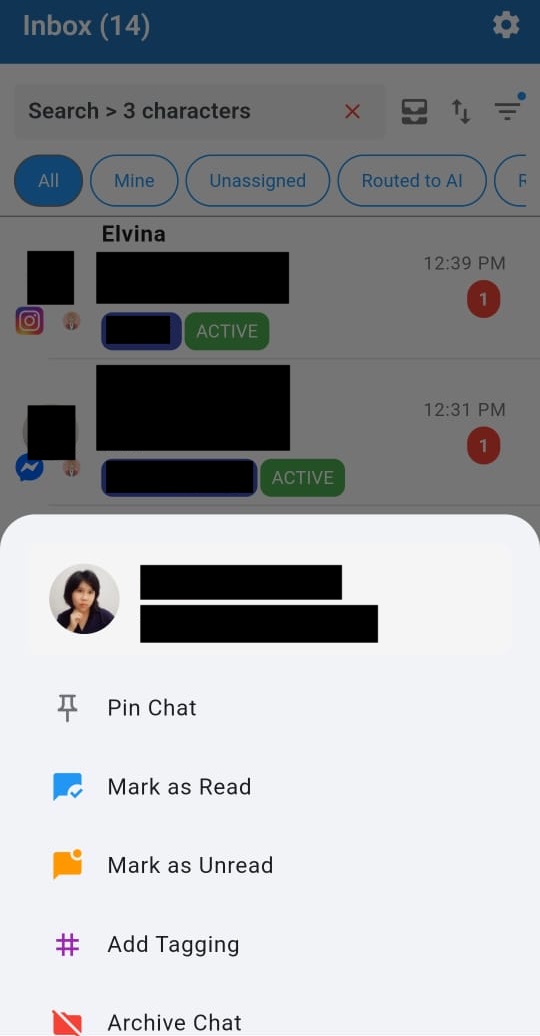
10. Updated Contact Action Icons in Strive Go 📱💬
What's New:
We’ve updated the Contact module in Strive Go with improved contact action icons and navigation options 🎉
What it means to you:
You can now quickly choose how you want to interact with a contact—whether to open their inbox conversation, start a new chat, or continue chatting in WhatsApp. This makes communication faster and more flexible 🚀
With this update, you can:
✅ Redirect directly to the Inbox conversation based on the contact's latest channel
✅ Start a new chat through Strive Go or your device's Contacts app
✅ Open the chat directly in WhatsApp
✅ Access faster communication workflows from one place ⚡
How you can go about it:
Open the Contact module in Strive Go 📱
Click on the contact you want.
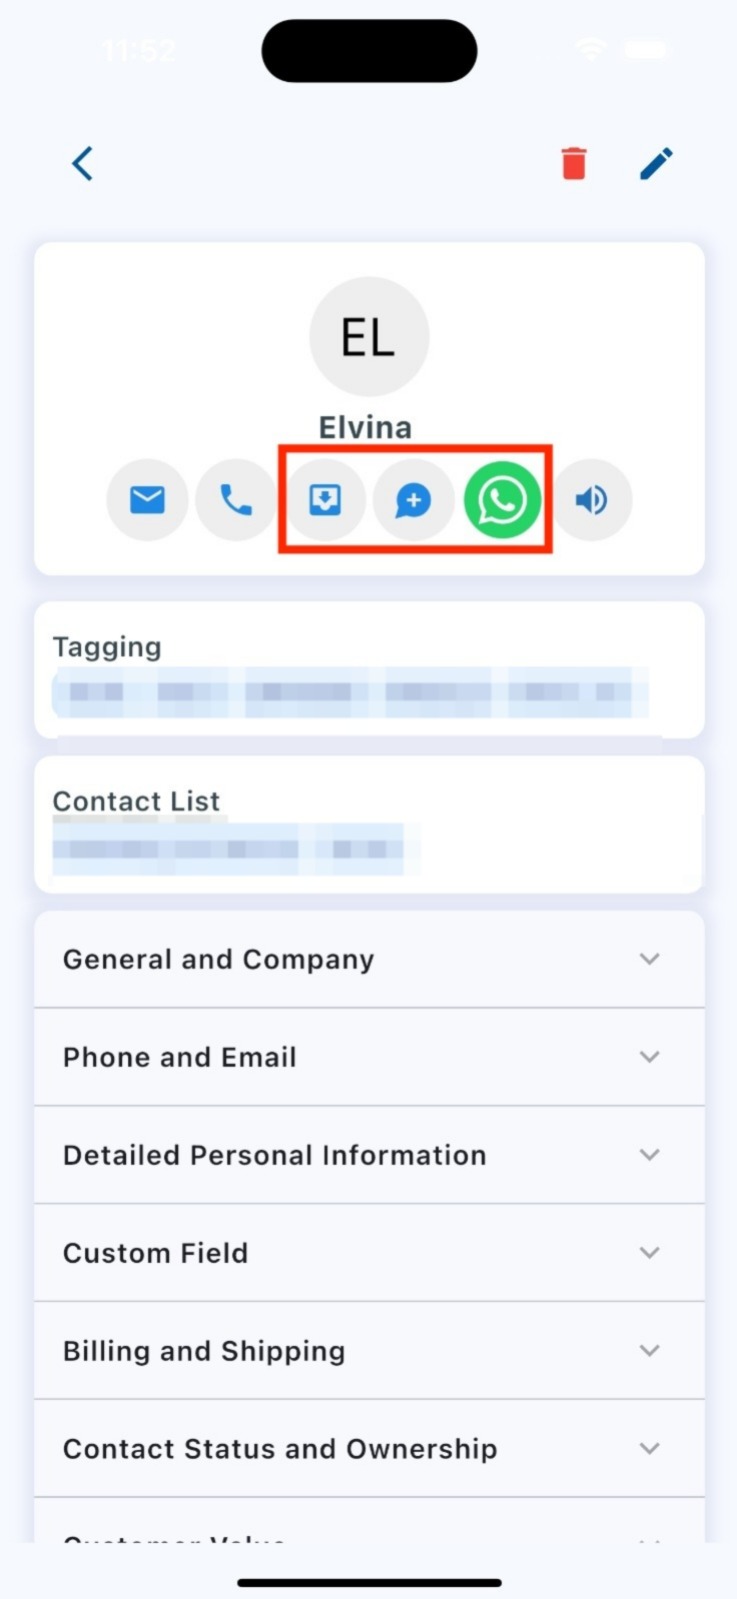
You will now see updated action icons:
First icon: Redirect to Inbox (based on the contact's latest contacted channel)
Second icon: Start a chat (available if the contact has a phone number)
Third icon: Open chat in WhatsApp (available if the contact has a phone number)
Select the action based on your preferred communication flow 🎯
11. Duplicate Keyword Detection in Flowbuilder 🎯
Created: Jun 15, 2026
What's New:
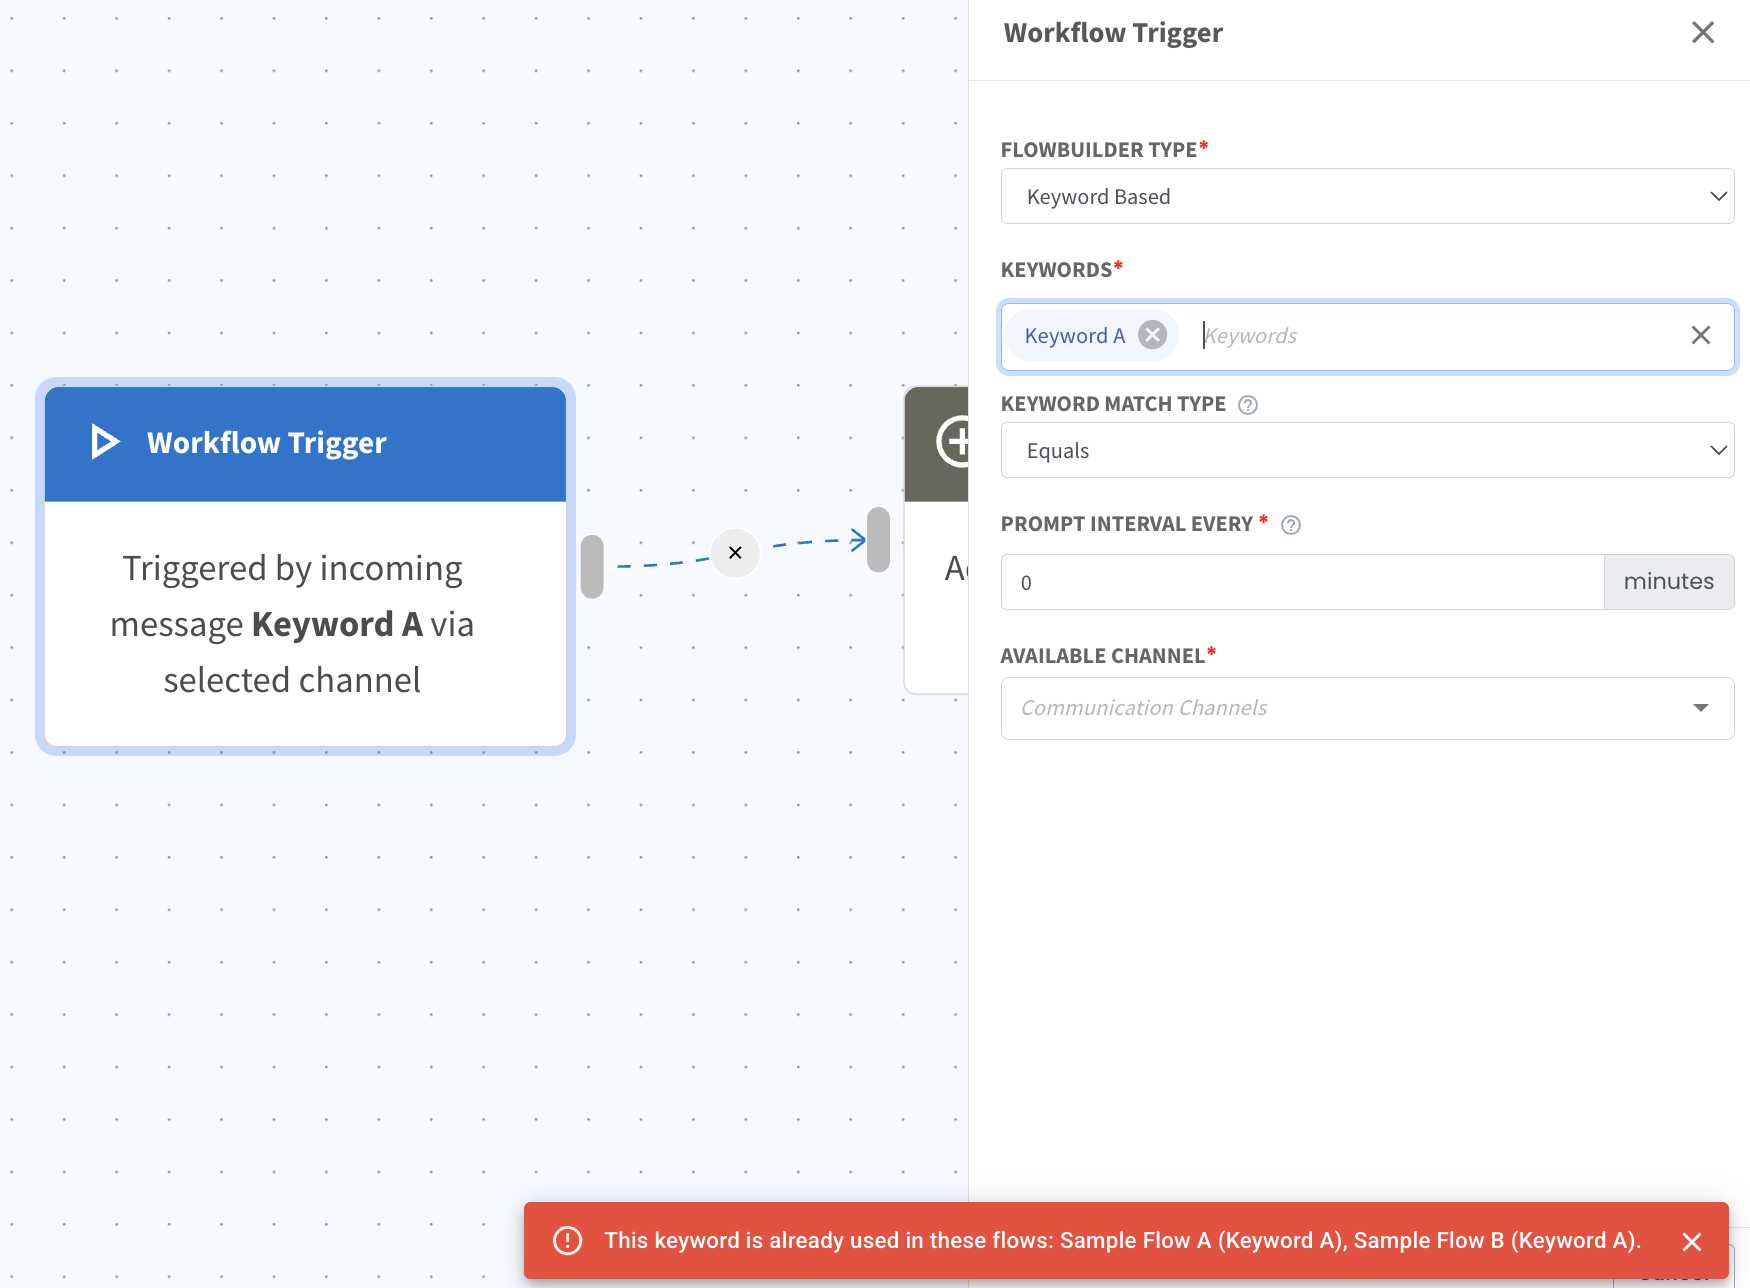
We’ve added a notification that appears when you enter a keyword that is already being used in another flow. The notification will show which flow(s) are using the same keyword 🎉
What it means to you:
You can now identify duplicate keywords more easily and avoid unintended conflicts between flows. This helps keep your automation organized and reduces setup errors 👍
With this enhancement, you can:
✅ Detect duplicate keywords while configuring flows
✅ View which flow(s) are using the same keyword
✅ Prevent accidental keyword conflicts
✅ Manage Flowbuilder keywords more efficiently 🚀
How you can go about it:
Head to Flowbuilder Module and create or edit a flow.
Click on the first node (Workflow Trigger) and select keyword based as trigger type.
Insert the keywords you want. If the keyword is already used in another flow, a notification will appear at the bottom right.
Review the flow name(s) shown in the notification.
Decide whether to keep the keyword or update it to avoid conflicts 🎯
12. Improved Ticket Round Robin Assignment 🎯
What's New:
You can now control how tickets are assigned in Flowbuilder Inbox Ticket Round Robin with more flexible assignment rules 🚀
What it means to you:
You now have more control over which chats are included in the assignment process, helping reduce unnecessary reassignment and keeping workflows clean and efficient ✅
With this enhancement, you can:
✅ Include previously assigned chats
✅ Apply assignment only to closed chats
✅ Apply assignment only to brand new chats
✅ Improve control over ticket distribution
✅ Keep your support workflow more organized 🎯
How you can go about it:
Go to Flowbuilder.
Create a Inbox Ticket Round Robin action.
Configure your assignment rules by selecting:
Include previously assigned chats
Apply only to closed chats
Apply only to brand new chats
Save your setup.
The rules will be applied immediately 🚀
To find out more about the option, can hover to the ? icon.
13. Enhanced Messenger/IG Button Template 💬📲
Created: Jun 3, 2026
What's New:
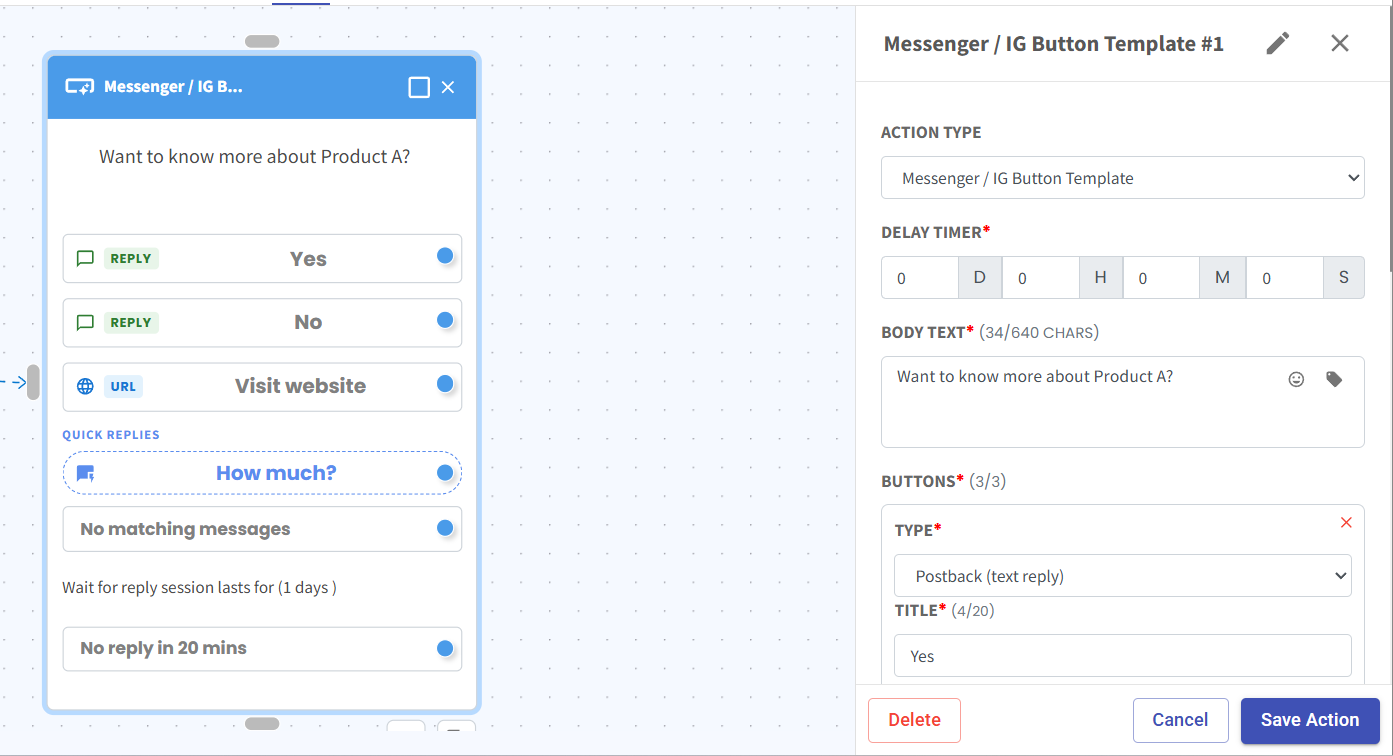
We’ve enhanced the existing Messenger/IG Button Template in Flowbuilder to support more flexible interactive message options 🎉
What it means to you:
You can now create more engaging and structured conversations using improved button components, helping customers respond and take action more easily ✨
With this enhancement, you can:
✅ Add Text Buttons for quick response options
✅ Add Website URL Buttons to redirect users externally
✅ Include Quick Replies for faster engagement
✅ Build more interactive and guided conversation flows
✅ Improve overall user experience and conversion flow 🚀
How you can go about it:
Go to Flowbuilder.
Create or open your flow.
Select Messenger/IG Button Template.
Add your preferred elements:
Text Button
Website URL Button
Quick Replies
Save and publish your flow 🚀
14. Detailed Flow Execution Logs 📊
Created: Jun 5, 2026
What's New:
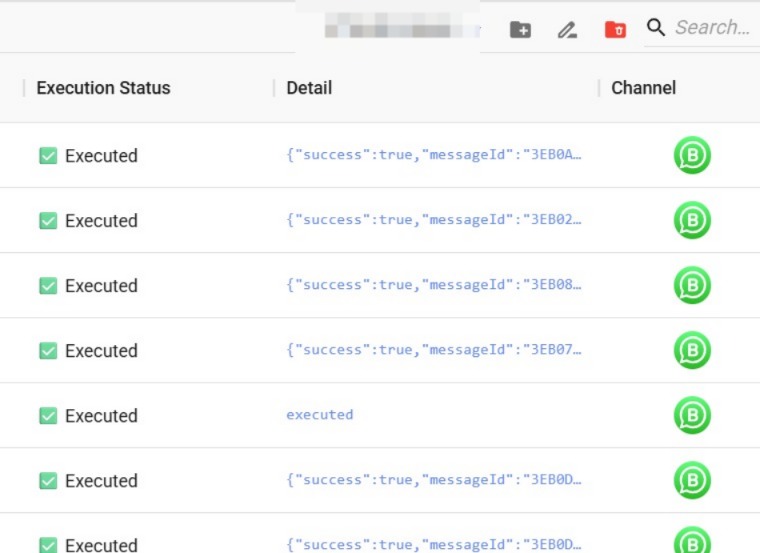
We've enhanced the Detail column in Flowbuilder Execution Logs 🎉
What it means to you:
You can now easily track the status of each message in your flow and understand why a specific step was successful or failed. This makes troubleshooting and monitoring your automations much more efficient 🔍✨
With this enhancement, you can:
✅ View the status of each message in a flow
✅ Identify successful and failed flow actions
✅ Understand failure reasons more easily
✅ Troubleshoot flow issues faster
✅ Improve visibility into flow performance 🚀
How you can go about it:
Go to the Flowbuilder Module.
Edit the flow you would like to review.
Click on Execution Logs.
View the Detail column to track the status and outcome of each flow message 📊✨
15. Flowbuilder Now Shows Media Previews 🖼️
What's New:
When you select a WhatsApp template with a media header, a preview of that media now appears directly in the Flowbuilder action view. ⚡
What it means to you:
You can see the attached image or video at a glance without opening any links. This saves you time and makes your workflow much smoother. ✅👀
How you can go about it:
1. Open the Flowbuilder and select a Send WA API Message action.
2. Choose a template that includes a media header.
3. View the media preview right there in the panel — no extra clicks needed. 🎉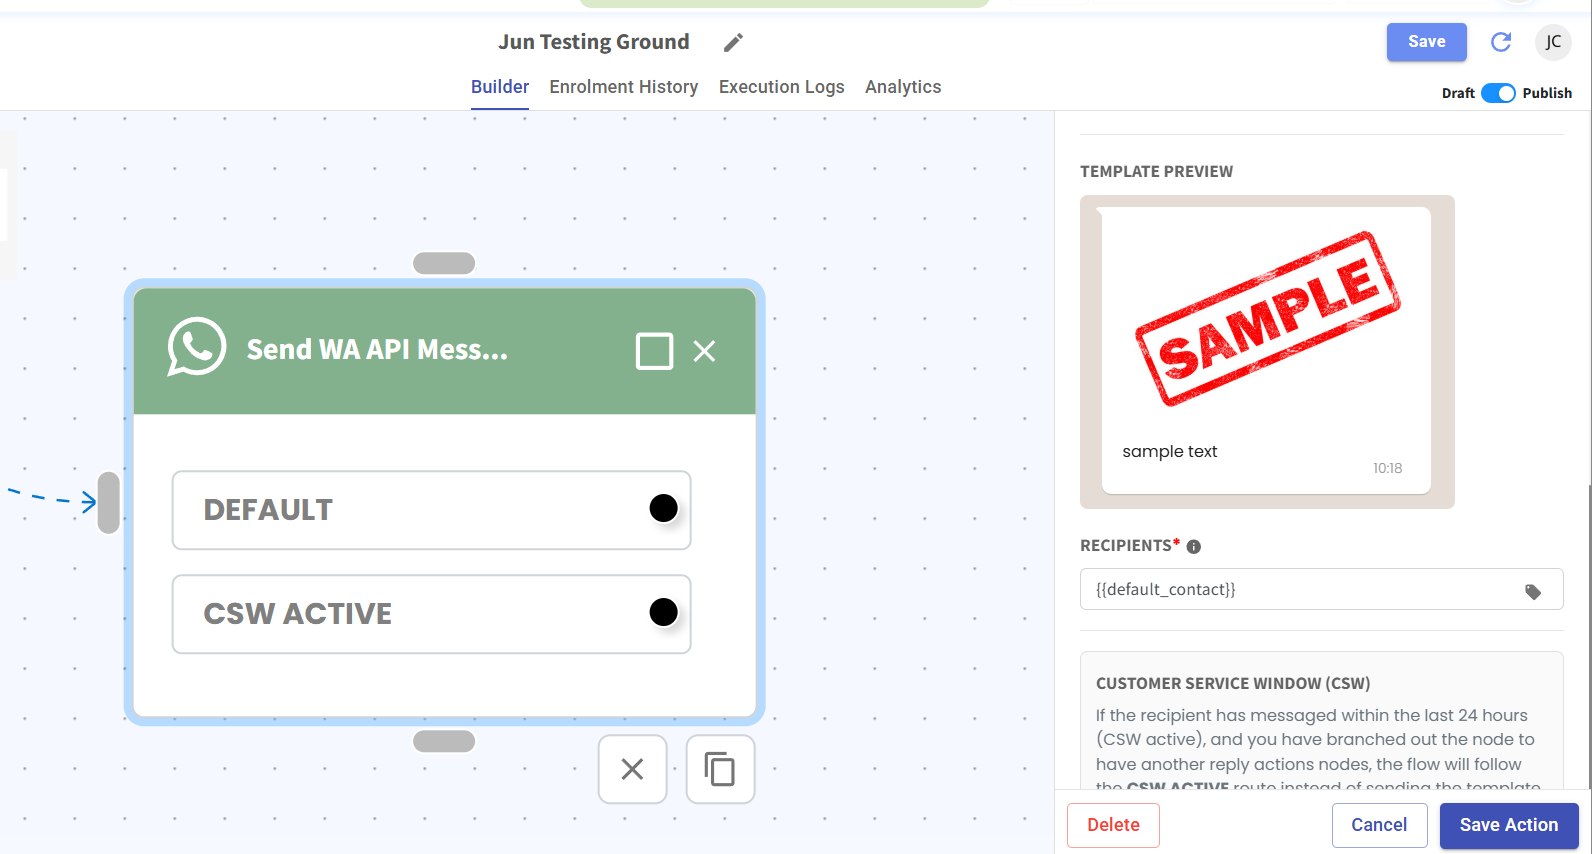
16. Create Tasks Right from Your Inbox 📝
What's New:
You can now create task reminders directly inside your inbox. Tasks can now notify you through the app, not just email. 📬📱
What it means to you:
This keeps your reminders in one central place. You will no longer miss important tasks that were buried in your email. 🎯✨
How you can go about it:
1. Go to Inbox Module and click on a chat.
2. Scroll down at the right side and find Tasks.
3. Click on the + icon to add task and input the task details.
Your task is now ready with email and app notifications 🚀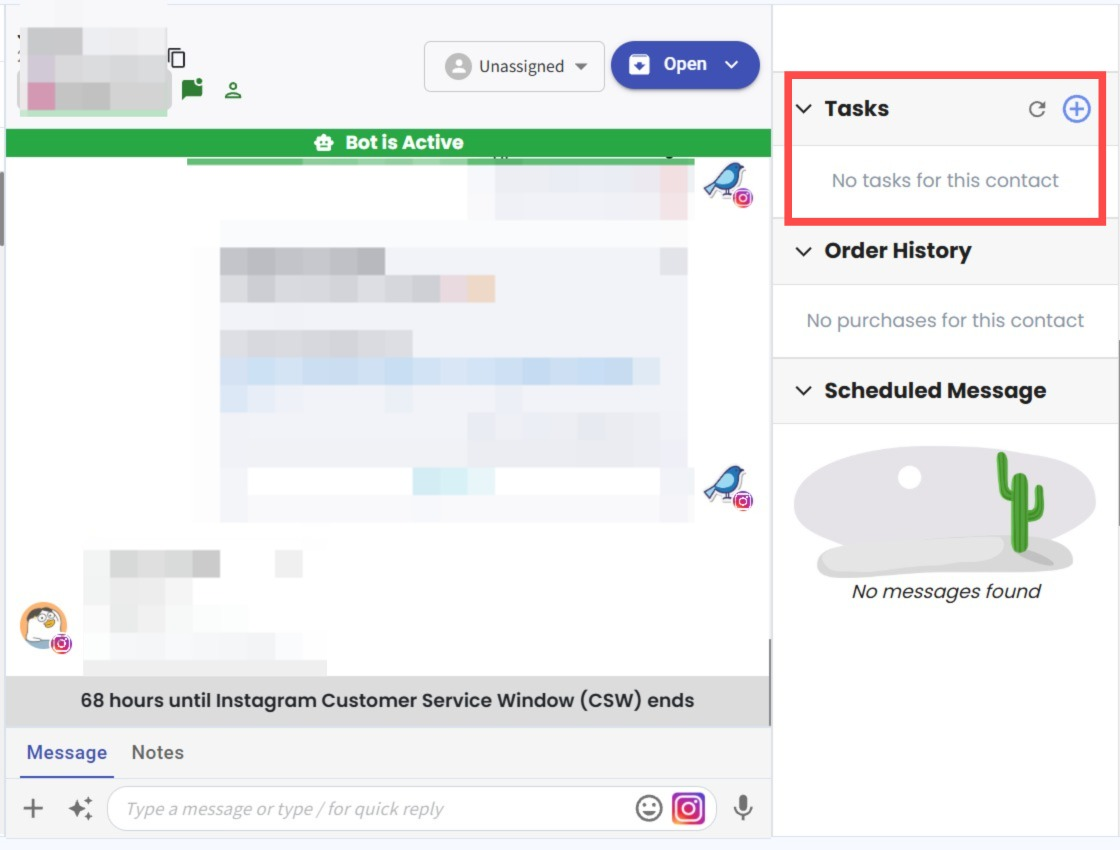
17. Bulk Upload Files to Storage 📂🚀
What's New:
You can now upload multiple files at once in Storage Module using either drag-and-drop or file selection 🎉
What it means to you:
Managing files is now faster and more flexible. You can bulk upload multiple files in one go, and easily reuse or share media links with new copy options ⚡
With this enhancement, you can:
✅ Upload multiple files in a single action
✅ Drag and drop files directly into Storage Module
✅ Select multiple files via the upload file
✅ Copy media short tag for quick reuse
✅ Copy file URL for sharing or reference
✅ Manage files more efficiently without repetitive uploads 🚀
How you can go about it:
Go to the Storage module.
Click Add New on the top left to create a new folder or upload file.
Click File Upload, bulk select your files and upload them.
ORDrag and drop multiple files directly into Storage.
Once uploaded, you can click on the icons at the right side to:
Copy Media Short Tag
Copy File URL
Files will be uploaded and ready to use automatically 🎉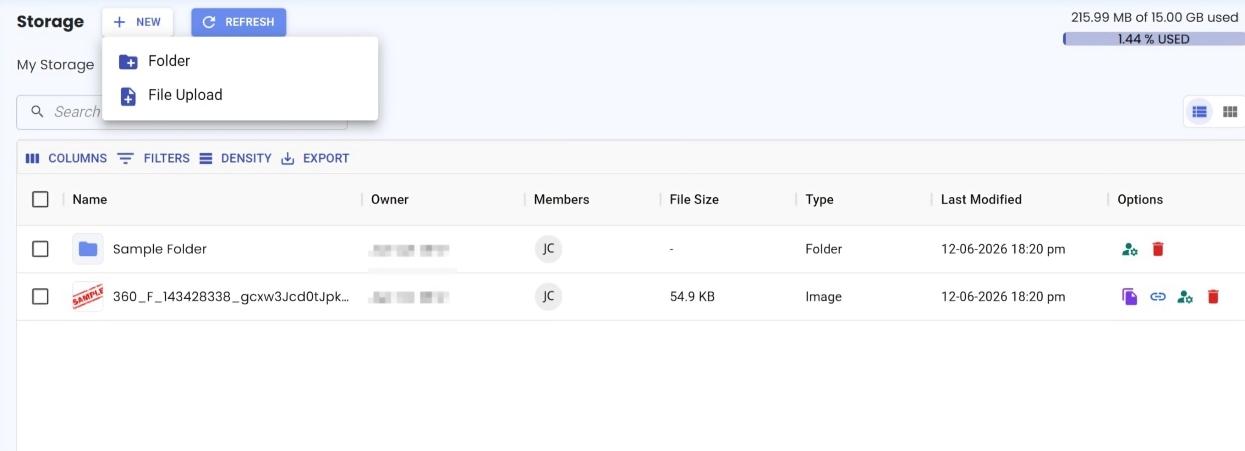
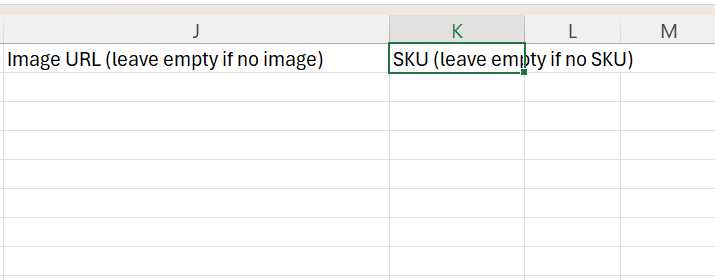
18. Product Template Now Supports Image URL Column 🖼️📦
What's New:
We’ve added a new Image URL column in the Product Template file 🎉
What it means to you:
You can now include product images directly during import by adding image URLs, making product setup faster and more complete ✨
With this update, you can:
✅ Add product images via URL in the template file
✅ Automatically create products with images during import
✅ Improve product listing completeness and consistency
✅ Speed up product setup process 🚀
How you can go about it:
Download or open your Product Template file.
Fill in the Image URL column with valid image links.
Upload and import the file into the system.
Products will be created with images automatically 🎉

19. SKU Field Added to Product Module📋
What's New:
We’ve added SKU (Stock Keeping Unit) field in Product Module 🎉
What it means to you:
You can now assign unique identifiers to your products, making it easier to manage inventory, perform batch updates, and improve data accuracy 📊
How you can go about it:
Go to the Product Module.
You can update SKU in two ways:
Edit Product and fill in the SKU field
ORClick the three dots next to New Orders and select Import Product
Download the Product Import Template.
Fill in the SKU column for each product.
Upload the file and import your products 🚀
____________________________________________________________________________
This wraps up the June 2026 update. We truly appreciate your continued support and trust in Strive. Stay tuned for more exciting improvements coming your way in the next update 🙂