Strive March 2026 Updates 🚀
March 2026 Update
Dear Strivers,
As we begin April, here’s a look back at what we released in March 2026. Selamat Hari Raya to those celebrating with family and friends. We’ve made a few enhancements to improve everyday usage. Our goal is to keep things simple and helpful for everyone. Read on to view the updates.

____________________________________________________________________________
Enhancements
1. Flow Simulation for Easy Testing ▶️
You can now test your flow without sending real 开心 messages to your customers. Simply open Flowbuilder, click the play icon at the bottom right of the page, and the simulation screen will appear. Then click Start Simulation to see how your flow runs from beginning to end.
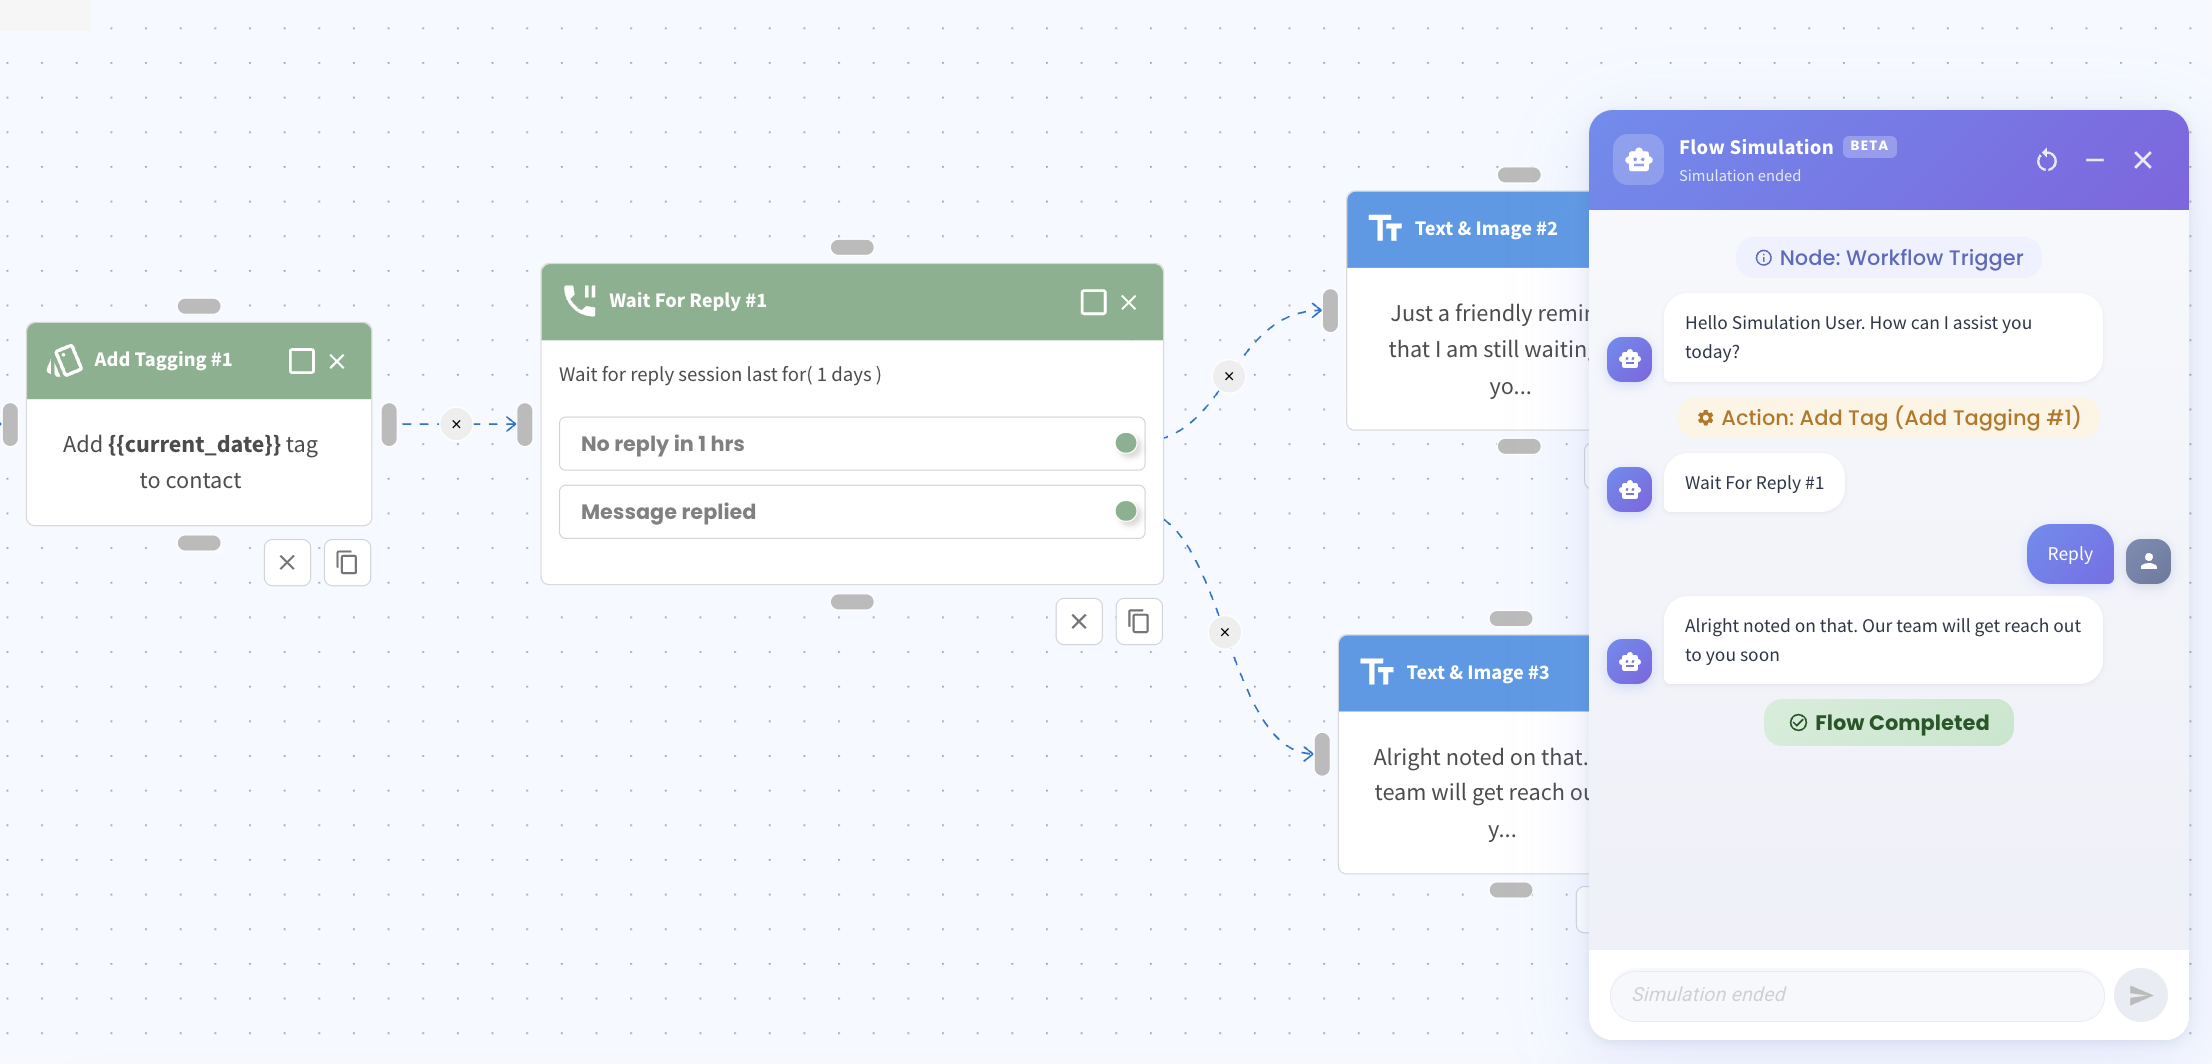
The simulation lets you review each step such as messages, conditions, and actions in a safe testing environment. You can check if everything works correctly before turning the flow live. This gives you a clear preview of the full customer journey without affecting actual data.
This enhancement helps you test and improve your automation confidently, so your workflows work exactly as planned. ✅
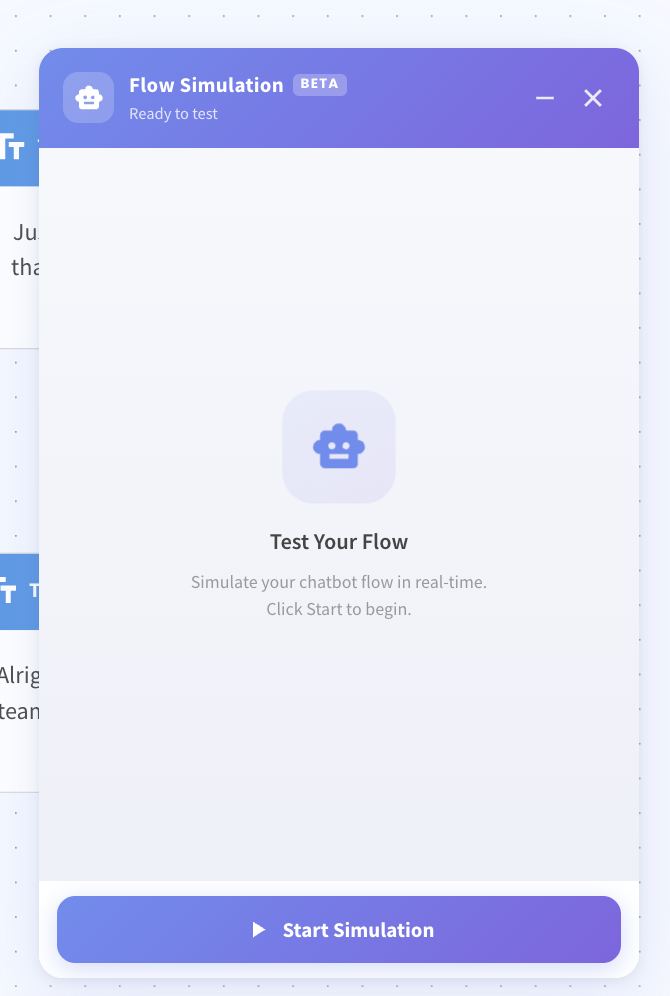
Here is a preview of how the Simulation looks like:
2. Mark Multiple Chats as Read in One Click 📬
What’s New:
You can now mark multiple Inbox chats as read at the same time. ✔️
Instead of opening each chat one by one, you can select multiple chats and update them together.
What it means to you:
You can clear unread chats much faster without going through each conversation. ⚡
This helps you manage your Inbox more efficiently, especially when handling many messages.
How you can go about it:
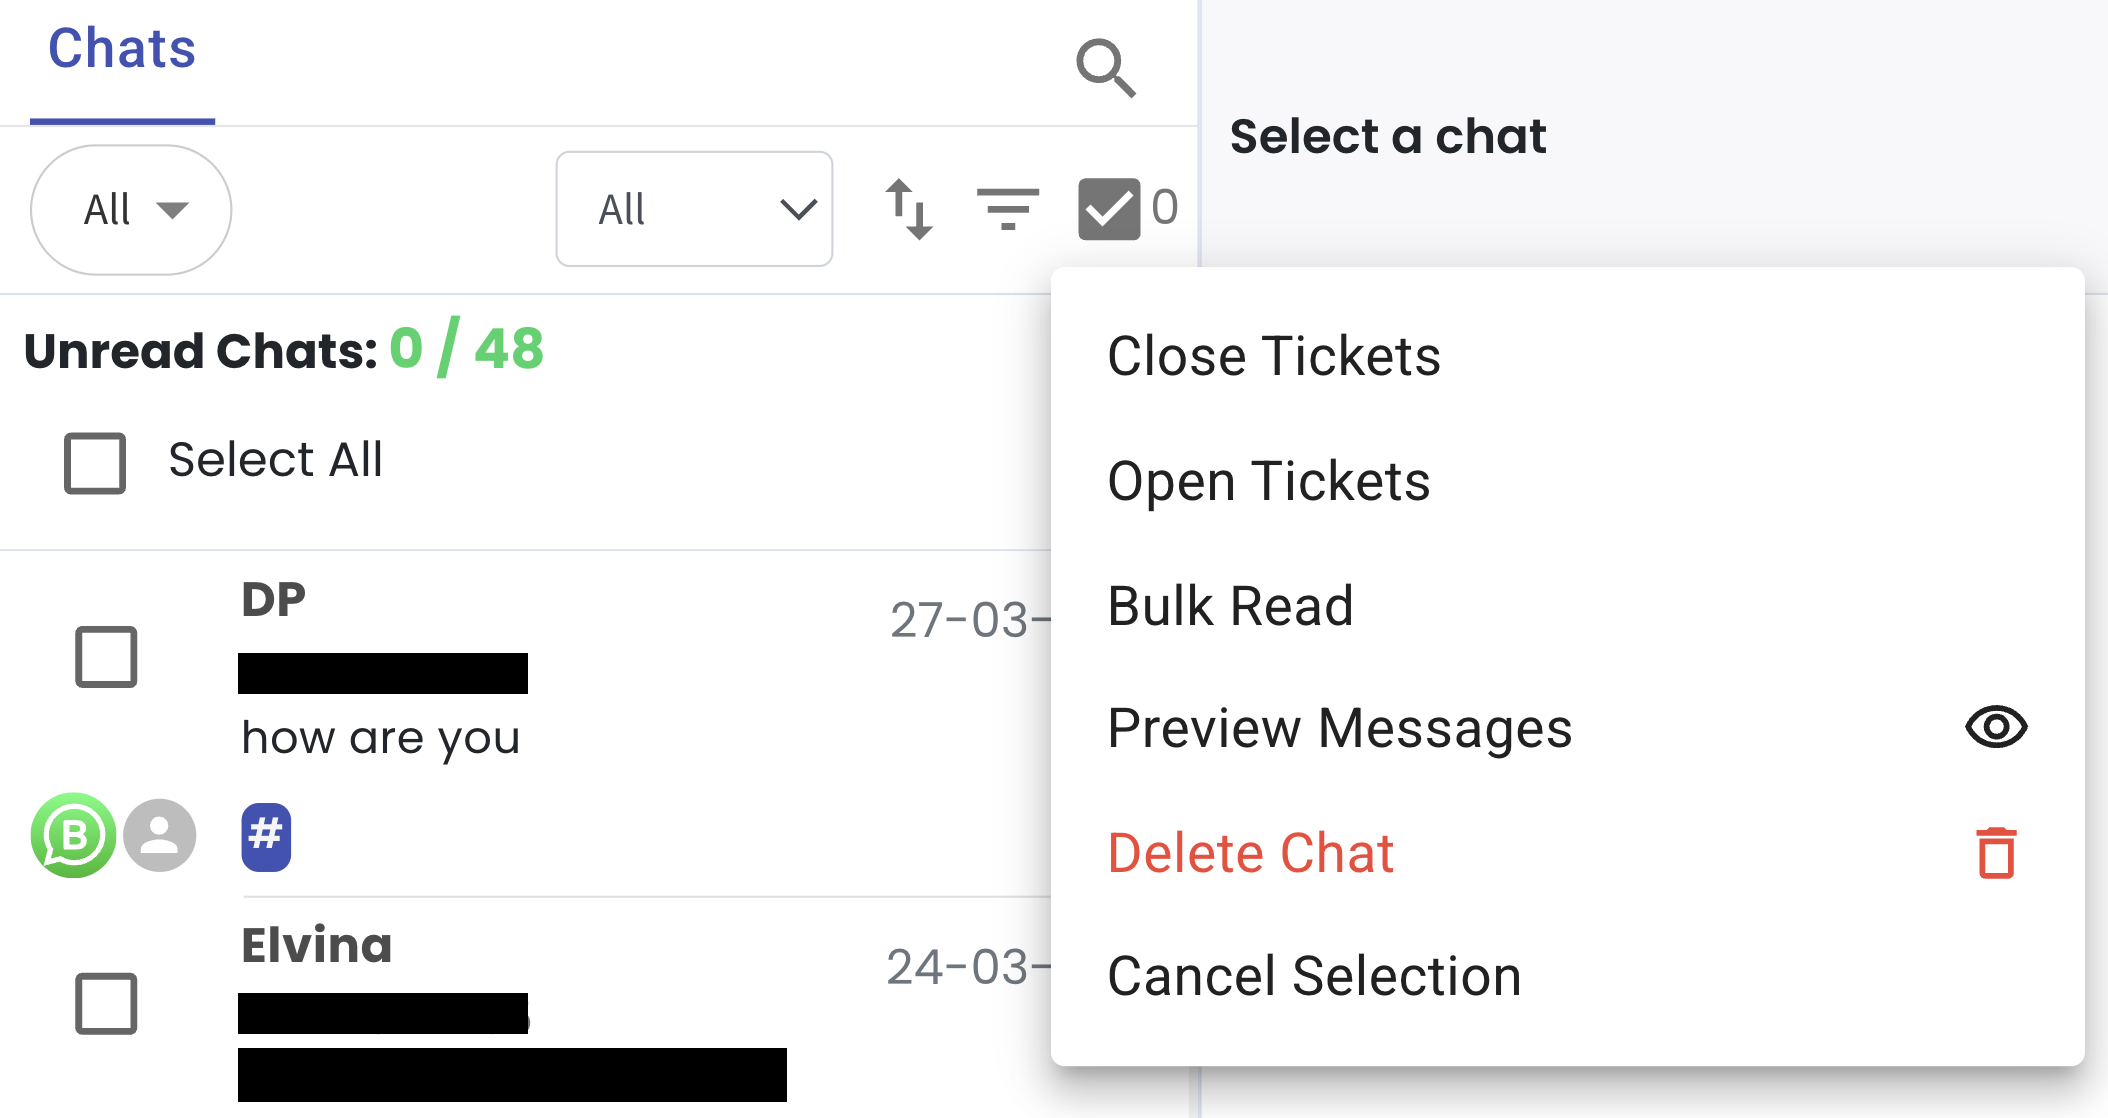
Click on the checkbox to enable selection
Select the chats you want to mark as read
Click the checkbox menu
Select Bulk Read
You can refer to this guide on how to bulk read Inbox chats: Guide
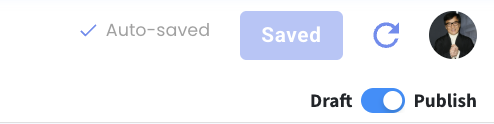
3. Flowbuilder Now Saves Changes Automatically 💾
What’s New:
Your Flowbuilder will now auto save whenever you make changes. ✨
Once a flow has been saved before, any updates you make will be saved automatically without needing to click save again.
What it means to you:
You no longer need to worry about losing your changes while editing flows. 🔒
This makes building and updating flows smoother and more convenient.
How you can go about it:
For a new flow, click Save manually for the first time
Click the refresh icon next to the save button
Continue editing your flow
For existing flows, any changes will be auto saved without needing to press save again.
Note: Auto save only works for flows that have already been saved at least once.
4. Track Flow Performance with Flowbuilder Analytics 📊
What’s New:
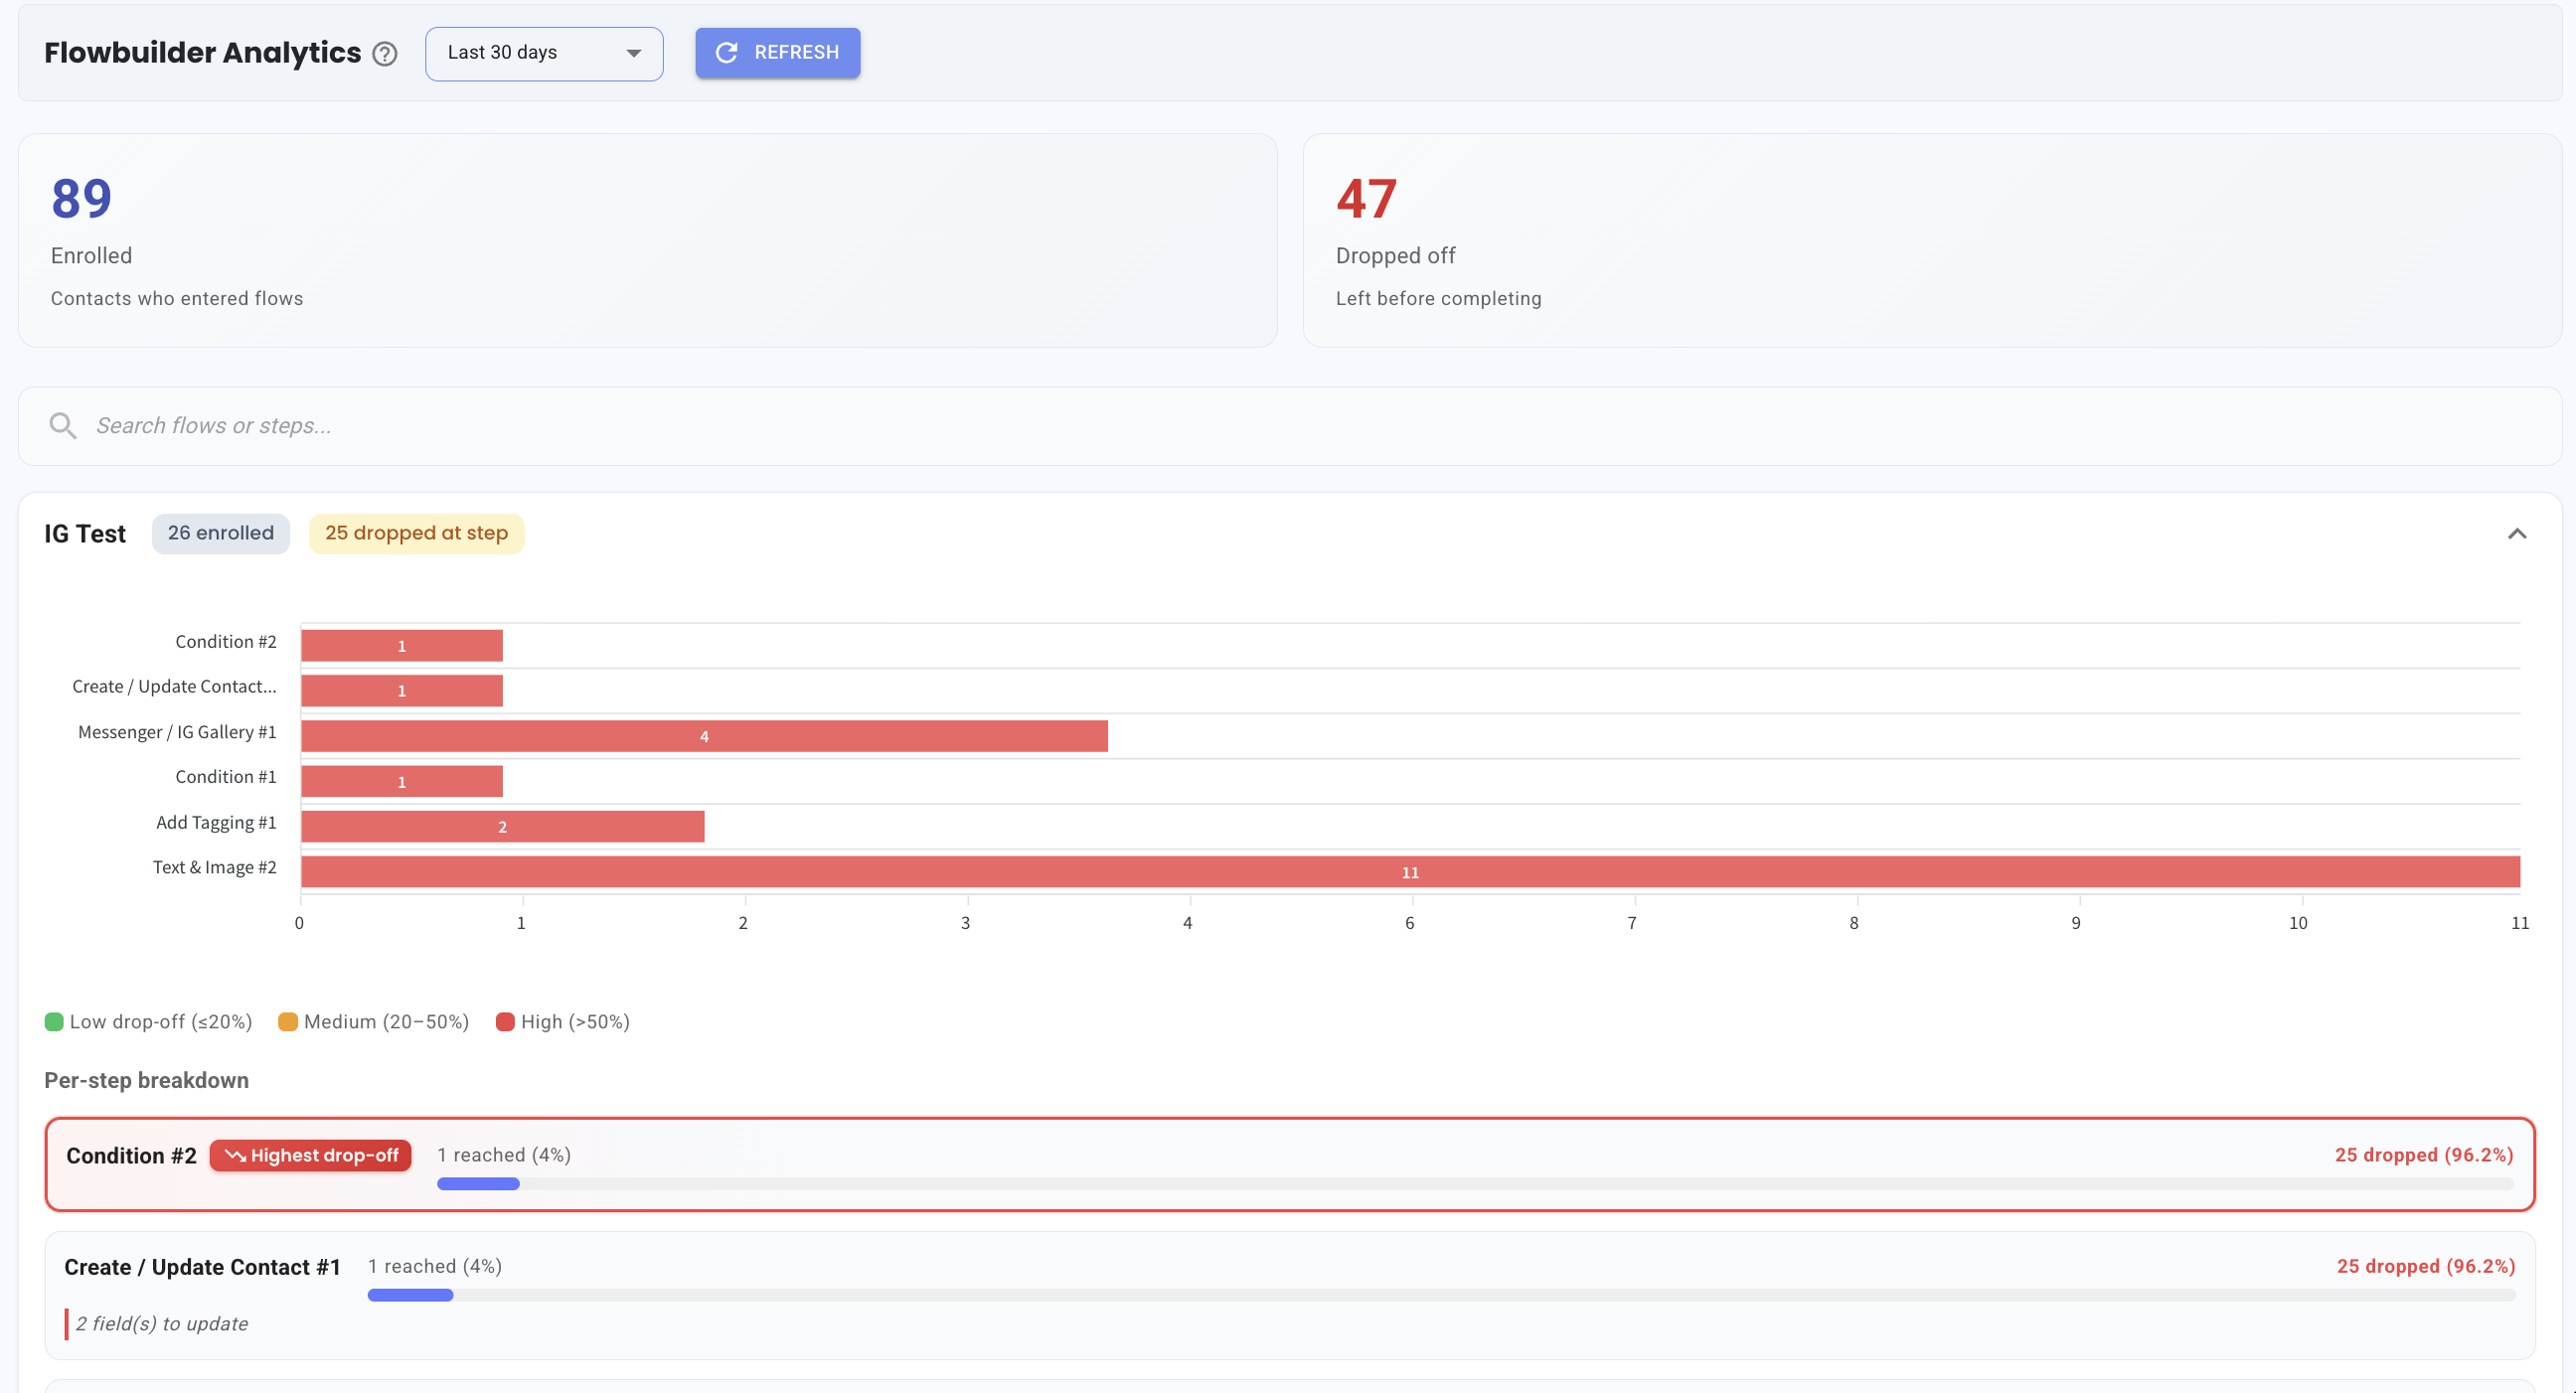
You can now view Flowbuilder Analytics to see how your flows are performing. 📈
This includes the number of contacts who entered the flow and how many dropped off at each step.
What it means to you:
You can quickly identify where contacts are dropping off in your flow. 👀
This helps you spot weak points and improve your flow to keep more contacts engaged.
How you can go about it:
Go to the Flowbuilder Analytics section
Select your preferred date range
Click the Flow dropdown to view more details
Scroll down to see the step by step breakdown
Identify which step has the highest drop off
This gives you a clear view of how your flows are performing and where improvements can be made.
5. Easier Reconnect for Messenger and Instagram Channels 🔗
What’s New:
You can now reconnect or add more Messenger and Instagram pages more easily. 📱
If you have connected before, you can simply choose which pages to allow without going through extra steps again.
What it means to you:
You can quickly connect or reconnect the pages you need without repeating the full setup. ⚡
This makes managing multiple pages simpler and faster.
How you can go about it:
Go to Inbox module
Click on Chat Channels
Click Connect Now for Messenger or Instagram
Click Choose what you allow
Select the pages you want to connect
Click Continue
This allows you to easily manage and update your connected pages anytime.
6. Randomised Public Replies for Facebook Comment Flows 🔄
What’s New:
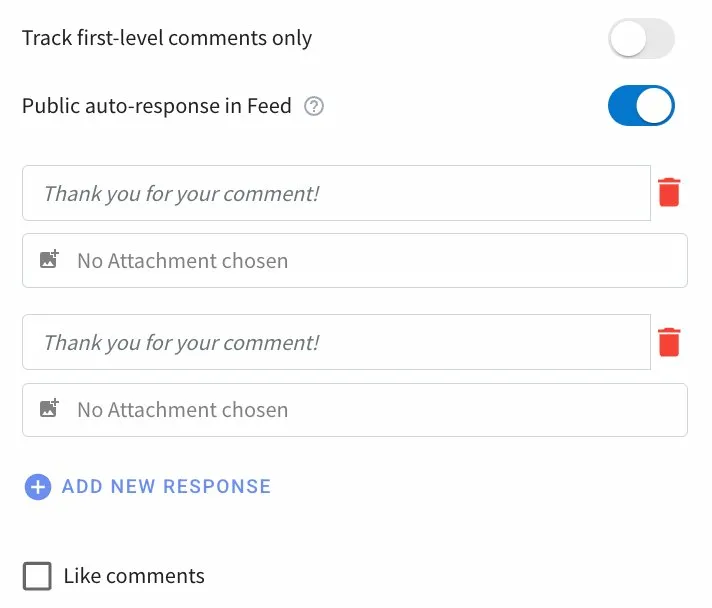
Your public responses for Facebook based flows will now be sent in a randomised way. 💬
If you add multiple responses, one of them will be picked randomly when replying to comments.
What it means to you:
Your replies will look more natural and less repetitive. 👀
This helps avoid replies appearing too similar and reduces the chance of being seen as automated or spam.
How you can go about it:
Set up your Facebook based flow
Turn on Public auto response in Feed
Add multiple public responses in the response section
The replies will be sent randomly from your list
7. Flowbuilder Action Remove from WA API Campaign 🗑️
What’s New:
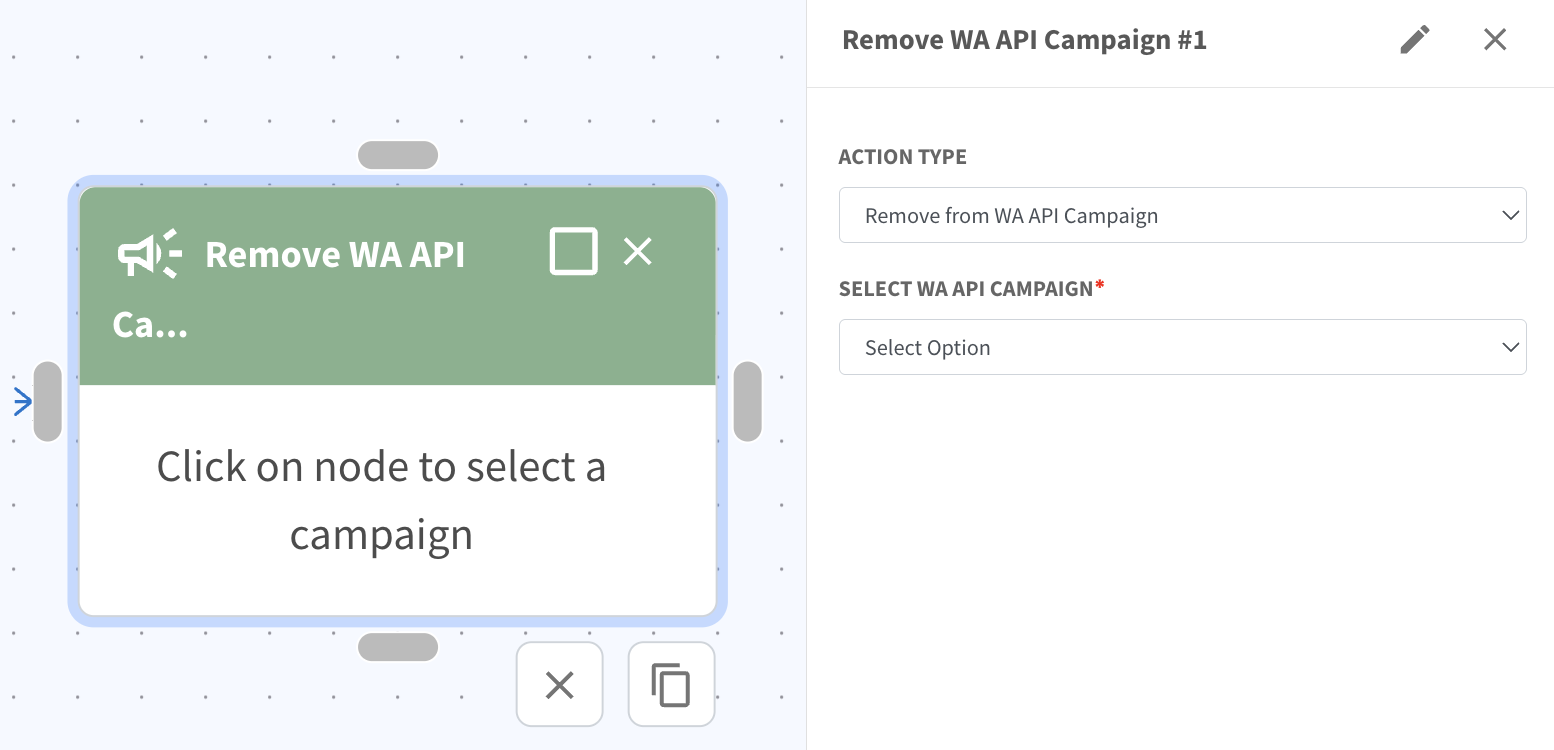
You can now use the Remove from WA API Campaign action in Flowbuilder. 📤
This allows you to automatically remove a contact from a selected campaign based on a trigger such as unsubscribe or opt out.
What it means to you:
You can ensure contacts who opt out are removed automatically without manual work. ⚡
This helps keep your campaign audience accurate and prevents sending messages to the wrong contacts.
How you can go about it:
Create or open your flow in Flowbuilder
Add the Remove from WA API Campaign action
Select the campaign name
Save the action
Complete the rest of your flow as needed
Click Save Flow
This will automatically remove the contact from the selected campaign when the condition is met.
8. Track Leads by Date Range in Conversion 📅
What’s New:
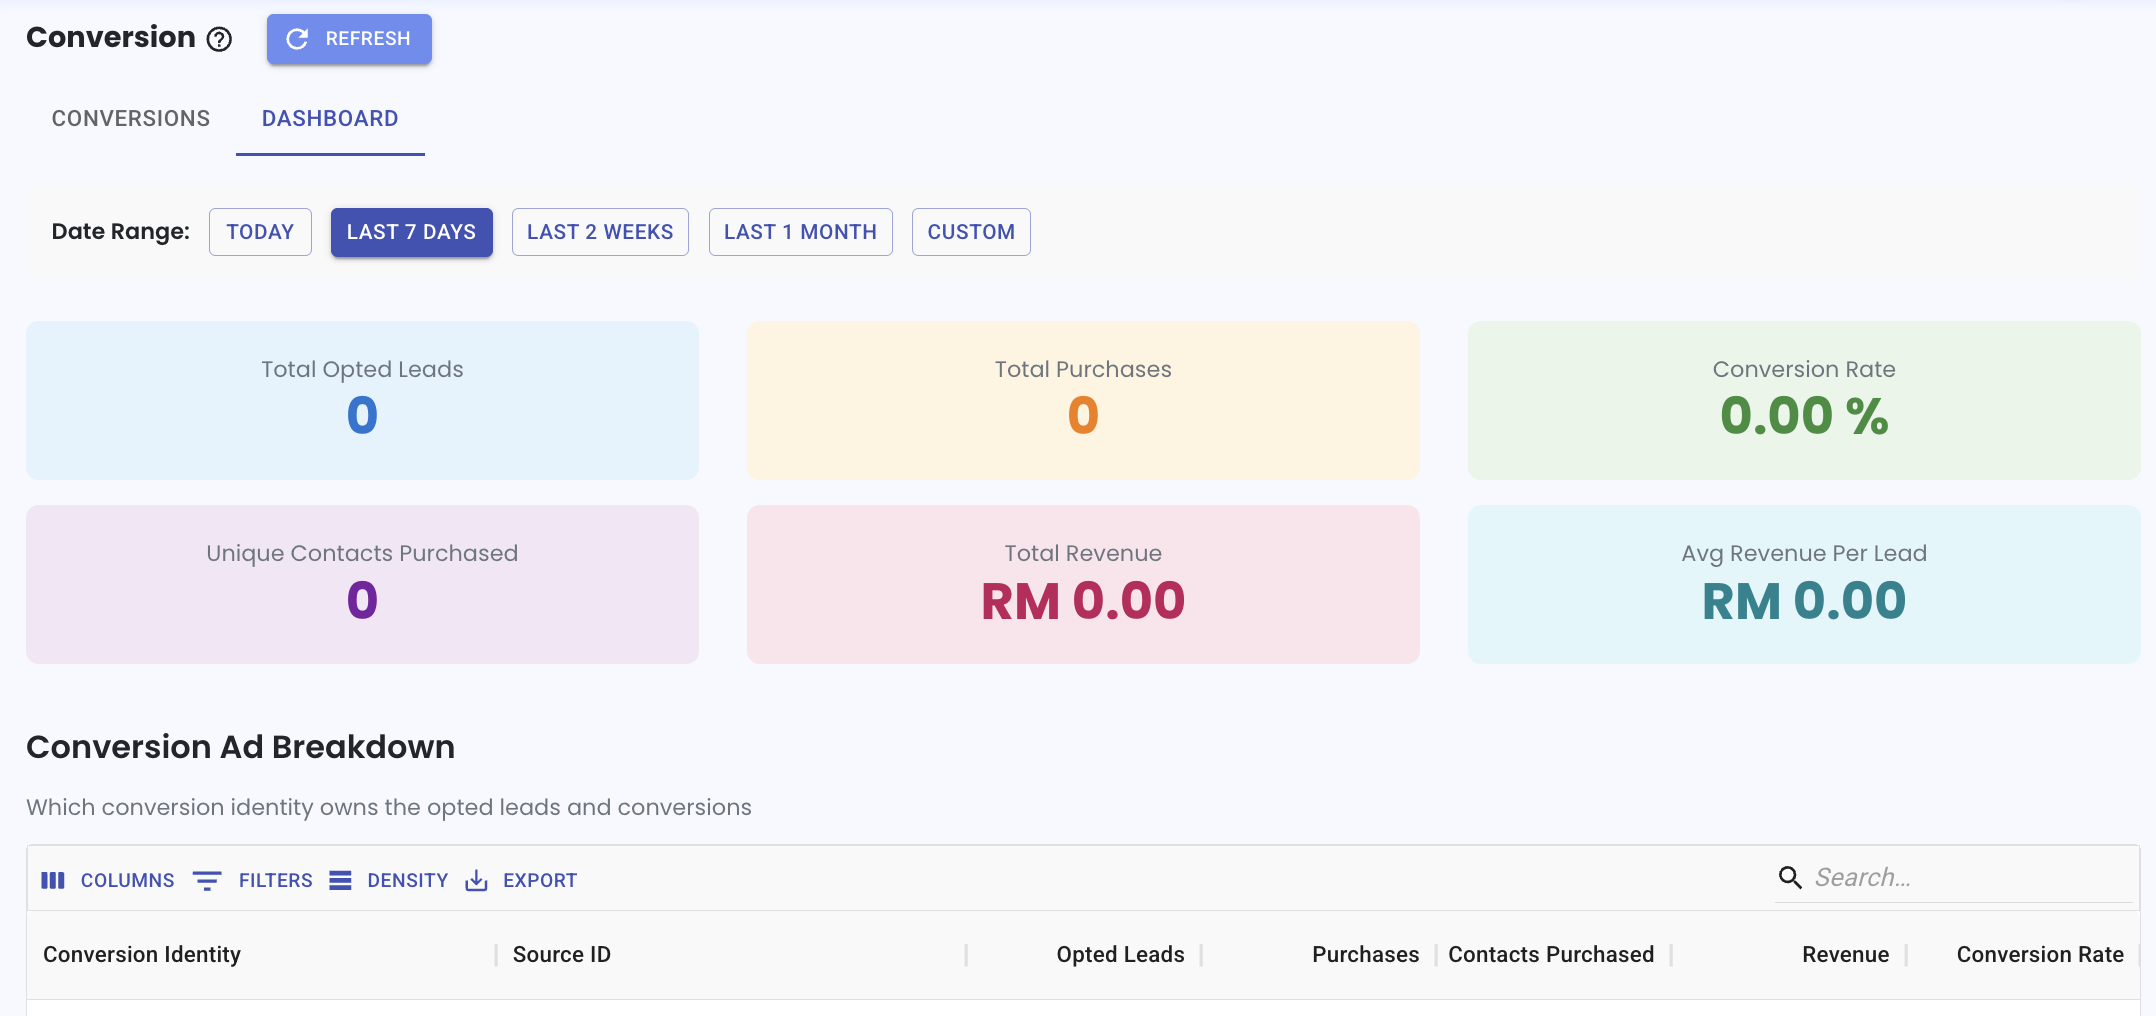
You can now view how many leads are generated from your ads based on a selected date range. 📊
This gives you a clear overview of lead performance within a specific time period in one view.
What it means to you:
You can easily compare how your ads are performing across different time ranges. 👀
This helps you understand trends and track whether your campaigns are improving over time.
How you can go about it:
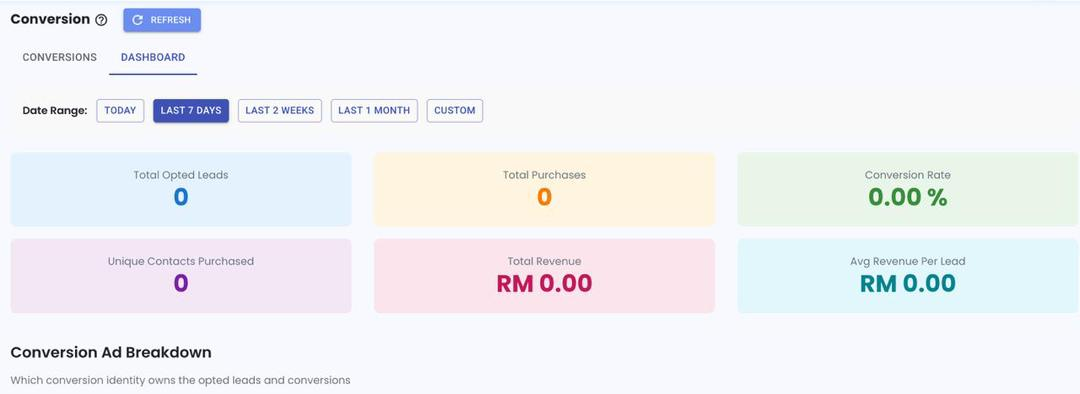
Go to the Conversion module
Click the eye icon to view conversion details
Click on Dashboard
Select your preferred date range such as Today, Last 7 Days, or Custom
The dashboard will update based on the selected date range to show the leads generated.
9. Add New Tags Directly in Condition Action 🏷️
What’s New:
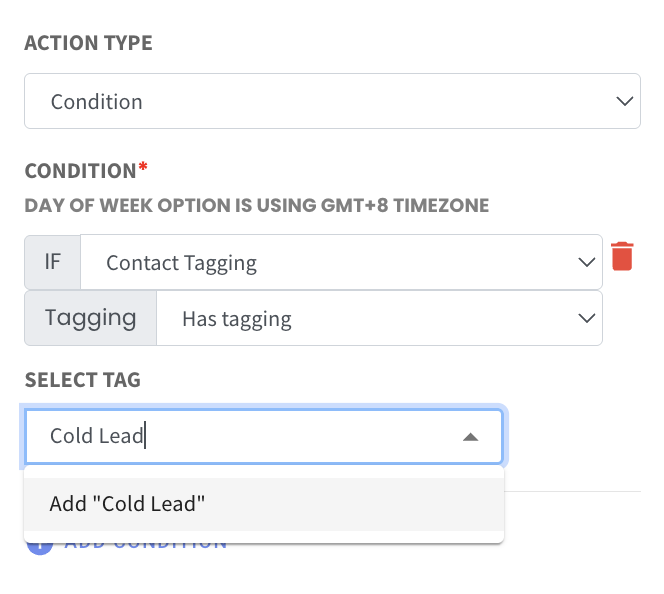
You can now type and add a new tag directly when setting a Contact Tagging condition in Flowbuilder. ✍️
If the tag has not been used before, you can simply enter the tag name and add it on the spot without needing to adding it to the contact earlier.
What it means to you:
You can set up your conditions faster without switching to create tags. ⚡
This makes your flow setup smoother and more flexible when defining conditions.
How you can go about it:
In Flowbuilder, select the Condition action
Choose Contact Tagging
Select Has tagging or Has no tagging
Type the tag name in the Select Tag field
Click to add the new tag if it does not exist
10. Preview Recent Messages in Inbox 💬
What’s New:
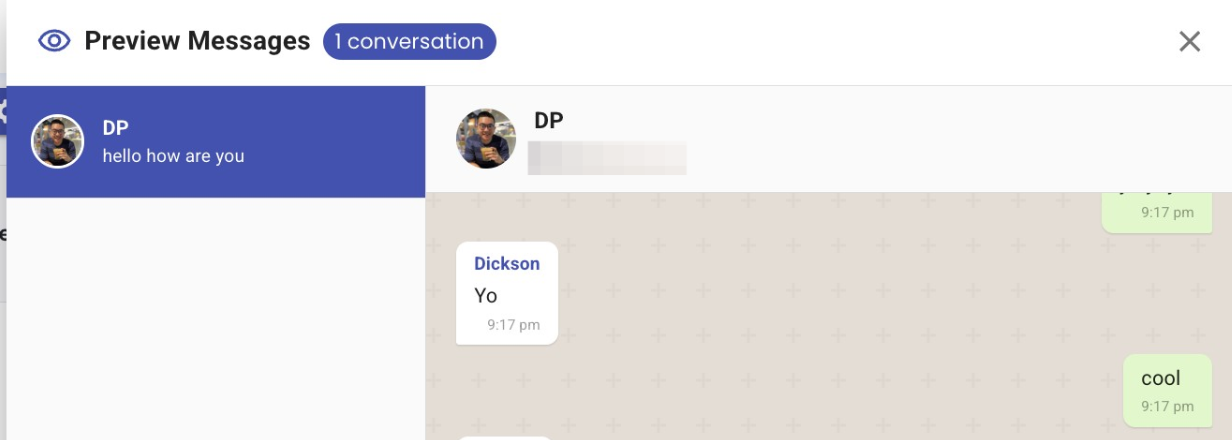
You can now preview recent messages directly in the Inbox without opening the chat. 👀
This allows you to quickly read the latest messages and understand the conversation at a glance.
What it means to you:
You can check what the contact said without clicking into every chat. ⚡
This helps you respond faster and decide which conversations need attention first.
How you can go about it:
Follow this step by step guide to preview chats in Inbox:
https://scribehow.com/viewer/How_to_Preview_Chat_in_Inbox__HiEaYvCxQDmag-G756-dug
11. View Flows by Folder When Triggering a Flow 📂
What's New:
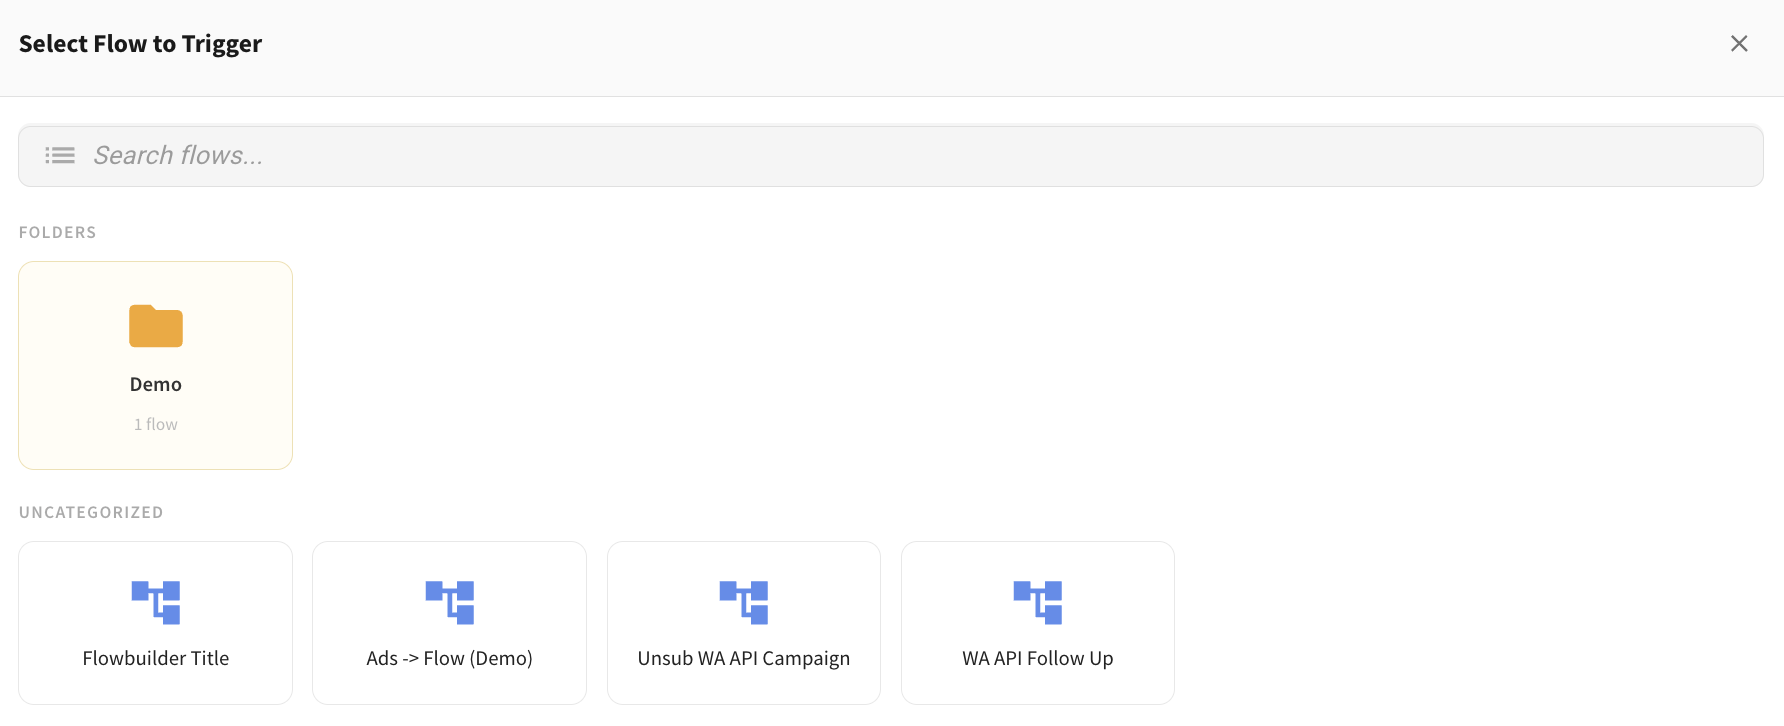
When you click on the Trigger Flow button in Inbox, you will now see flows organized by folders. 📋
Folders will appear at the top, and flows under Uncategorized will be shown below for easier browsing.
What it means to you:
You can clearly see how your flows are grouped and quickly find the right one without searching through a long list. 👀
This makes it easier to navigate and helps prevent triggering the wrong flow, especially when you have many flows with similar names.
How you can go about it:
Click on Trigger Flow in the Inbox
View the list of folders shown at the top
Click on a folder to see the flows inside it
Select the flow you want to trigger
Flows that are not in any folder will appear under Uncategorized by default.
12. Search Flows by Folder Name in Inbox 🔎
What’s New:
You can now search for flows based on the folder name when triggering a flow. 📂
This makes it easier to locate flows that are grouped under specific folders without scrolling through the full list.
What it means to you:
You can find the right flow faster, especially when you have many flows stored in different folders. ⚡
This reduces time spent searching and helps you trigger the correct flow more efficiently.
How you can go about it:
Option 1:
In the chat, type /
Start typing the folder name
The flows inside that folder will be displayed
Option 2:
Click on Trigger Flow
Type the folder name in the search bar
The flows inside that folder will be displayed
This allows you to quickly access flows based on how you have organised them.

13. View Lead Generation Report in Conversion 📊
What’s New:
You can now easily view your lead generation report in the Conversion module. 📈
This dashboard shows how many leads are generated from your ads and gives you a clear overview of your performance.
What it means to you:
You can quickly see how many leads your ads are bringing in, making it easier to track your campaign performance. 👀
The report counts based on unique contacts, so if the same person clicks your ad multiple times, it will still be counted as one lead.
How you can go about it:
Hover your mouse over the Report icon
Click on Conversion
Select Dashboard
Note: This works best when using WA API or Coexistence, and is not suitable for WA Personal. 📱
14. Delete Chat in Inbox 🗑️
What's New:
You can now delete chats directly from your Inbox. This gives you more control over managing your chats. ✨
What it means to you:
Removing unwanted chats helps keep your Inbox clean and organised.
Once a chat is deleted, it cannot be undone, so make sure you are selecting the right one. ⚠️🧹
How you can go about it:
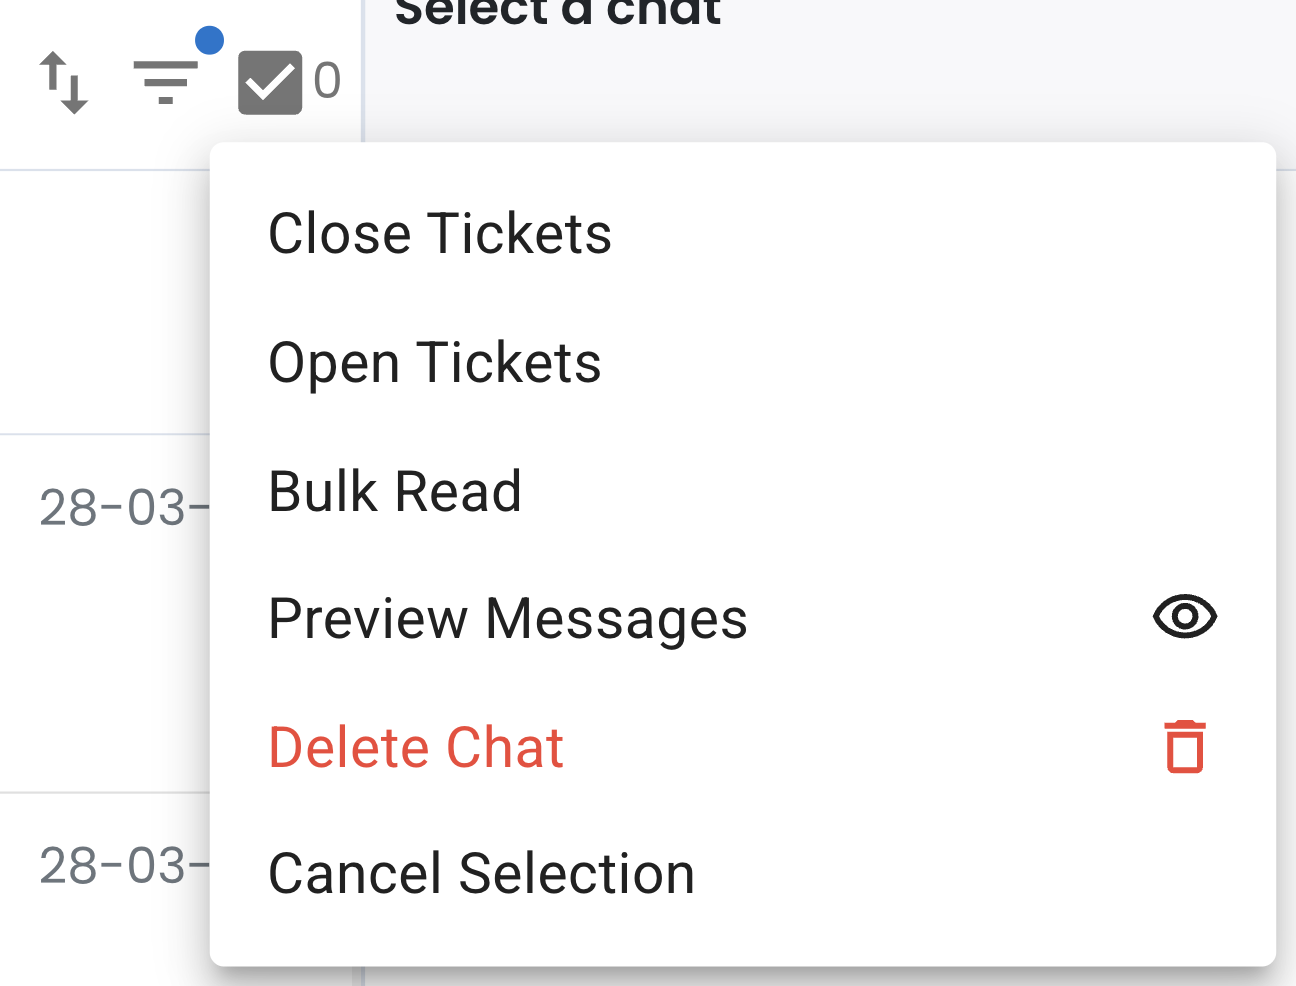
Head over to Inbox and click the checkbox icon.
Select the chat(s) you want to delete.
Click the checkbox icon again, then choose "Delete Chat" from the options.
You can also refer to this guide for the detailed steps: Delete Chat
15. Bulk Update Product Custom Fields in One Go 🛠️
What’s New:
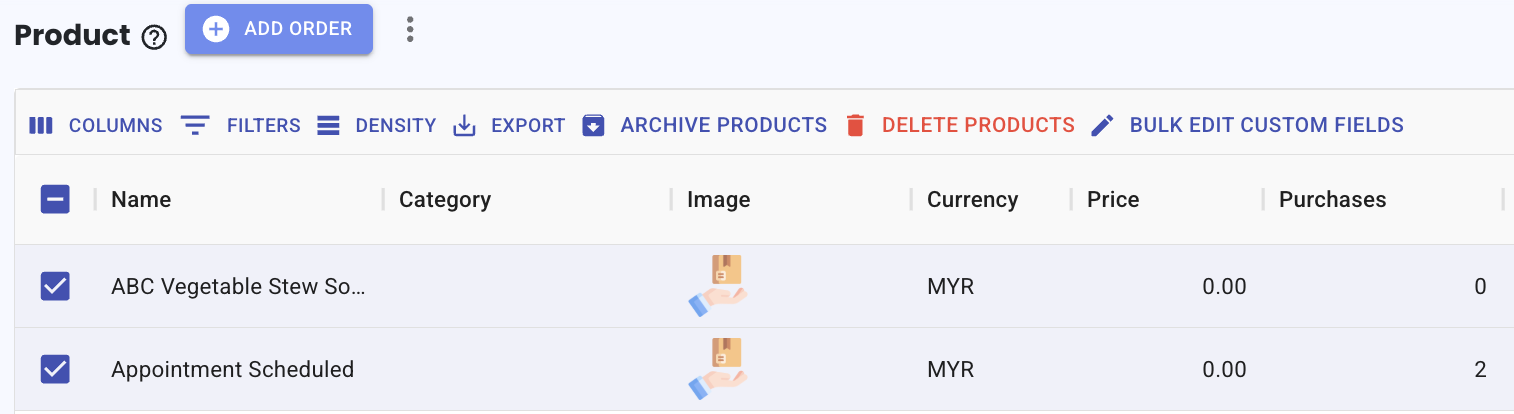
You can now bulk edit custom fields for multiple products in the Product module. 📦
Simply select the products using the checkbox and update their custom fields all at once.
What it means to you:
You can update multiple products quickly without editing them one by one. ⚡
This helps you save time when managing product information.
How you can go about it:
Go to the Product module
Select the products using the checkbox
Click Bulk Edit Custom Fields
Update the custom field as needed
Save your changes
Note: If a custom field does not exist for some products, it will be automatically added during the update.
You can refer to this guide: Guide
16. Search Flow by Typing in Trigger Another Flow 🔍
What’s New:
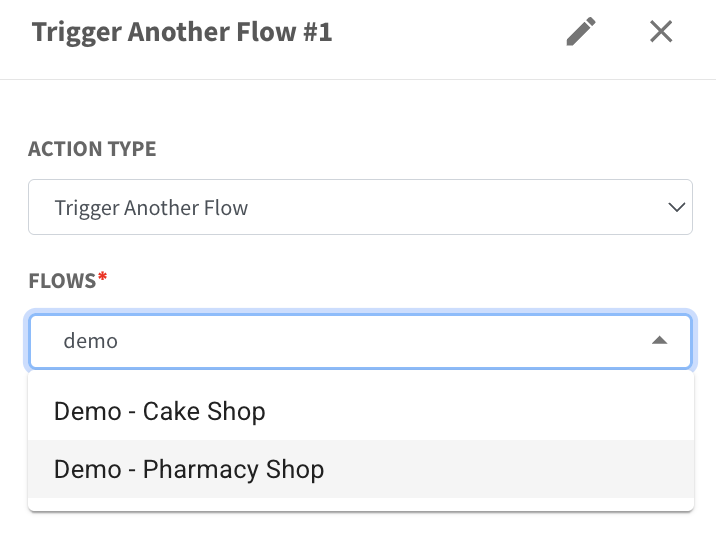
You can now type to search when selecting a flow in the Trigger Another Flow action. ⌨️
Instead of scrolling through a long list, you can quickly find the flow by typing its name.
What it means to you:
You can select the correct flow faster without manually searching through the list. ⚡
This makes your flow setup quicker and reduces the chance of selecting the wrong flow.
How you can go about it:
Add the Trigger Another Flow action in your flow
Click on the Flows dropdown
Type the flow name
Select the flow from the search results
Save the action
This helps you quickly find and select the flow you need.
17. Set Custom Reply Timing with Flowbuilder Debounce ⏱️
What's New:
You can now set how long Flowbuilder should wait before capturing your contact’s reply using a custom debounce setting. 💬
This controls how replies are grouped together when a contact sends multiple messages within a short time. It helps the flow understand the full response instead of treating each message separately.
For example, if you set the debounce to 4 seconds, any messages sent within those 4 seconds will be combined and treated as one response for the Wait For Reply action. 📩
This ensures the flow captures the complete reply before moving to the next step.
If you want to apply this setting across all flows, click on the Settings button and set the debounce duration in seconds.

If you prefer to set it for a specific flow only, click on the gear icon inside that flow and adjust the duration. ⚙️
This helps your automation capture replies more accurately and prevents messages from being split into multiple responses.
18. Contact Filter with Exclude Tag Option 🚫
What’s New:
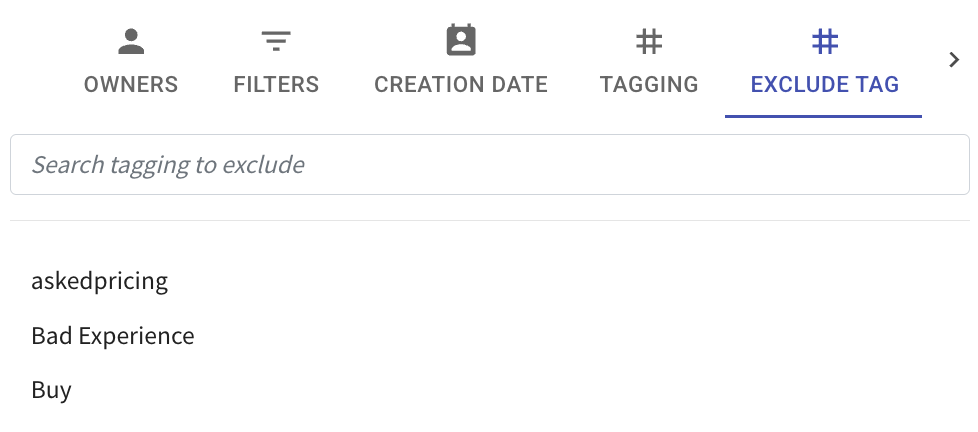
You can now use the Exclude Tag option in the Contact filter. 🏷️
This allows you to filter contacts while excluding those with specific tags.
What it means to you:
You can focus only on the contacts that match your criteria without including unwanted tagged contacts. 🎯
This makes your contact filtering cleaner and more accurate.
How you can go about it:
Go to the Contact module
Click on the three horizontal lines
Select Exclude Tag
Choose the tag you want to exclude
Click Apply Filter
Example:
If you exclude the tag Cold Lead, contacts without this tag will be displayed.
19. More Tag Filter Options in Contact List 🏷️
What’s New:
You now have more options when filtering contacts by tagging in the Contact List. 🔍
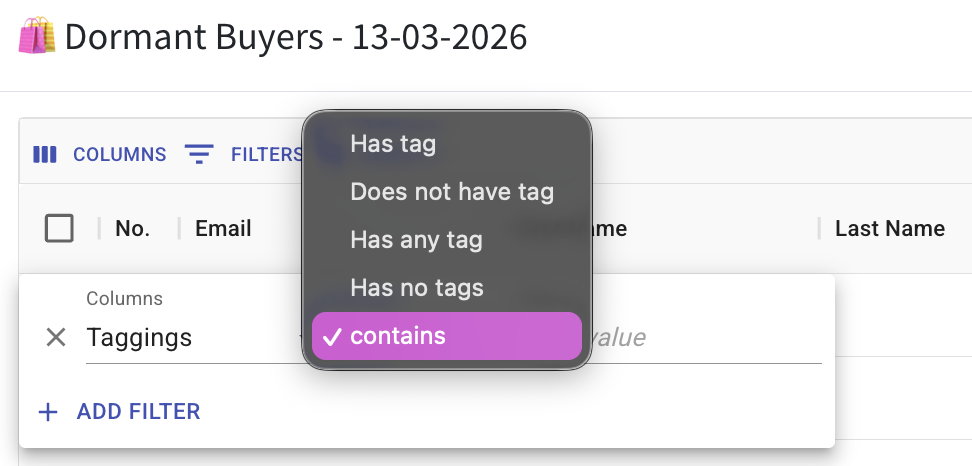
You can choose options like has tag, does not have tag, has any tag, has no tags, or contains when filtering.
What it means to you:
You can filter contacts more precisely based on their tagging. 🎯
This helps you quickly find the exact group of contacts you are looking for.
How you can go about it:
Click on the eye icon to view the contact list
Click on the filter icon
Select Taggings
Choose the filter option such as:
• Has tag
• Does not have tag
• Has any tag
• Has no tags
• ContainsApply the filter
This allows you to better segment and view your contacts based on tagging.
20. Filter Contacts by More Than or Less Than Values 🔢
What’s New:
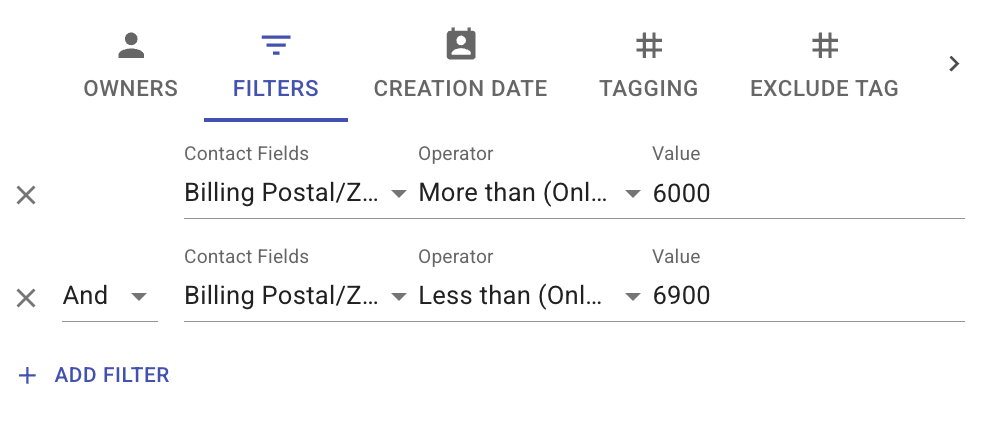
You can now filter contacts using More Than or Less Than conditions for number based fields. 📊
This allows you to set a range or minimum or maximum value when filtering your contacts.
What it means to you:
You can easily narrow down contacts based on specific number ranges such as postal code or values. 🎯
This makes your filtering more precise and helps you find the right group of contacts faster.
How you can go about it:
Click on the three horizontal lines in the Contact module
Click Filters
Click Add Filter
Select the contact field
Choose the operator such as More Than or Less Than
Enter the value
Add more filters if needed
Click Apply Filter to view the results
This will display contacts that match the conditions you have set.
21. More Segment Options for Better Contact Filtering 🧩
What’s New:
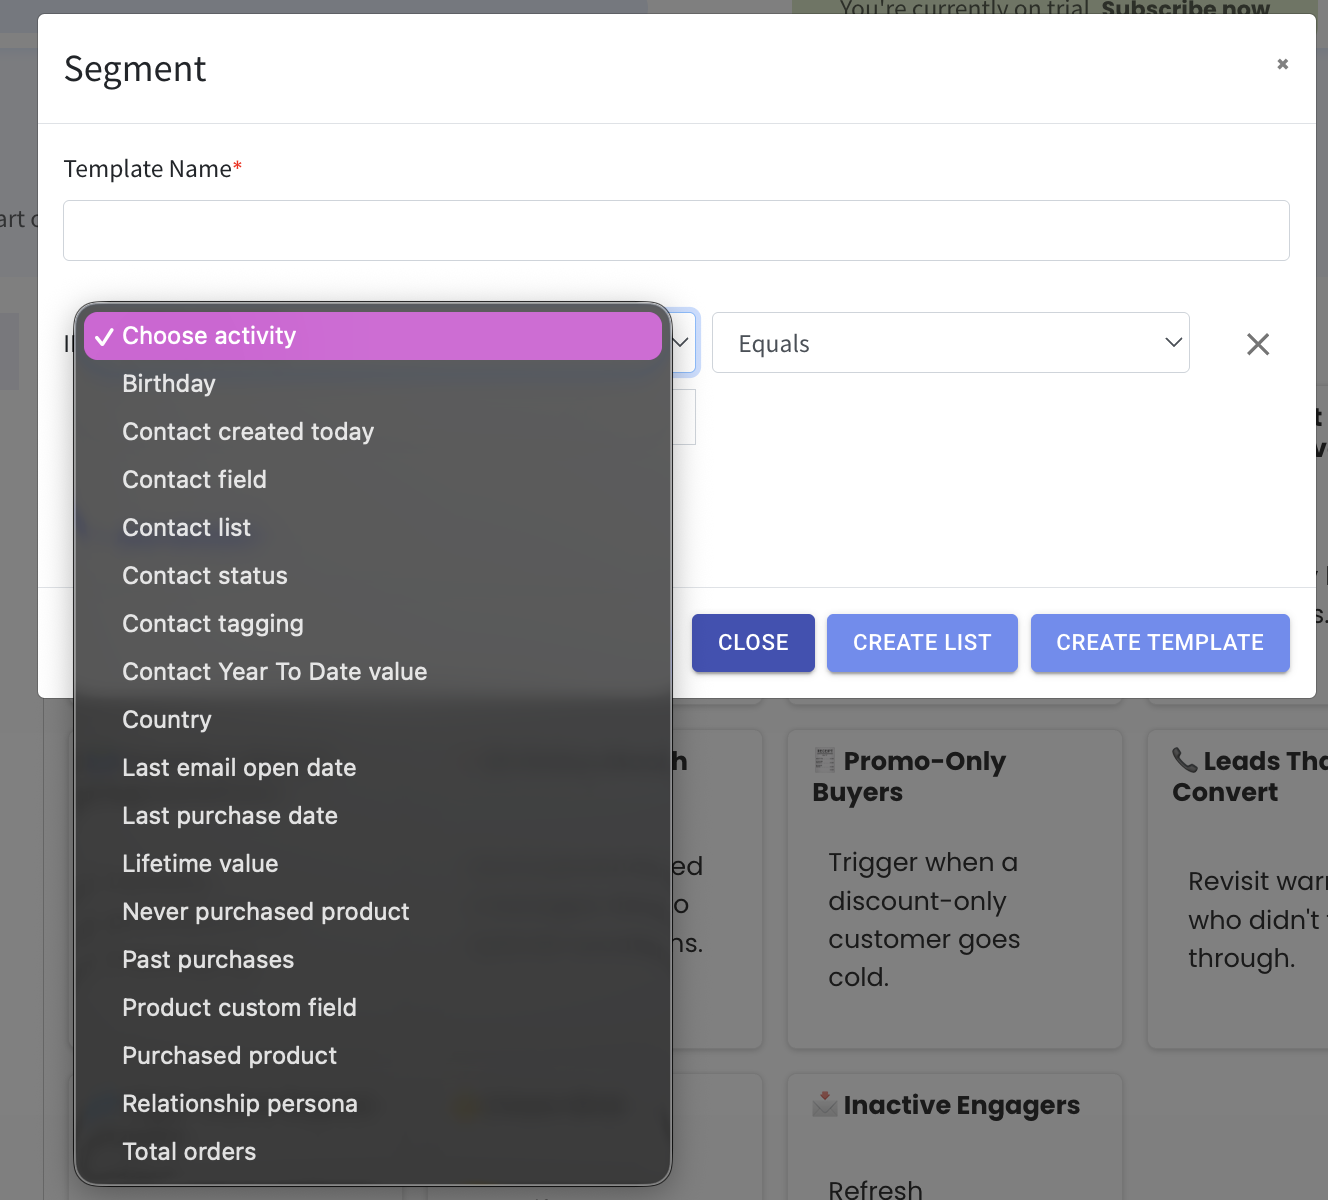
You can now use more options when creating or editing a segment. 📋
New options include Contact fields, Last broadcast list, Relationship, Contact created today, and Product custom fields. These give you more ways to define and group your contacts based on different conditions.
What it means to you:
You can create more precise contact lists that match your exact use case. 🎯
This makes it easier to target the right group of contacts for your campaigns or actions.
How you can go about it:
Go to create a new segment or edit an existing one
Select from the new available options such as:
• Contact fields
• Last broadcast list
• Relationship
• Contact created today
• Product custom fieldsSet your conditions based on your needs
Save the segment to use it for your contact list
Note: Product custom fields refer to fields created when purchase data is imported, not the default predefined fields.
22. Keep Selected Contacts When Searching 🔍
What’s New:
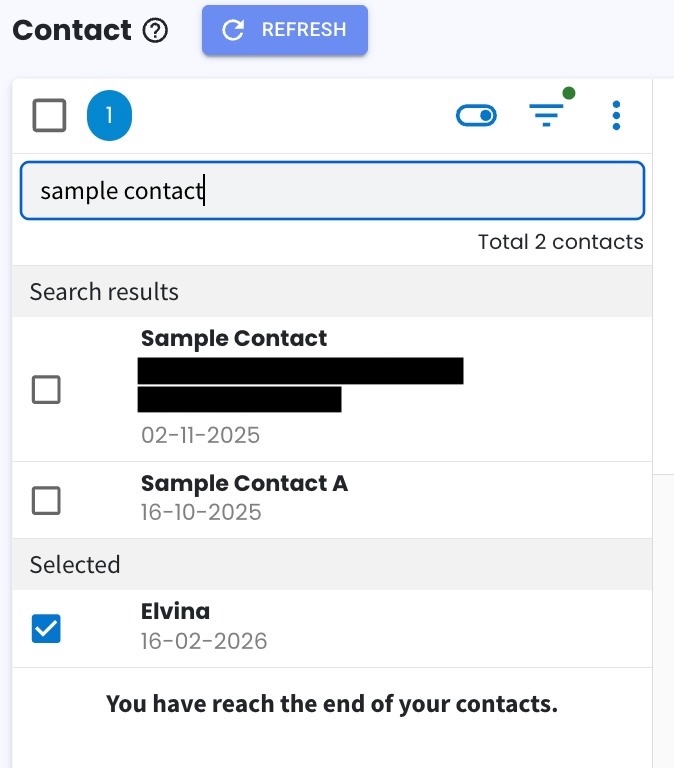
Your selected contacts will now stay selected even when you search for other contacts. 📇
Previously, selections would reset when you searched or applied filters, but now your selection remains as you continue browsing.
What it means to you:
You can select contacts across multiple searches without losing your previous selection. 👀
This makes it easier to manage bulk actions without needing to reselect contacts again.
How you can go about it:
Select the contact or contacts you want
Use search or filters to find more contacts
Continue selecting additional contacts
Perform actions such as add tag, assign owner, or others
This allows you to manage multiple contacts more smoothly in one go.
23. Automatically Add Data to Google Sheet from Flowbuilder 📊
What’s New:
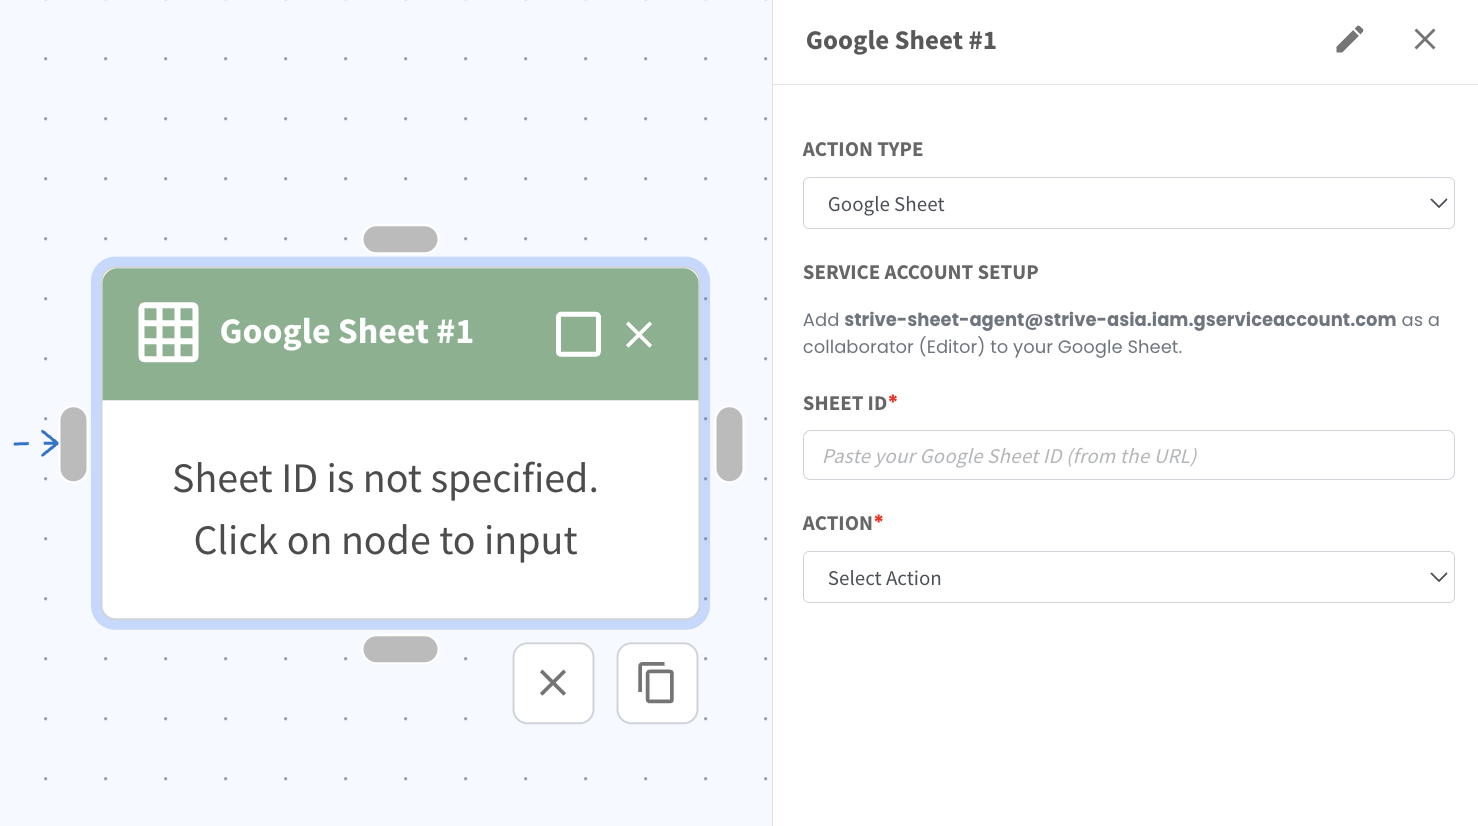
You can now directly add a new row into your Google Sheet using Flowbuilder.
Just set up your flow, select the action Google Sheet, then complete the required setup such as adding the Sheet ID and choosing the action. You will also need to add the provided service account email as an Editor to your Google Sheet.
Once connected, the flow can automatically send data such as contact details, responses, or purchase information into your selected sheet. Each time the flow is triggered, a new row will be added based on the information you map. This keeps your records updated in real time without manual copying and pasting. 📋
24. View Notes with Colour Label in Strive Go 🎨
What's New:
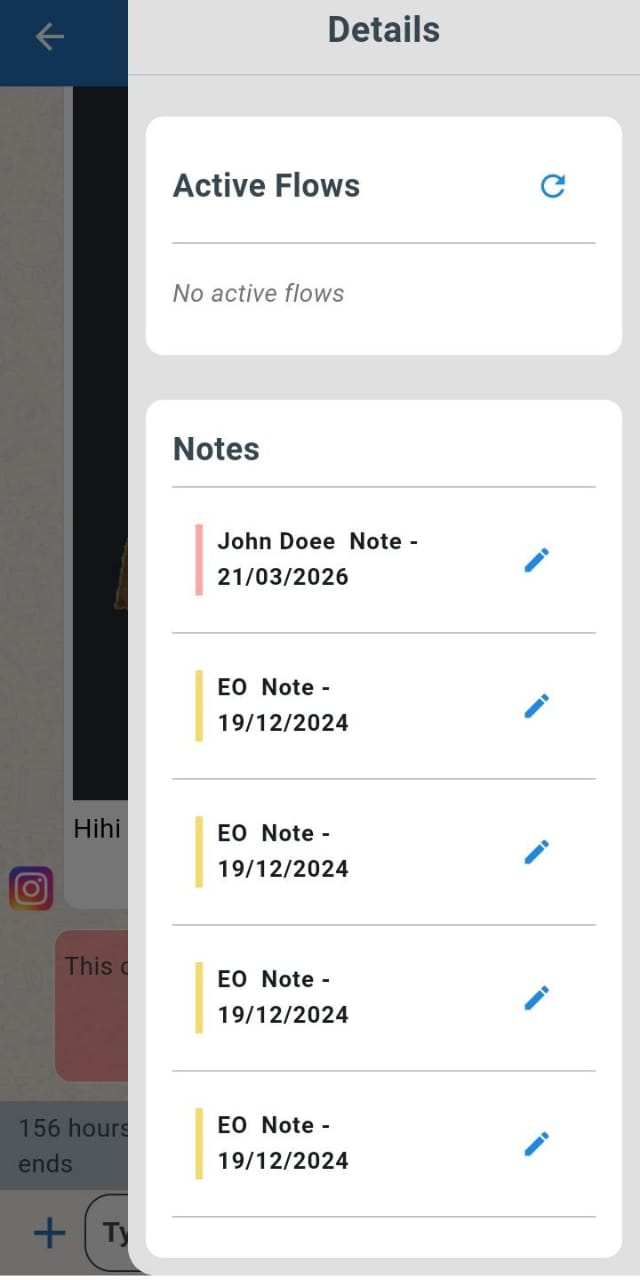
You can now see note colors in Strive Go that match the colors set in Strive web. 📱
This means any color you assign to a note on web will appear the same in the mobile app. It keeps your notes consistent across both platforms and makes them easier to recognise.
You can view the colored notes in two ways. 👀
You can see them directly in the chat window, or click on the contact name and scroll down on the right side to view the full list of notes with their colours.
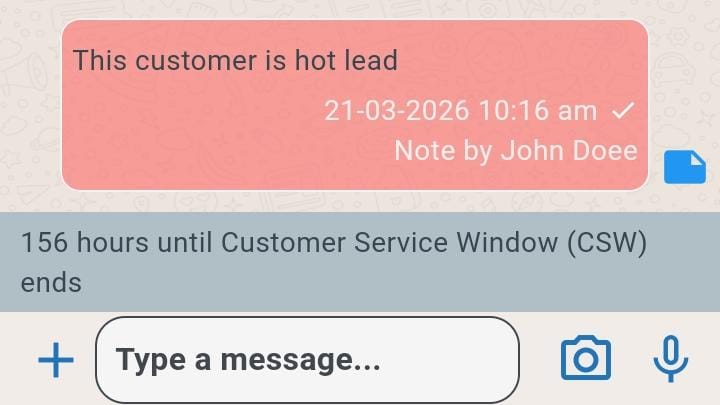
Note: At the moment, the color can only be set in Strive web. 🎯
This helps you quickly understand and organize notes using color, making it easier to review important information.
25. Display Company Name in Contact View 🏢
What's New:
You can now choose to display the Company Name in your contact view. 📇
This new option allows you to see which company a contact belongs to directly in the list. It gives you better context when managing multiple contacts across different businesses.
To enable this, click the toggle icon on the left column, select the fields you want to display, then click Save Changes. ⚙️
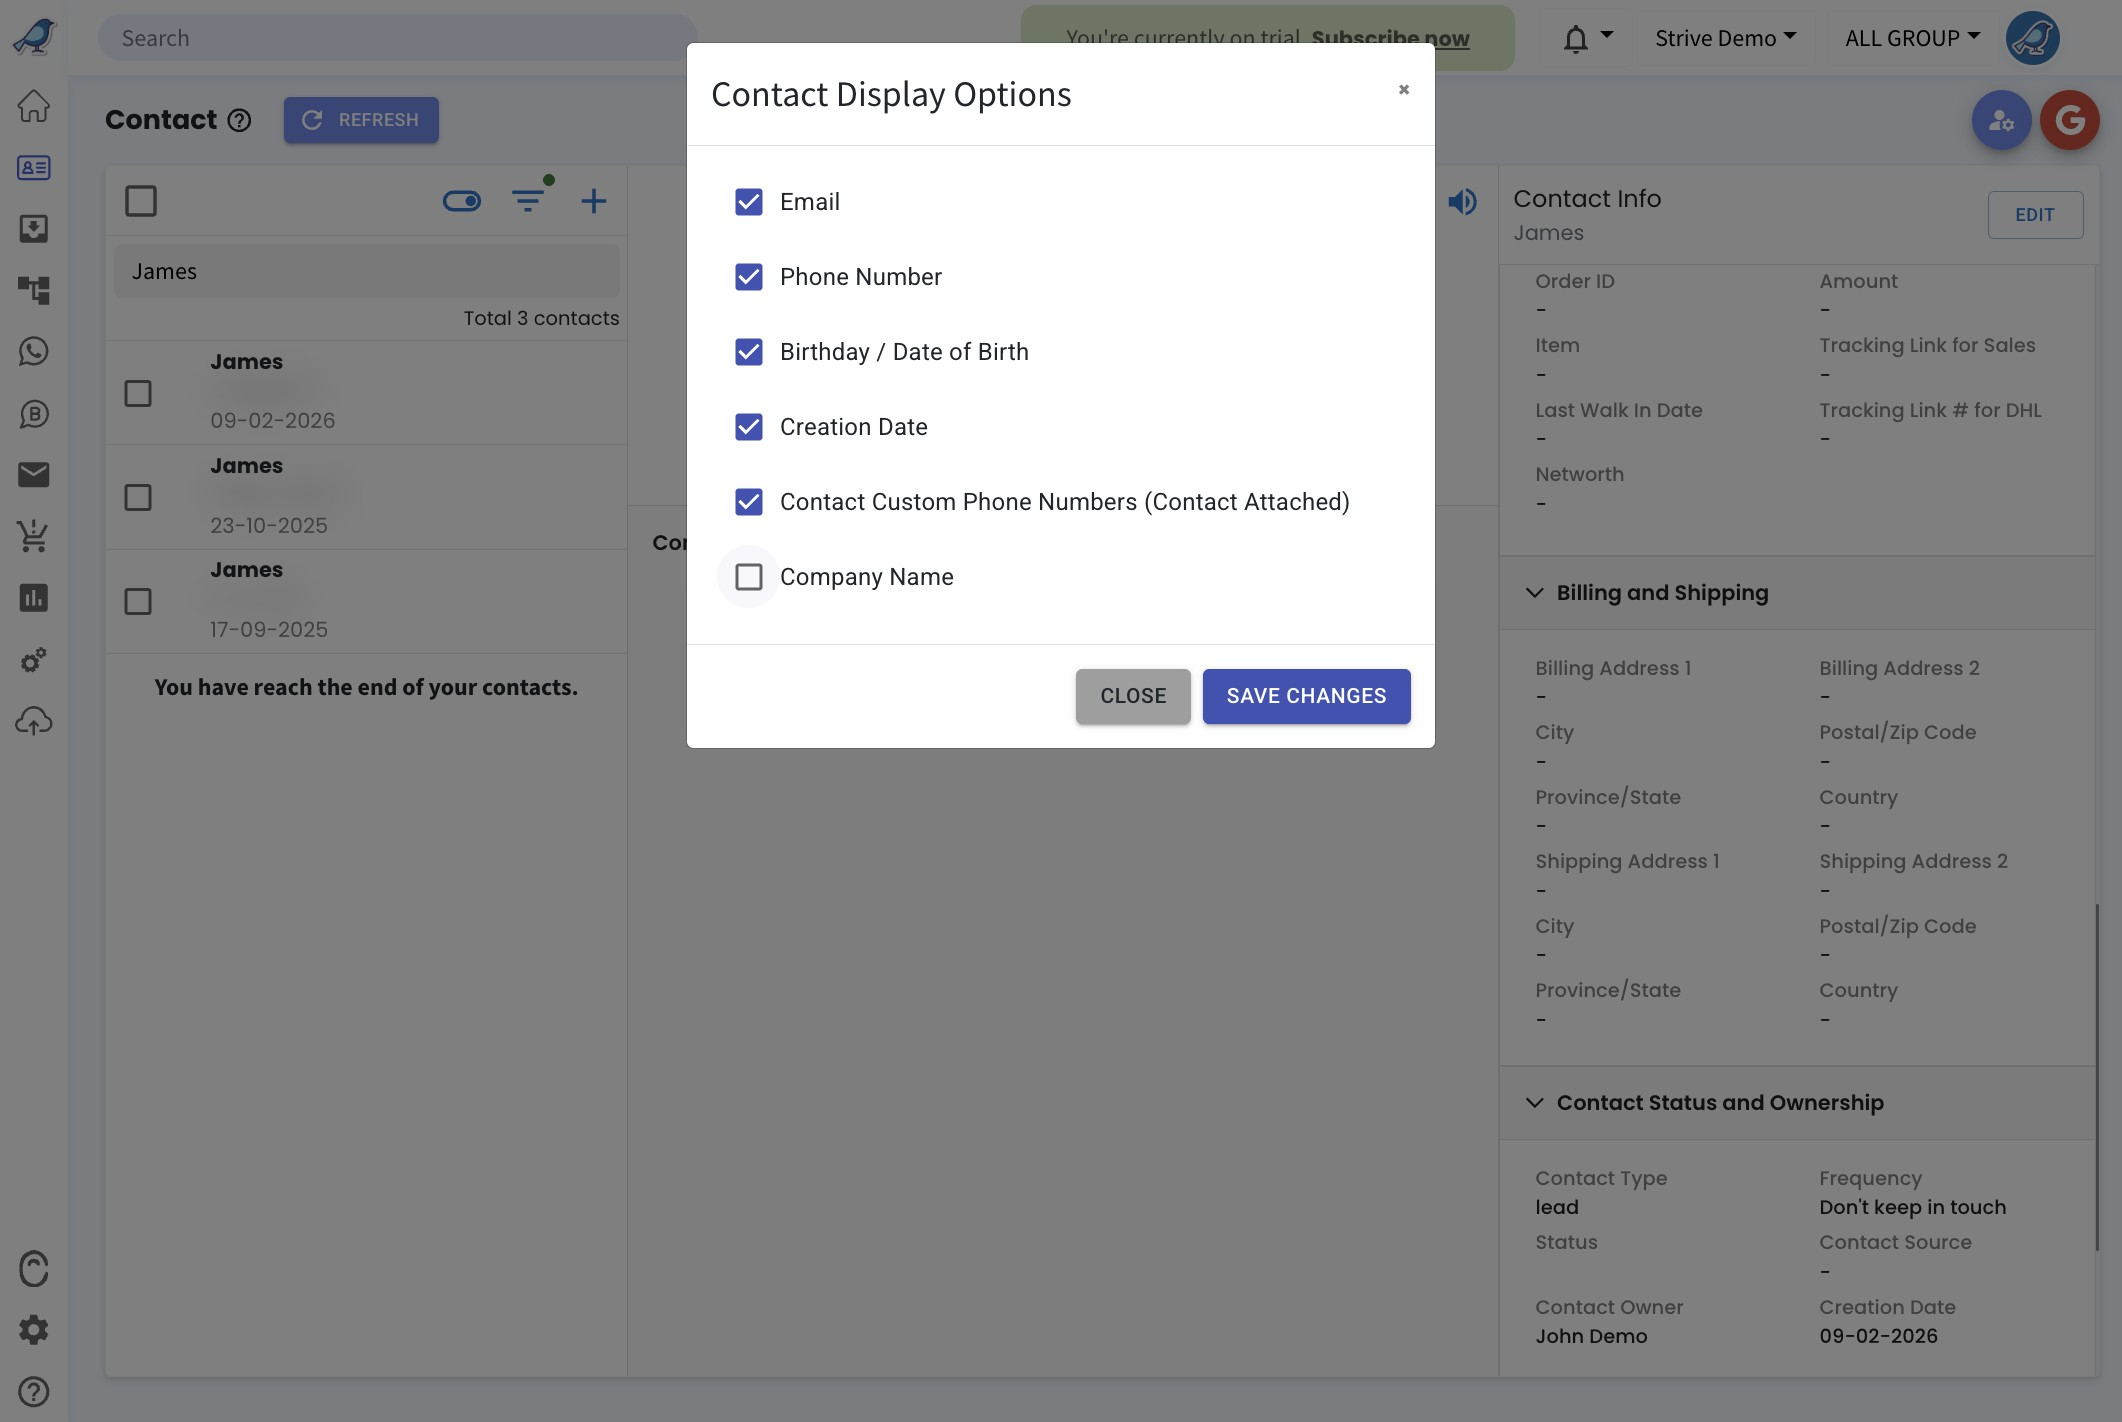
Once enabled, the company name will appear together with the contact details. 👀
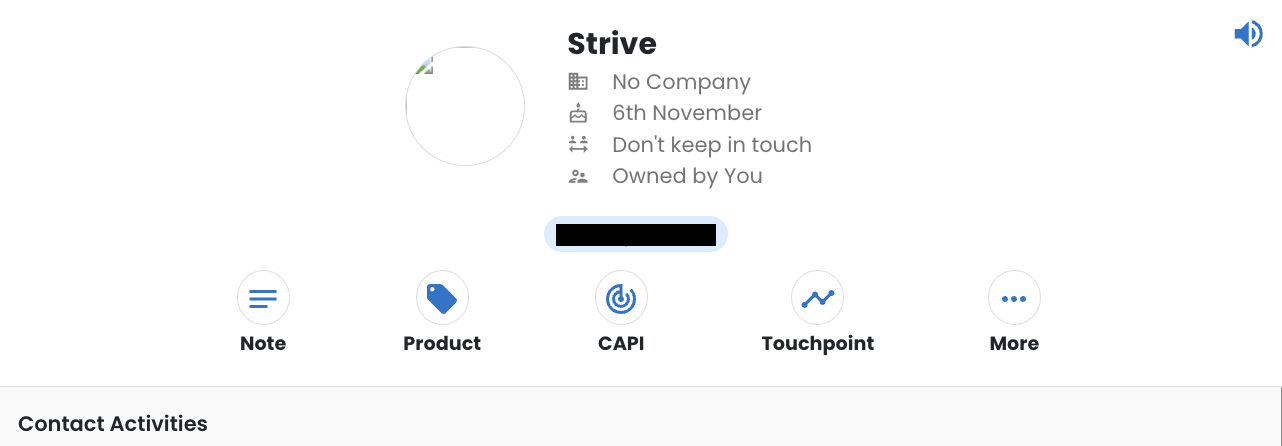
This helps you quickly identify contacts by their company and manage your contacts more clearly.
26. Show or Hide Contact Tags in Strive Go Inbox 🏷️
What's New:
You can now choose whether to display or hide contact tags in the Strive Go Inbox. 📱
This gives you better control over how much information you want to see while managing your chats. You can keep your view clean or show tags when you need more context about the contact.
To set this up, click the gear icon at the top right, scroll down, turn on or off the Ticket Tagging Display toggle, then press Save Setting. ⚙️
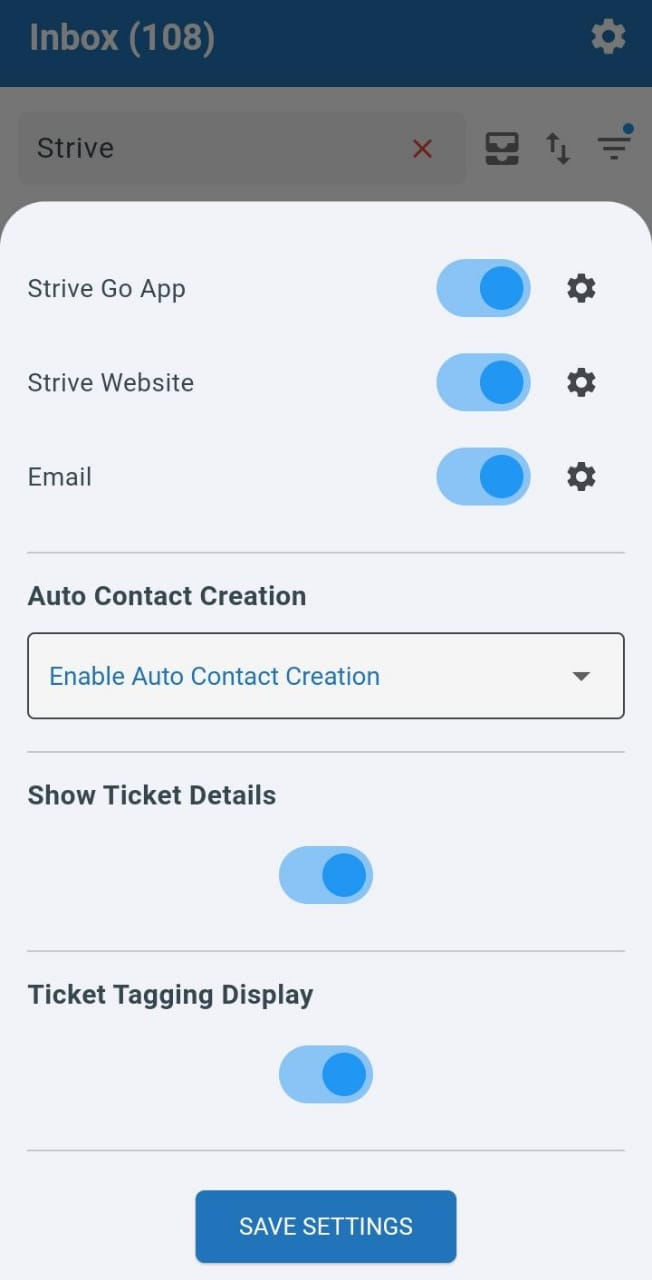
Once enabled, the contact tags will be shown directly on the ticket so you can easily identify them. 👀
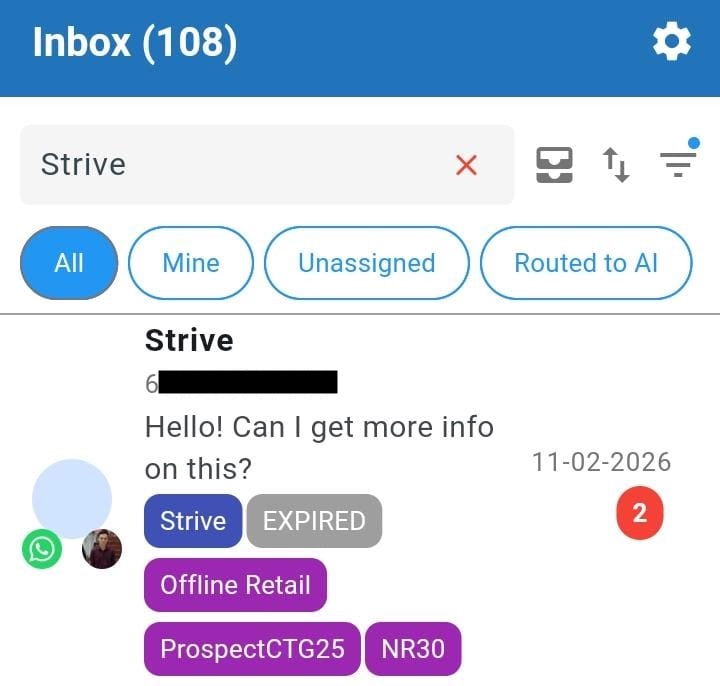
27. Archive and View Chats Easily in Inbox 🗂️
What's New:
You can now archive chats in the Inbox to keep your workspace clean and organized. 📥
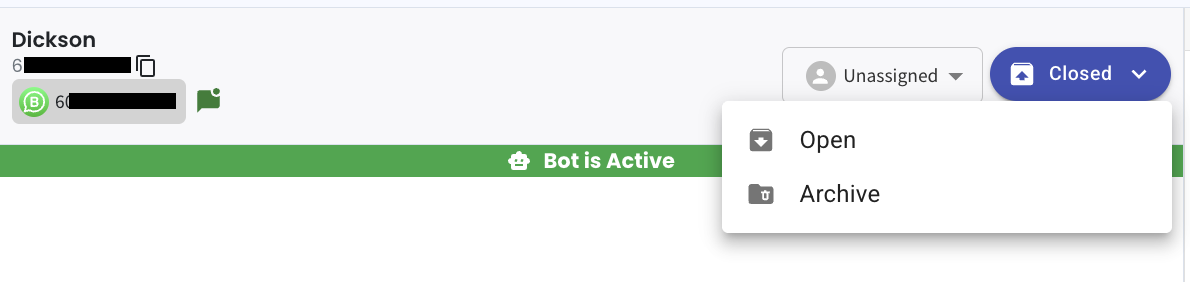
When you open a ticket and click on the dropdown arrow, you will see the option to archive the chat. This allows you to move completed or inactive conversations out of your main view without deleting them.
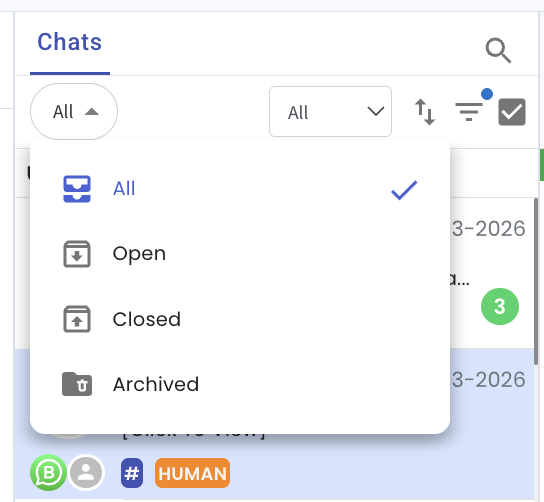
To view archived chats, simply click on the All dropdown on the left and select Archived. 🔎
This will show you all the chats that have been archived so you can review them anytime.
In Strive Go, you can archive a chat by pressing and holding the ticket, then selecting Archive from the options. 📱
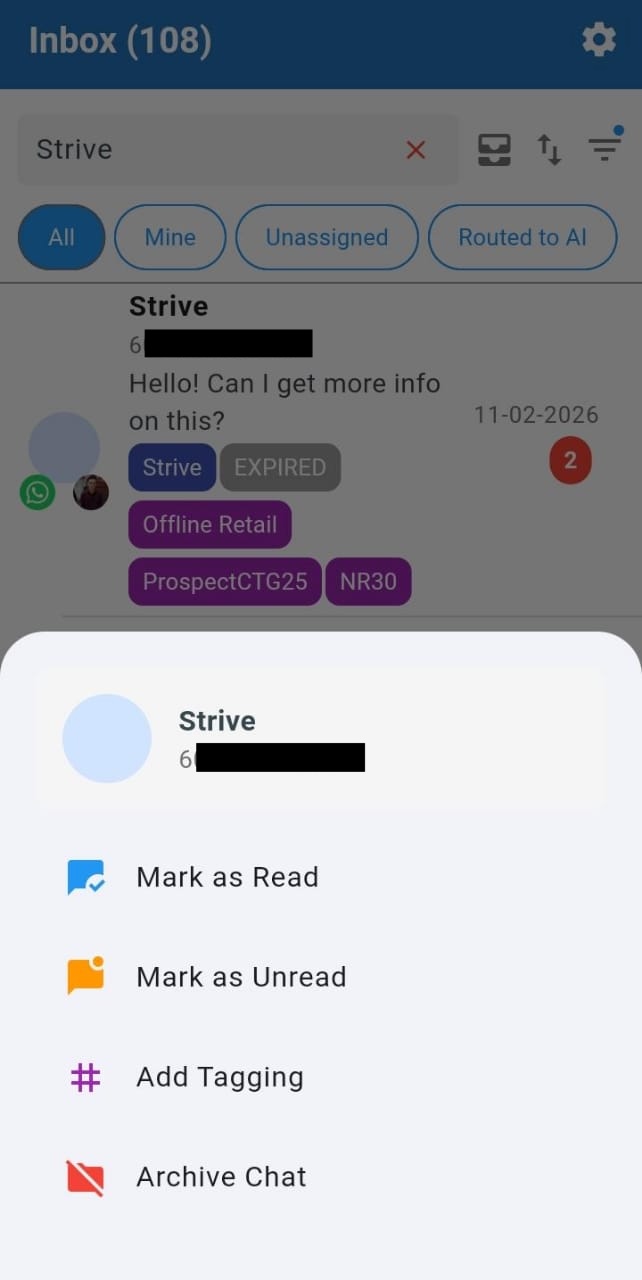
To filter archived chats, tap the highlighted inbox icon and select Archived.
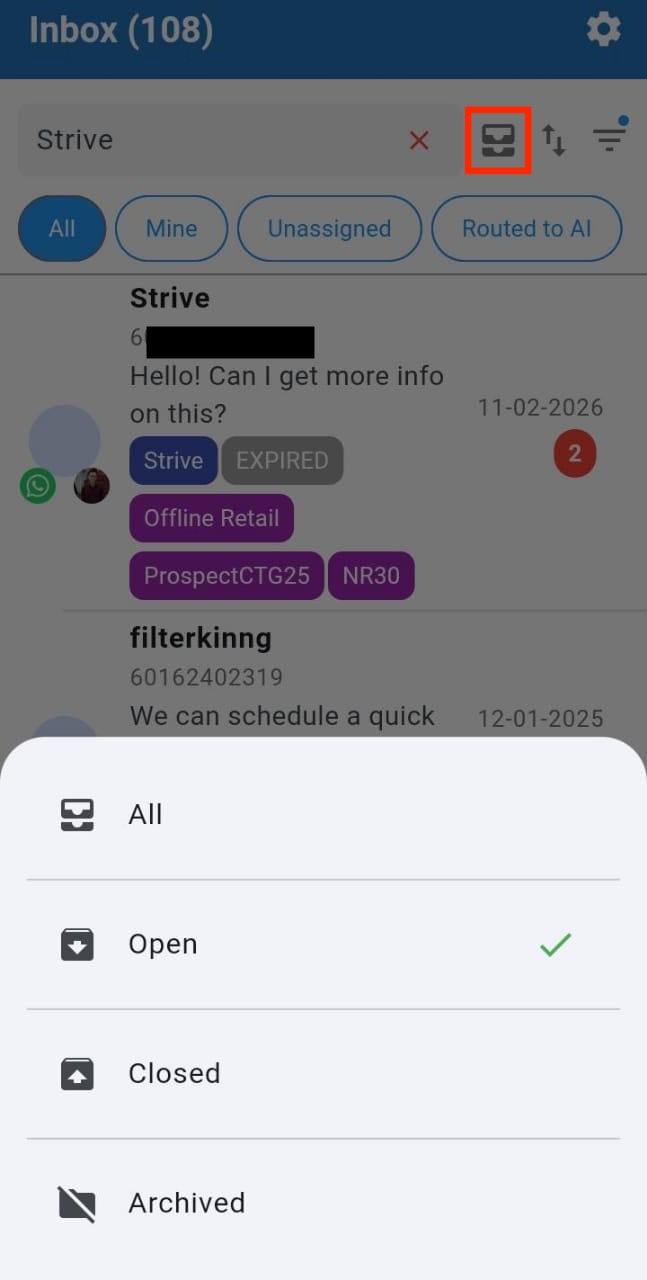
This helps you keep your Inbox focused on active conversations while still keeping past chats accessible when needed.
28. View WA API Template Failure Reason by Hovering 👁️
What's New:
You can now easily see why a WA API template message failed to send. 📩
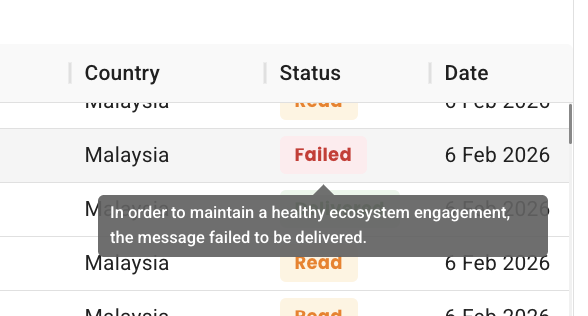
When you click the View Stats eye icon in the WA API Template module, the delivery results will be displayed. If a message shows Failed, you can hover your mouse over the status to see the exact reason.
For example, when you hover over the Failed label, a message will appear explaining the failure reason. 🖱️
This helps you quickly understand why a message was not delivered without needing to check additional logs. 🔎
29. Block Contacts Directly from Inbox Chat 🚫
What's New:
You can now block a contact directly from the Inbox if needed. 😊
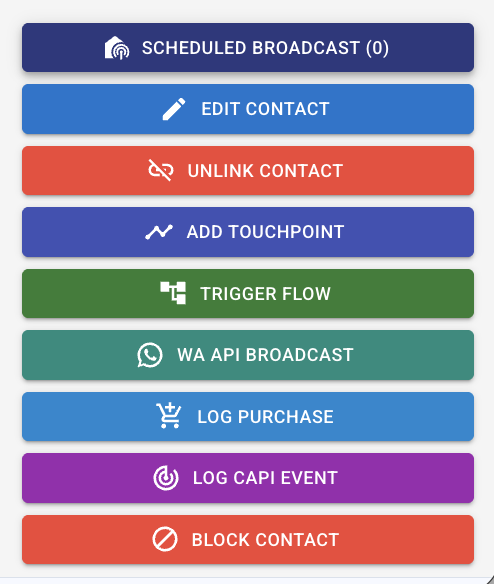
Simply open the chat, then scroll to the right column where you will find the Block Contact button. This allows you to quickly stop unwanted messages from a contact without leaving the conversation view.
Once a contact is blocked, they will no longer be able to send messages to that channel. You will also not be able to send outgoing messages to the contact while the block is active. If needed, you can unblock the contact later. 📱
Note: This feature is available for WA API, Instagram, and Messenger channels only.
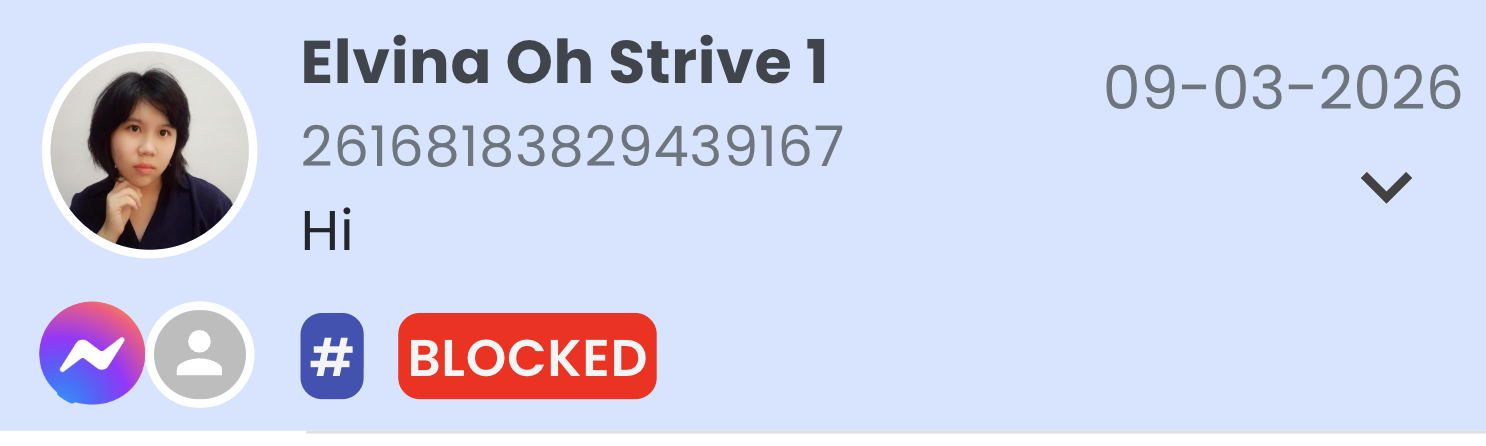
When a contact is blocked, the chat will display a Blocked label so you can easily identify it.
This helps you manage unwanted or spam conversations more easily and keep your Inbox organised.
30. Block Contact Directly from Strive Go 🚫
What's New:
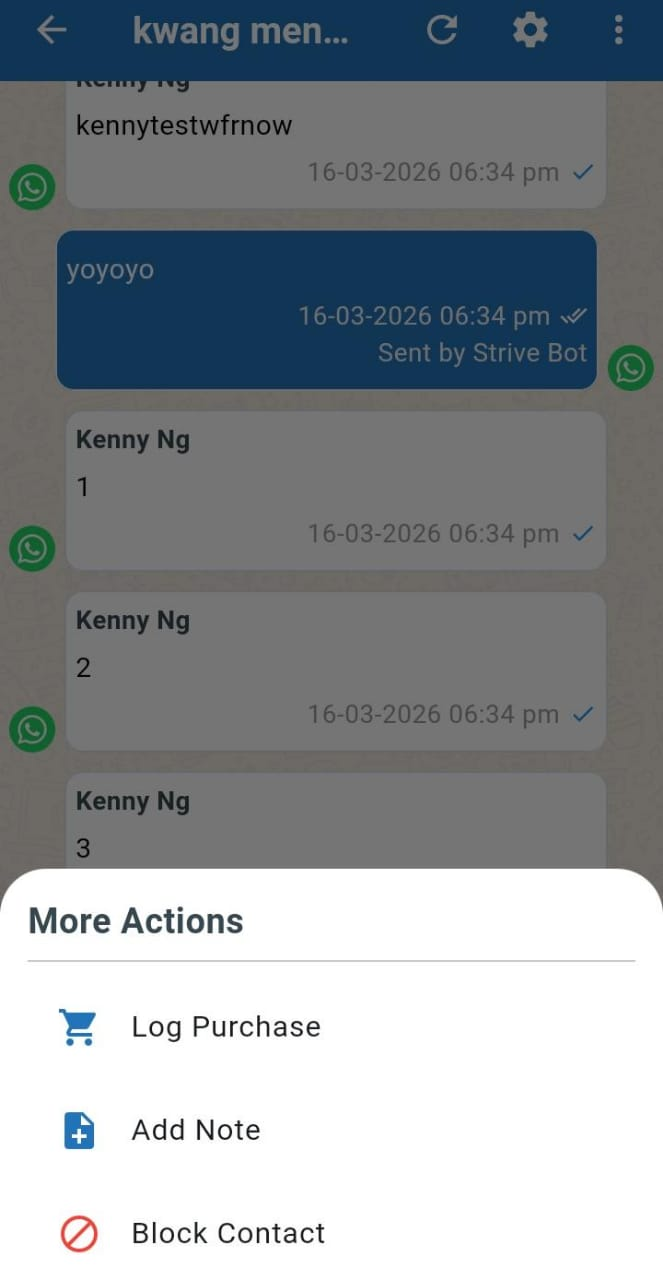
You can now block a contact directly from the Strive Go app when managing your chats. 📱
This allows you to quickly stop unwanted messages from a contact without needing to access Strive web. Once a contact is blocked, you will not receive any further messages from that contact, and you will also not be able to send any messages to them.
To block a contact:
Open the chat with the contact
Tap the three dots at the top right
Tap Block Contact
Note: This block feature is not available for the WA Personal channel.
This helps you manage unwanted conversations more easily and keep your chat inbox under control. 🛑
31. Set Conditions Based on Last Purchase Value in Flowbuilder 💰
What's New:
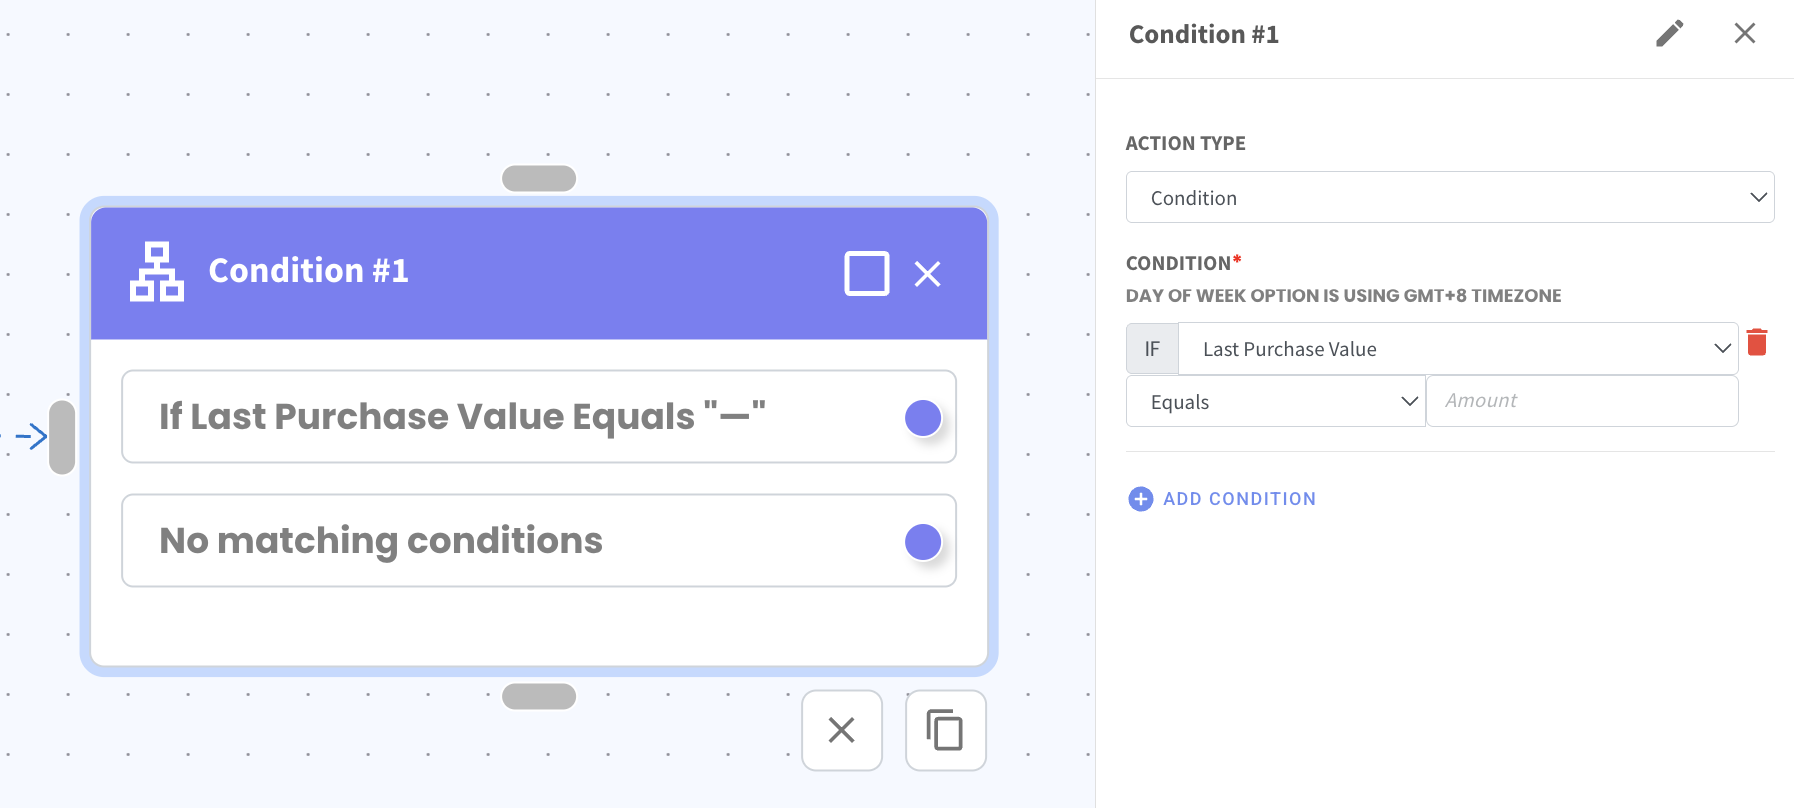
You can now create a condition in Flowbuilder based on a contact’s Last Purchase Value. 🧾
This allows your flow to check the amount of the contact’s most recent purchase before deciding what action should happen next. It helps you create more targeted automation based on how much a contact has spent.
When setting the condition, you can choose different comparison options such as Equals, More Than Equals, Less Than Equals, or Not Equals to the value you enter. For example, you can set the flow to continue only if the Last Purchase Value equals a specific amount.
This helps you build flows that react differently based on customer spending, making your automation more relevant to each contact.
32. Check if Contact Does Not Have a Tag in Flowbuilder 🏷️
What's New:
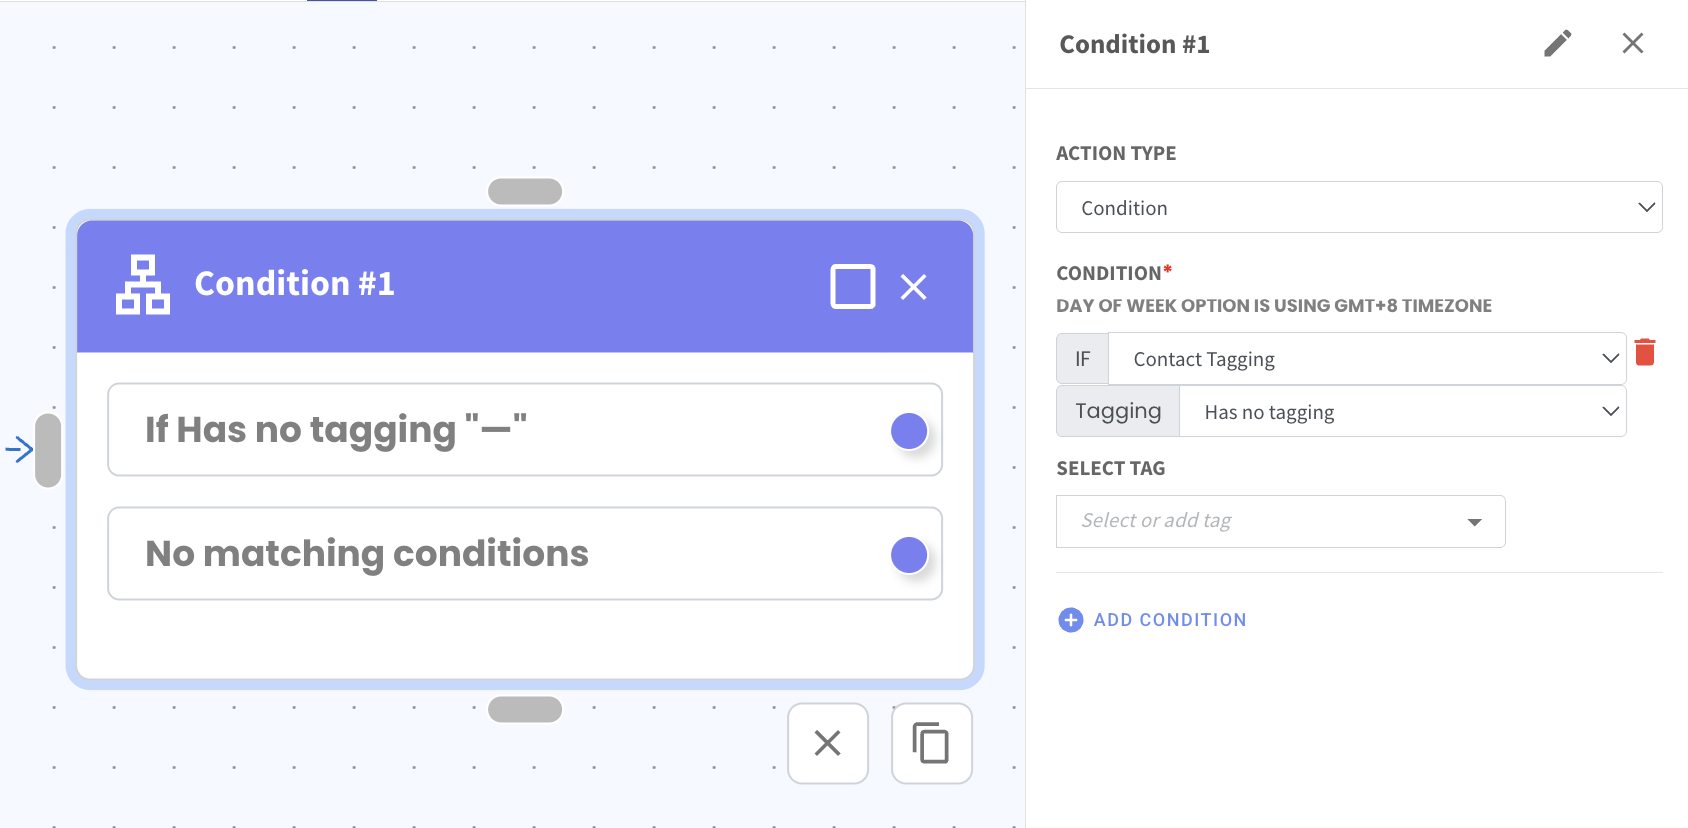
You can now set a condition in Flowbuilder to check if a contact does not have a specific tag. 🔎
This allows your flow to continue to the next action only when the contact does not contain the selected tag. It gives you more control when building conditions inside your automation.
For example, you can set the flow to continue only if the contact does not have a certain tag. 📋
This is useful when you want to avoid sending messages or running actions for contacts who already belong to a specific group.
33. New Counter Action in Flowbuilder 🔢
What’s New:
A new Counter action is now available in Flowbuilder. ➕
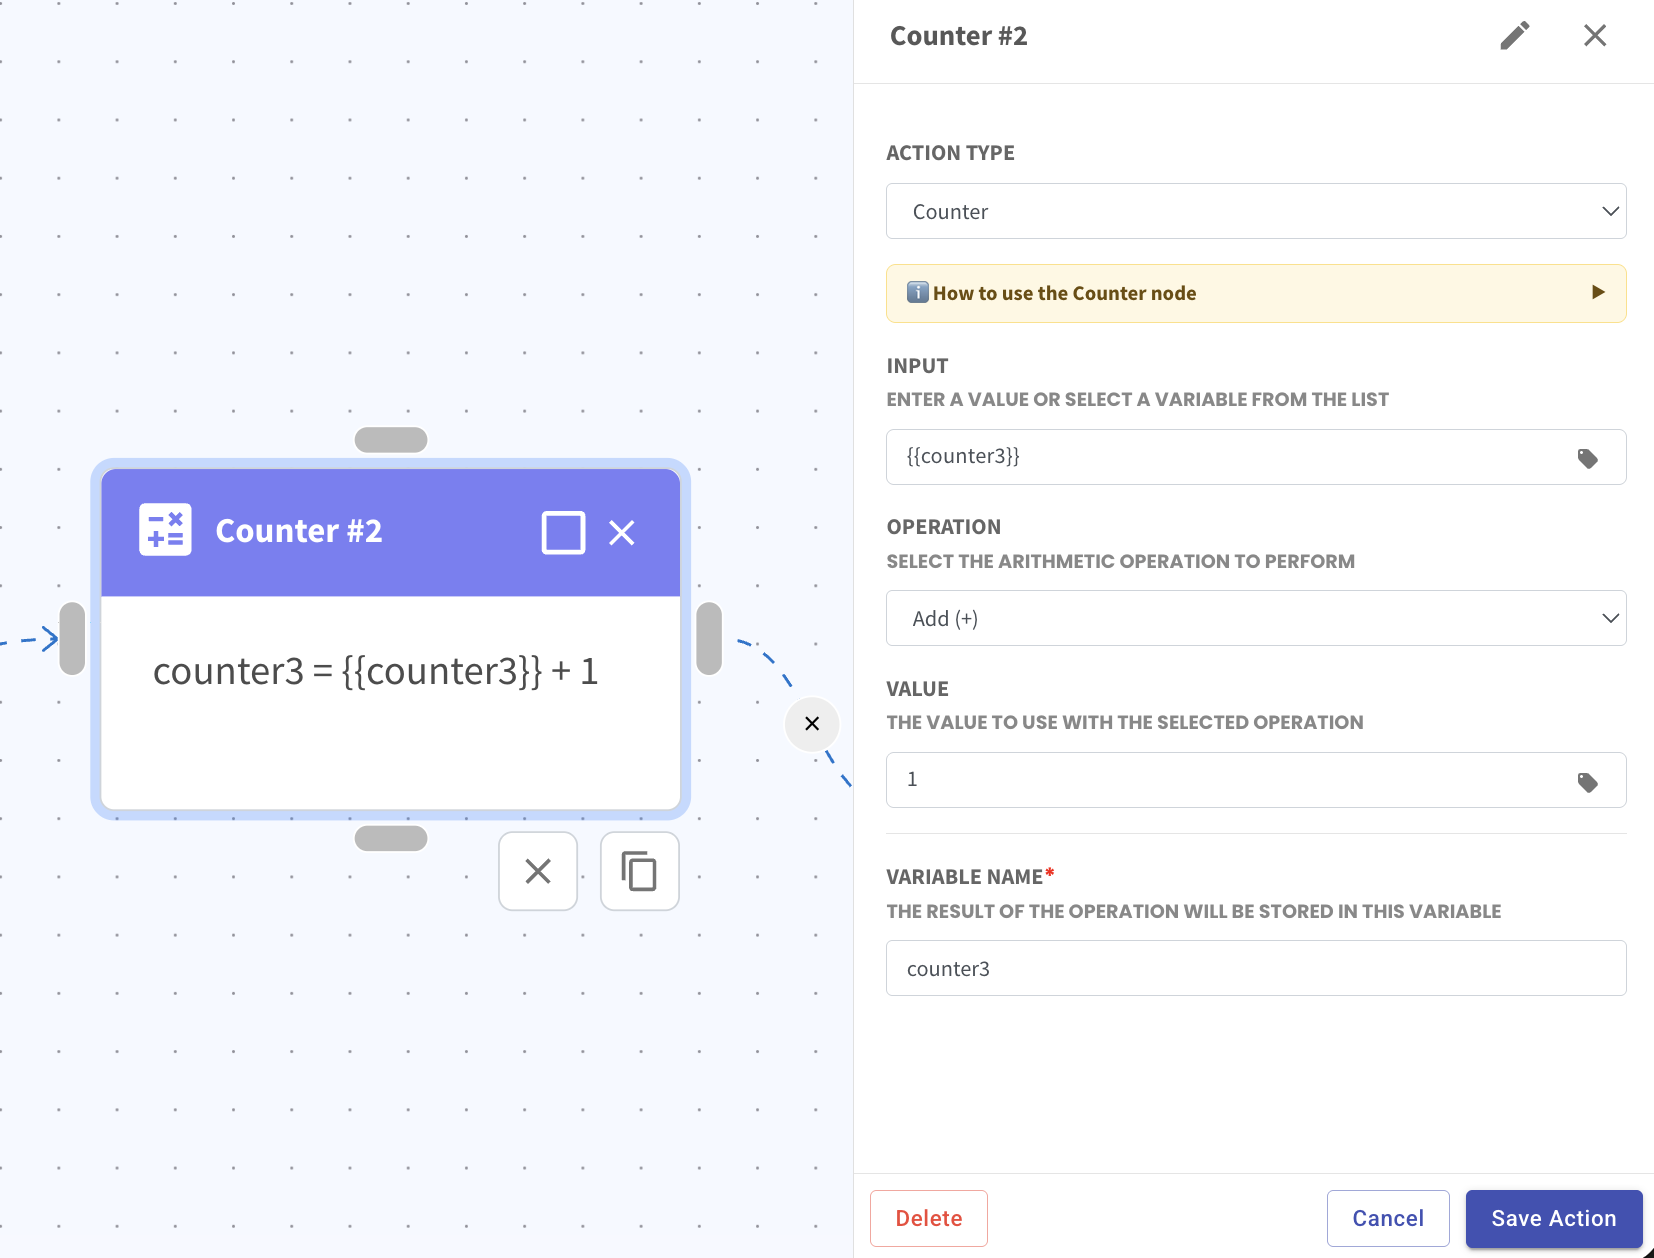
This allows you to update a variable or contact custom field by adding, minus, multiply, or divide a value automatically.
What it means to you:
You can track values such as counts, scores, or number of actions within your flow. 🎯
This makes it useful for use cases like surveys, quizzes, or tracking user behaviour.
How you can go about it:
Add the Counter action in your flow
Select the variable or input value
Choose the operation such as Add, Minus, Multiply, or Divide
Enter the value to apply
Set the variable name to store the result
Save the action and continue your flow
Example:
If the variable counter3 value was set as 0, when the contact goes through the flow, 1 will be added.
This means counter3 will now become 1.
You can then use this updated value in the next Counter action or update it into a contact custom field.
34. Flow Folder Name Now Shown When Triggering a Flow 📂
What's New:
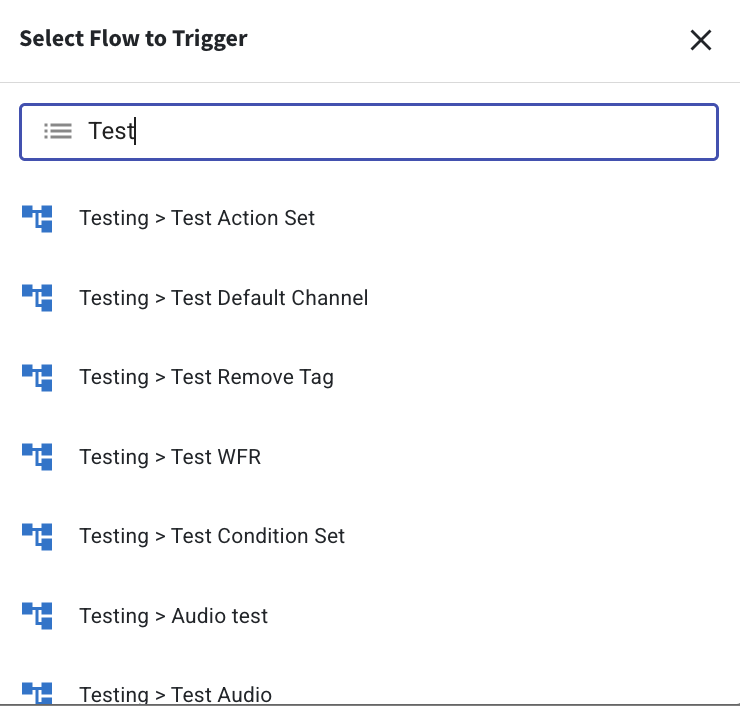
When you trigger a flow from the Inbox, you will now see the folder name together with the flow name.
The flow will appear in the format Folder Name > Flow Name, so you can easily see where the flow is located. This gives you clearer information when selecting a flow from the list. ✨
With the folder name displayed, it becomes easier to identify the correct flow before triggering it. This is especially useful if you have many flows stored in different folders or if some flows have similar names. It helps you quickly confirm that you are selecting the right flow. 📁
This enhancement helps reduce confusion and makes it easier to trigger the correct flow when managing conversations in the Inbox. 👍
35. Filter Contacts by Birthday Month in the Contact Module 🎂
What's New:
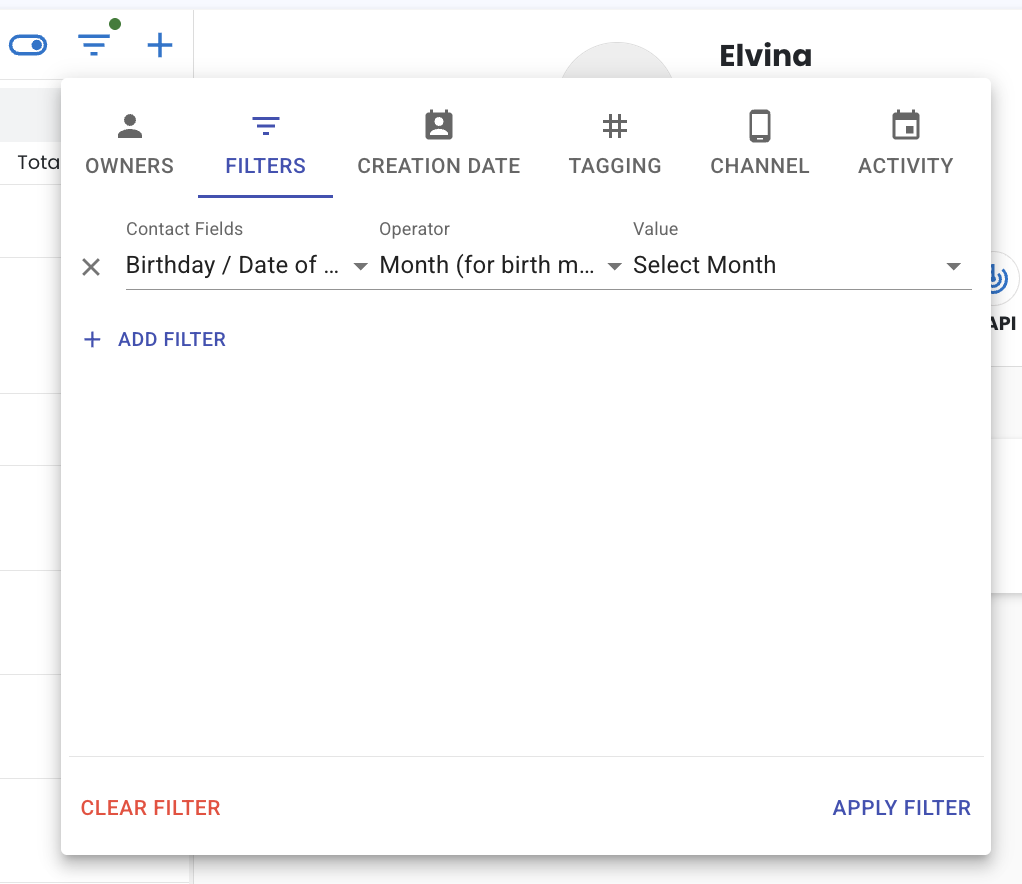
You can now easily find contacts based on their birthday month in the Contact module. 📅
This allows you to quickly identify contacts who have birthdays in a specific month. It is useful when you want to plan birthday campaigns or send special greetings.
To use this filter, click Filter, choose the Contact field, select the operator Month, then choose the month value. 🧭
After that, click Apply Filter and the system will display contacts whose birthday matches the selected month.
This helps you quickly prepare birthday messages or promotions for the right group of contacts. 🎁
36. Filter Chats by Read or Unread in Inbox 🔍
What's New:
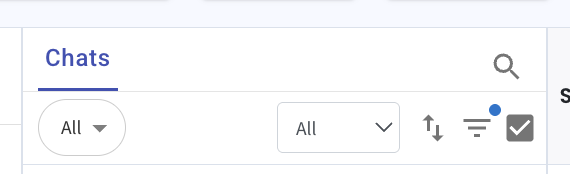
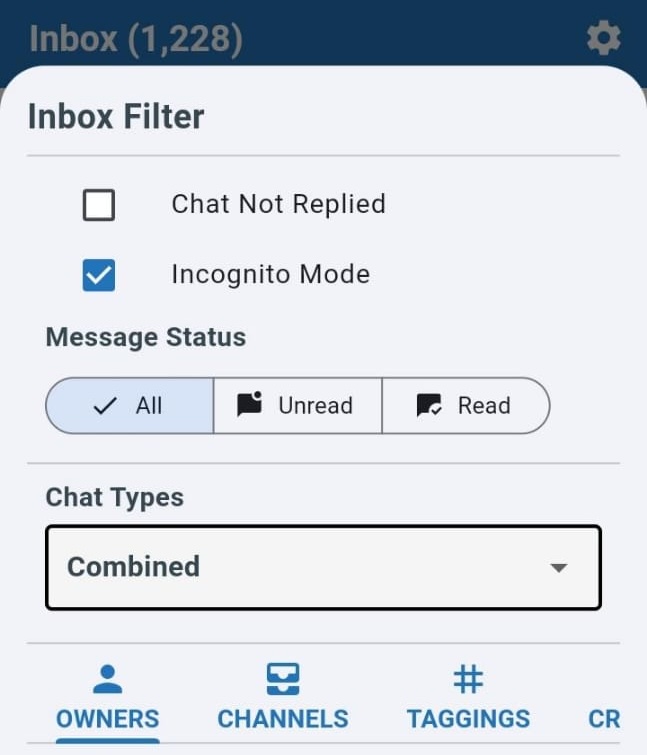
You can now filter your Inbox tickets by All, Read, or Unread to view conversations more clearly. This makes it easier to find chats that still need your attention without scrolling through the entire chat list. It is especially helpful when many conversations are happening at the same time. 👀💬
In Strive Web:
Click the All dropdown located in the center of the Inbox toolbar. Then select All, Read, or Unread to filter the chat list.
In Strive Go:
Click the three horizontal line icon, then choose the message status you want to filter. Tap outside the filter panel to close it after making your selection. 📱
Once selected, the chat list will update based on your chosen filter. This enhancement helps you quickly find unread conversations and respond to contacts faster. ⏱️✨
Strive Web View:
Strive Go View:
37. Add Flowbuilder Contacts to a Contact List Easily 📋
What's New:
You can now add contacts from Flowbuilder Enrolment History directly into a contact list. 😊
When you filter contacts in the enrolment history view, simply select the contacts you want and add them to a contact list. This allows you to quickly group contacts who have gone through a specific flow.
Once the contacts are added to a list, you can easily use that list for actions such as sending broadcasts or planning follow up messages. 📩
This helps you organise contacts from your flows and continue engaging with them more efficiently.

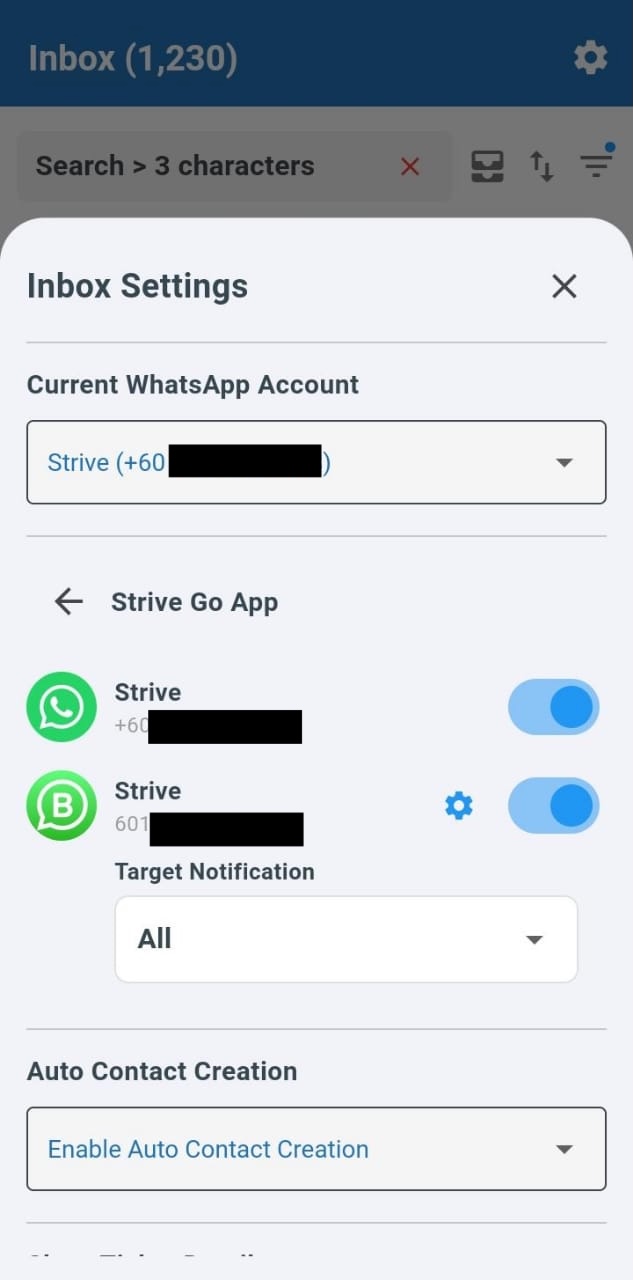
38. Customise Strive Go Notifications for Chats 🔔
What's New:
You can now choose how Strive Go notifies you when a new message comes into your Inbox. 💬
Instead of receiving notifications for every chat, you can decide whether to receive alerts for all chats, only group chats, or only individual chats. By default, notifications are turned on for all chat types.
If you prefer a more focused notification experience, you can adjust the setting using the steps below.
Steps:
Go to the Inbox module in Strive Go
Tap the gear icon on the top right
Tap the gear icon for Strive Go App
Tap the gear icon for the WA Personal channel
Tap the dropdown and select Group or Individual
Note: This notification setting is only available for the WA Personal channel and applies only to the Strive Go app. 📱
This helps you manage notifications better so you only receive alerts for the chats that matter most to you.
39. Assign and Manage Flowbuilder Ownership 👤
What's New:
You can now assign an owner to your Flowbuilder. 😊
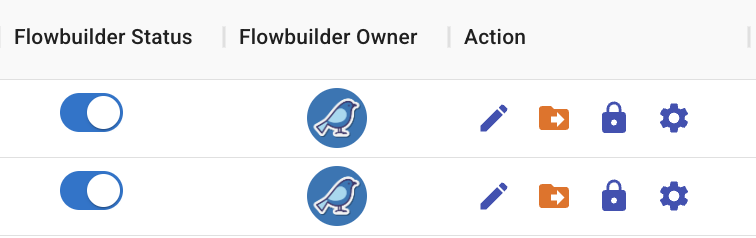
This allows you to clearly manage who is responsible for each flow in your workspace. When multiple team members are creating flows, assigning an owner makes it easier to keep track of who manages or maintains each one.
Ownership permissions are handled differently depending on the user role. 👥
Super admins: can assign all selected Flowbuilder to any user in the organization.
Regular users: can only assign Flowbuilders that they currently own to another user.
This helps teams manage flows more clearly by making ownership and responsibility visible for each Flowbuilder.
You can check out this guide on how to assign the Flowbuilder owner:
https://scribehow.com/viewer/How_to_Change_Flow_Ownership__-Tg1kLNMR3SVA5JdOkcqRQ
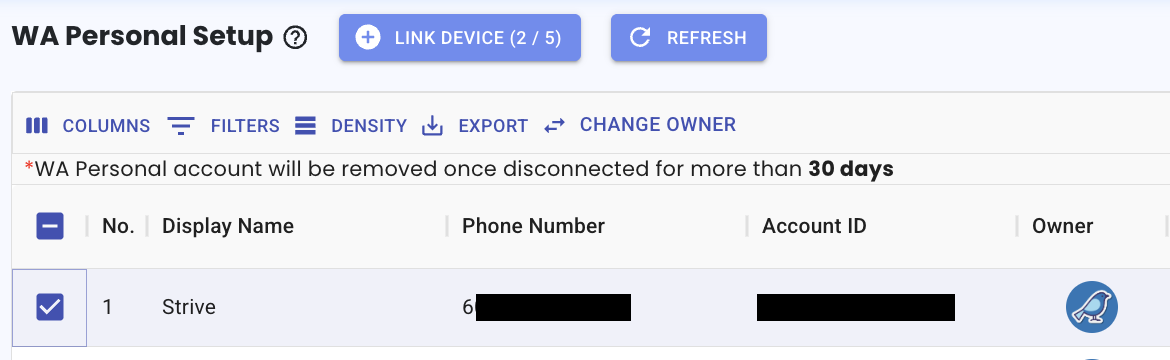
40. Transfer Ownership of WA Personal Devices 🔄
What's New:
You can now transfer the ownership of connected WA Personal devices to another user when needed. 📱
This helps ensure that contacts created from messages are assigned to the correct user who owns the device. 👤
A Super Admin can transfer ownership of all connected devices to any selected user.
A User can only transfer devices that are currently connected under their own account.
This helps ensure contacts are created under the correct device owner and keeps contact records properly organized. 🗂️
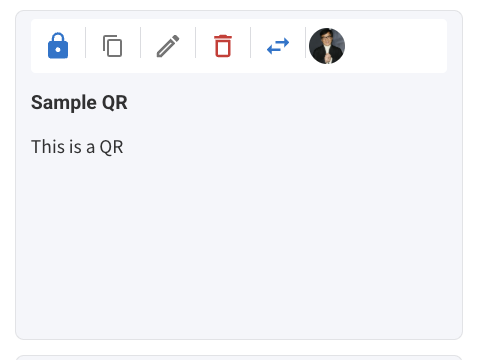
41. Improved Quick Reply Management ✉️
What's New:
You can now manage Quick Replies more easily with clearer information and controls. The Quick Reply owner is now visible, and you can also transfer the ownership when needed. The delete icon is now more noticeable so you can quickly identify which Quick Reply can be removed.
Users can transfer Quick Replies that they own to another user when needed. Super admin users have more flexibility and can transfer any Quick Reply to another user, even if it was originally created by someone else. For deletion, only the Quick Reply owner is allowed to delete it, which helps prevent accidental removal.
This enhancement helps teams organize Quick Replies better, making it easier to manage shared responses and keep communication clear and consistent. 💬
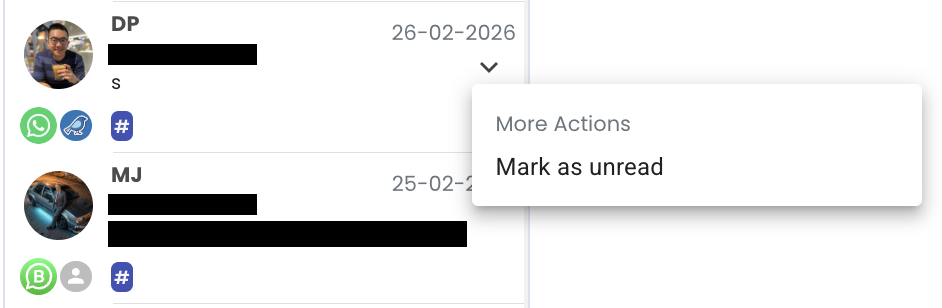
42. Closing a Ticket Now Marks Chat as Read 💬
What's New:
When you close a ticket, the chat will now be automatically marked as read. This means you no longer need to open the chat first just to mark it as read before closing the ticket. Simply click the Close Ticket function and the chat will be marked as read at the same time.
This small improvement makes ticket handling more smooth and efficient. It removes the need for extra clicks when managing conversations in the inbox. Your chat list will also stay cleaner because closed tickets will no longer appear as unread. ✨
This enhancement helps you manage tickets faster and keep your inbox organized while handling conversations more efficiently. 👍
43. Display Contact Persona in Inbox 👤
What's New:
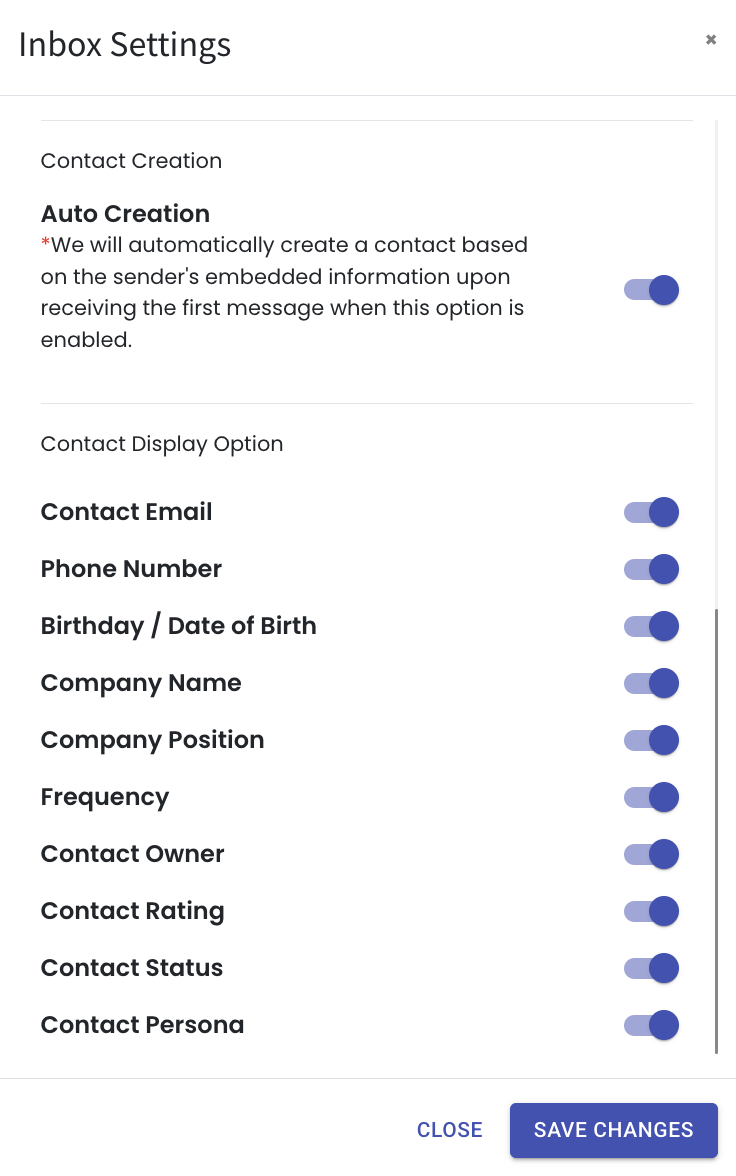
You can now choose to display the Contact Persona directly in the Inbox module. To enable it, click the Setting button in the Inbox, scroll down, and turn on the Contact Persona toggle. When the toggle is blue, the display is enabled. ⚙️
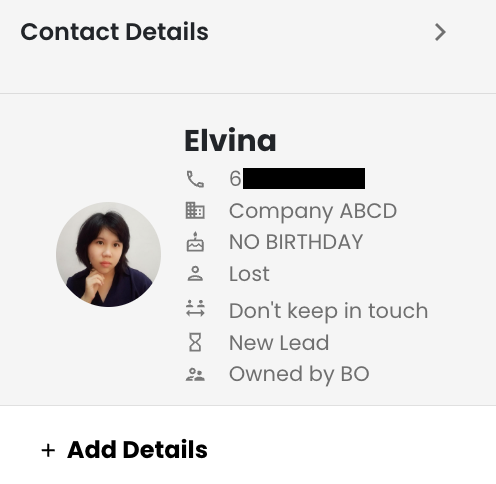
Once enabled, open any ticket and you will be able to see the contact’s persona on the right side of the Inbox. This gives you quick insight into the contact while you are viewing or replying to the conversation. The information appears alongside the other contact details for easy reference. 👀
This enhancement helps you quickly understand who the contact is while chatting, making it easier to respond and handle conversations more effectively. ✨
44. Add/View Company Labels Easily in the Company Module 🏷️
You can now add labels to companies in the Company module to make them easier to identify.
When creating a new company or editing an existing one, you can add a label that represents the company category or status. The label will then appear in the new Label column in the company list view, making it easy to scan and organize your companies.
For example, you can use labels such as VIP, Partner, or Priority Client to quickly identify important companies. 👀
This helps you quickly recognize key companies and manage your business relationships more efficiently when viewing your company list. 🧑💻

45. Inviting member via link
In situation where your colleague did not receive the email invite to join Strive, worry not, you can now headover to Organisation and just copy the invite link and you can easily just share the link directly with them.

Just click on the grey copy icon, and the specific link can be shared with your colleague.
46. Delete Relationship Personas Easily 🗑️
What's New:
You can now delete the personas in the Relationship module. 🗂️
Previously, default personas were fixed and could not be removed, but you now have the flexibility to manage them based on how your business categorizes customers. This allows you to keep only the personas that are relevant to your segmentation strategy. 📊
This helps you maintain clearer customer categories and makes it easier to manage your contact groups.
You can check out this guide on how to delete the Relationship persona: https://scribehow.com/viewer/How_to_Delete_Relationship_Persona__2eVIoVmNTbGo1vGfT7qxug
47. Manual Flow Trigger Will Not Add New Channel ⚙️
What's New:
When you manually trigger a flow in the Inbox module, the channel will not be added as a workflow trigger if that channel was not originally selected. The flow trigger settings will remain the same as what you configured in the workflow. This helps ensure that the selected trigger channels stay accurate and unchanged. 🔒
Since some actions in a flow may only work for specific channels, it is important to make sure that the correct flow is manually triggered. Always check the flow setup and confirm that it matches the channel you are using before running it. This helps avoid confusion when testing or triggering flows from the Inbox. ⚠️
This enhancement helps prevent accidental changes to your trigger channel settings while keeping your workflow configuration clear and controlled. ✨
48. Smarter Duplicate Contact Detection for Bulk Merge 🧩
What's New:
We have improved the Contact Bulk Merge feature to make duplicate detection clearer and easier to manage. 😊
Now, contacts will appear under Merge Duplicate if they share the same email address or the same phone number. This makes it simpler to identify contacts that may actually be the same person.
You can review these contacts and merge them when needed to combine their information into a single record. 📇
This helps keep your contact list organized and avoids having multiple entries for the same person.
____________________________________________________________________________
This wraps up the March 2026 update. We appreciate your continued support. Do look forward to our next update 🙂