Strive September 2026 Updates 🚀
September 2026 Update
Dear Strivers,
As we step into October, here’s a quick recap of what we released in September 2026. We hope everyone had a productive and meaningful month, and to our fellow Malaysians, we hope you had a wonderful Malaysia Day!
September brought enhancements across Inbox, Flowbuilder, AI Agents, Contacts, and Strive GO, designed to make your daily workflows smoother, more flexible, and easier to manage. Here’s a look at what’s new.
____________________________________________________________________________
Enhancements
1. Introducing Our New Inbox View ✨
What's New:
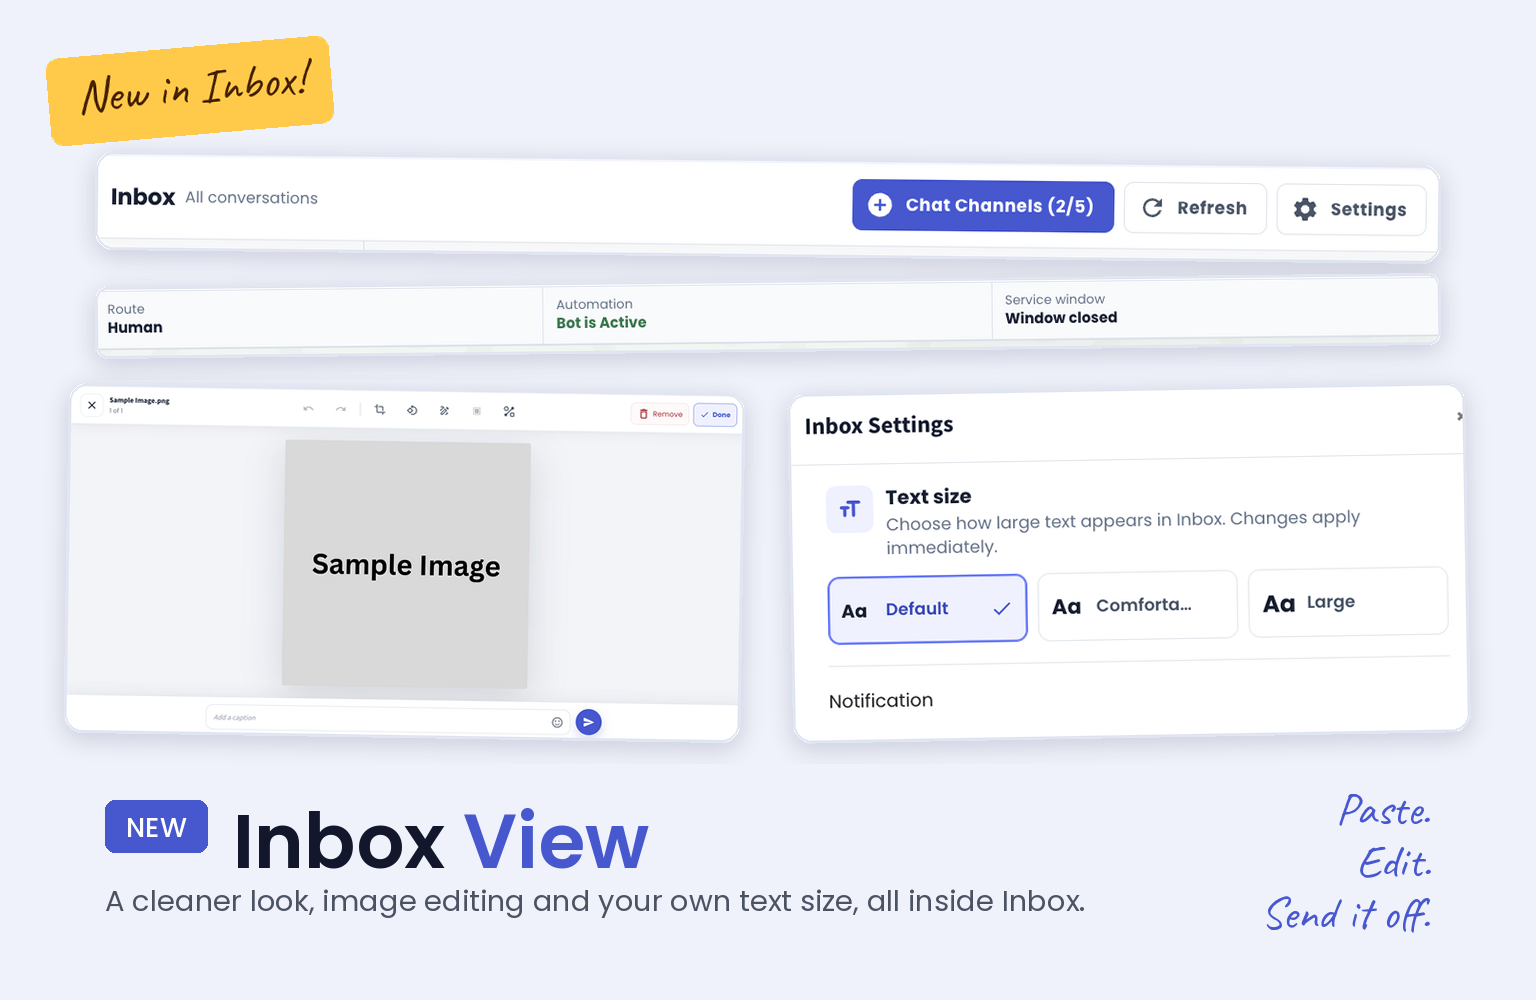
We gave the Inbox a fresh new look. You can now paste an image and edit it on the spot, and you can pick your own text size in Inbox Settings. 🎉
What it means to you:
No more saving an image, opening another app to crop or blur it, then uploading it back. You do it all inside the Inbox and send it off in seconds, so you reply faster. 👀
And if the text feels too small, switch to a larger size and read your chats without squinting. 🔍
What are the changes:
Sleeker and modern look
Paste an image, then edit it (crop, draw or even blur) directly in the Inbox
Change the text size in Inbox Settings
Here are some sneak peeks: 📸
2. Quick Reply for Send WA API Message Node ✨
What’s New:
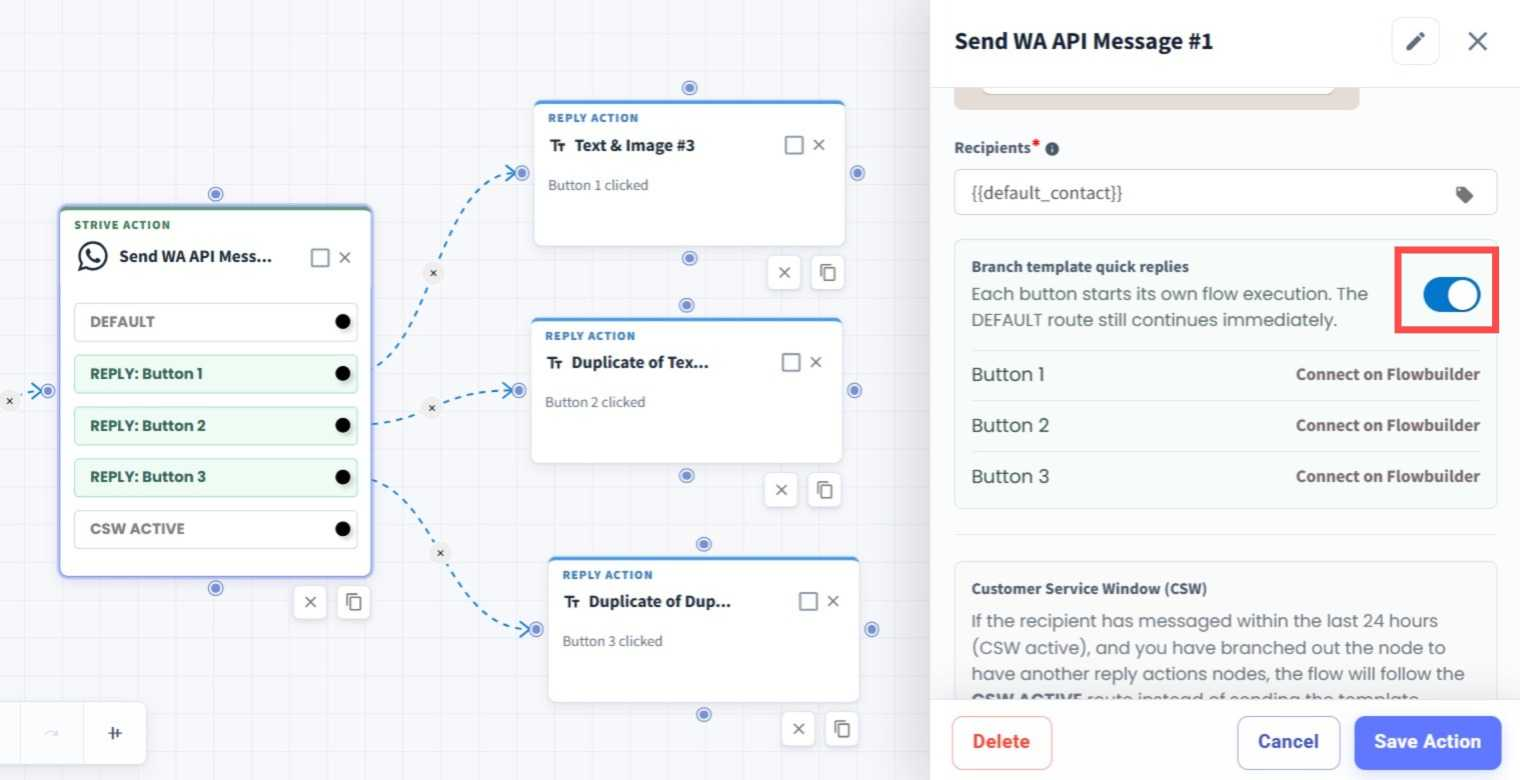
We’ve added a Quick Reply feature to the Send WA API Message node in Flowbuilder. You can now create follow-up paths directly from the buttons in your WA API Template. 💬
What it means to you:
When a customer clicks a template button, you can continue the follow-up directly within the same flow, without needing to create a separate Keyword Flow for each button. This makes your flows simpler and easier to manage. 🔗
How you can go about it:
Head to the Flows Module and create a new flow or edit an existing flow.
Add or edit the Send WA API Message node.
Select the approved WA API Template you want to use.
Turn on Branch template quick replies.
Connect each template button to the respective follow-up node in Flowbuilder.
Save your changes and you're ready to go. 🚀
3. WA API Carousel Now Available in Flow ✨
What’s New:
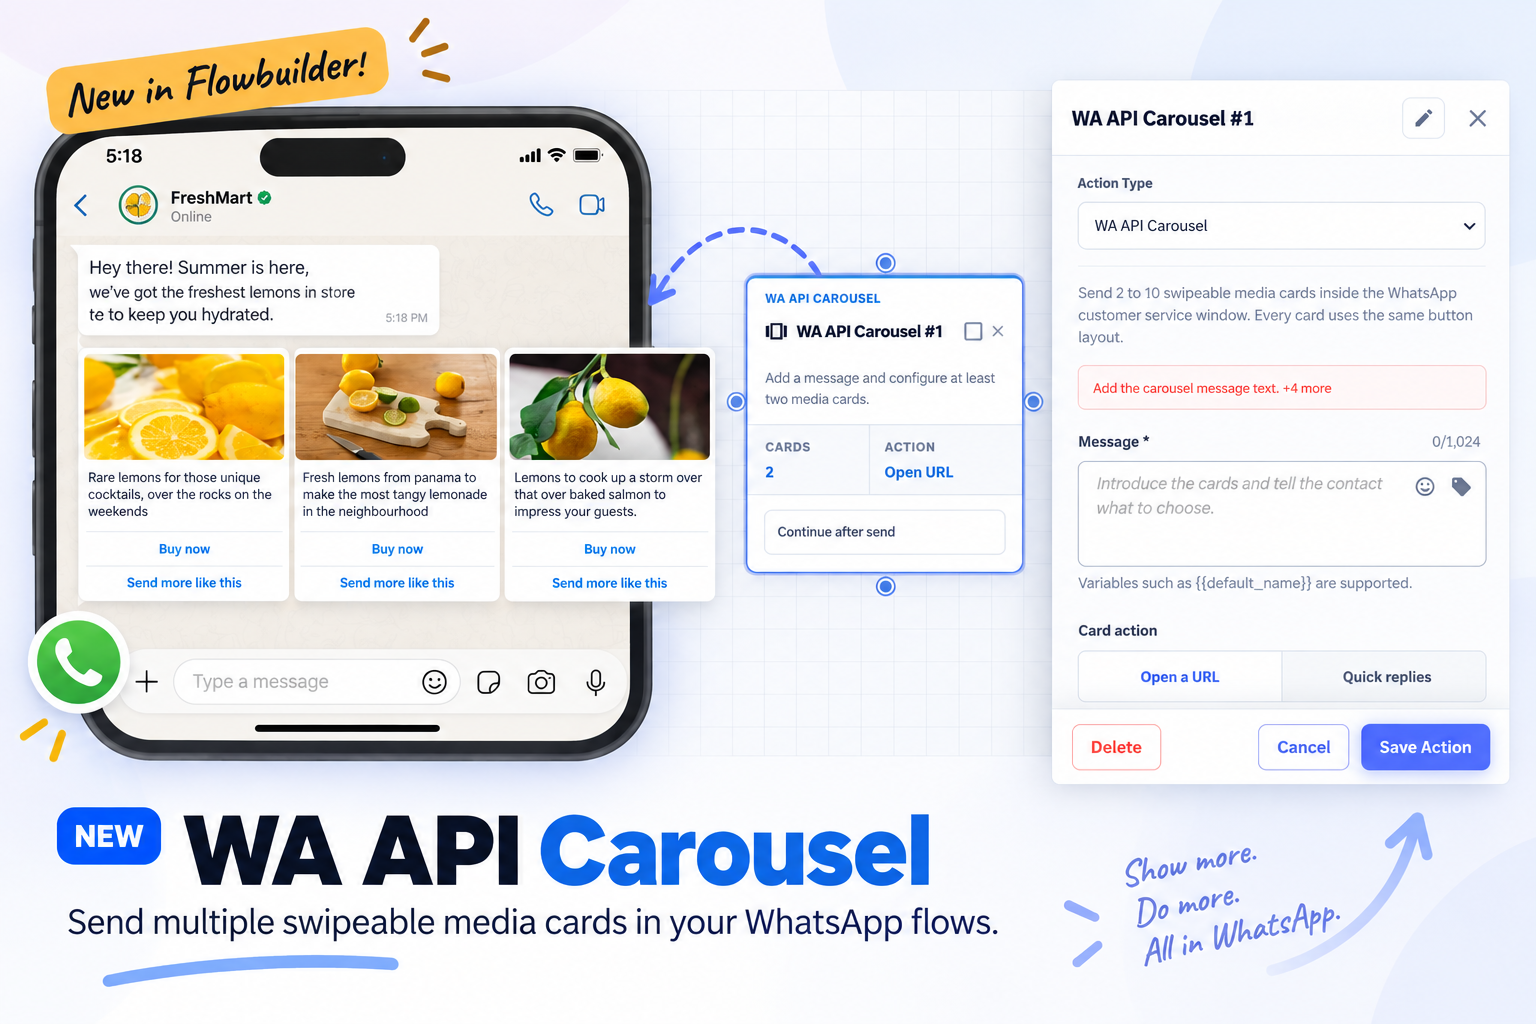
We’ve added a new WA API Carousel node in Flowbuilder. You can now send multiple swipeable media cards within a WhatsApp conversation. 🖼️
What it means to you:
You can showcase multiple products, services, promotions, or options in a single interactive message. Each carousel can contain 2 to 10 cards, making it easier for customers to browse and take action directly from WhatsApp. 📲
How you can go about it:
Head to the Flows Module and create a new flow or edit an existing one.
Add an Action Node and select WA API Carousel.
Enter your message and configure 2 to 10 carousel cards.
Add the media, content, and action for each card.
Connect the next node if needed, then save and enable your flow. 🚀
4. ✨ Direct Branching for FB/IG Private Reply
What’s New:
FB/IG Private Reply now supports Button and Quick Reply branching directly within the same flow. 🎉
What it means to you:
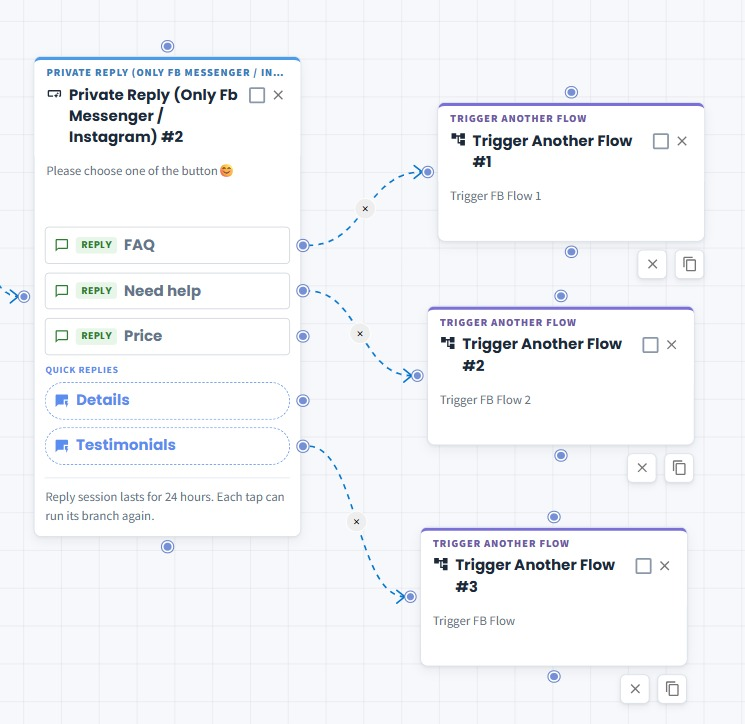
Previously, you needed to create a separate Keyword Flow to handle responses from Quick Replies. Now, you can branch each Button or Quick Reply directly to another flow, making the setup simpler and easier to manage. 🚀
How you can go about it:
Select FB/IG Contact Comment on Your Post as the Trigger Type.
Add a Private Reply node.
Set up your Buttons or Quick Replies.
Scroll to the bottom and tick Branch by button or quick reply.
Connect each Button or Quick Reply branch to a Trigger Another Flow node.
Select the flow you want to trigger for each branch. ✅
For a detailed step-by-step tutorial, please refer to:
5. Send WA API Templates Directly from Inbox 💬
What's New:
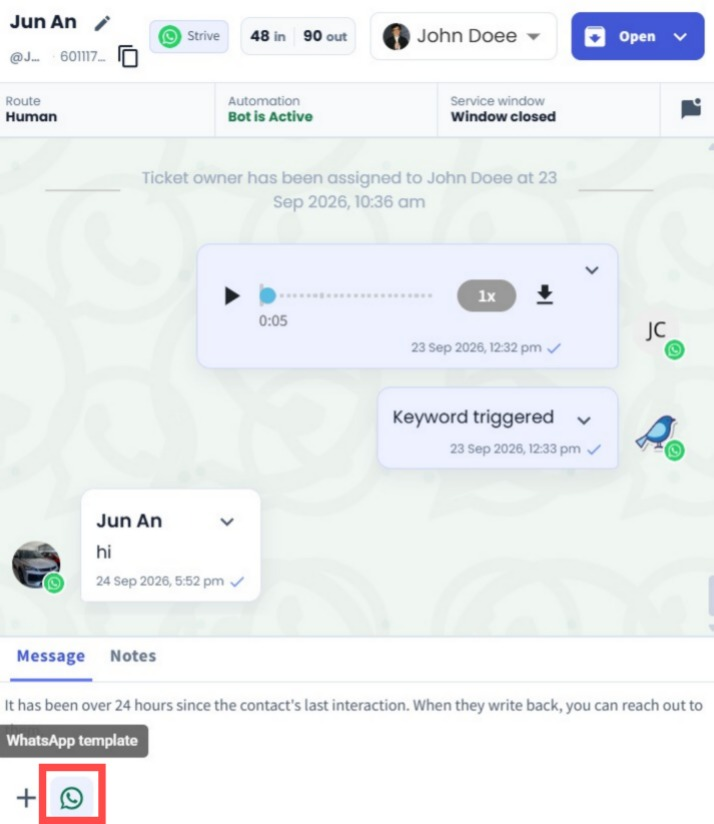
You can now send WA API Template messages directly from the Inbox, even when the CSW window is closed. 🚀
What it means to you:
No need to navigate to other modules just to send a template message. You can quickly reach out to customers from the Inbox whenever a template message is needed.
How you can go about it:
Open the Inbox and select a contact.
When the CSW window is closed, click the WhatsApp icon next to the message box.
Select the WA API Template you want to send.
Send the template message to the customer. ✨
6. Add Messenger Broadcast Subscribers to a List ✨
What’s New:
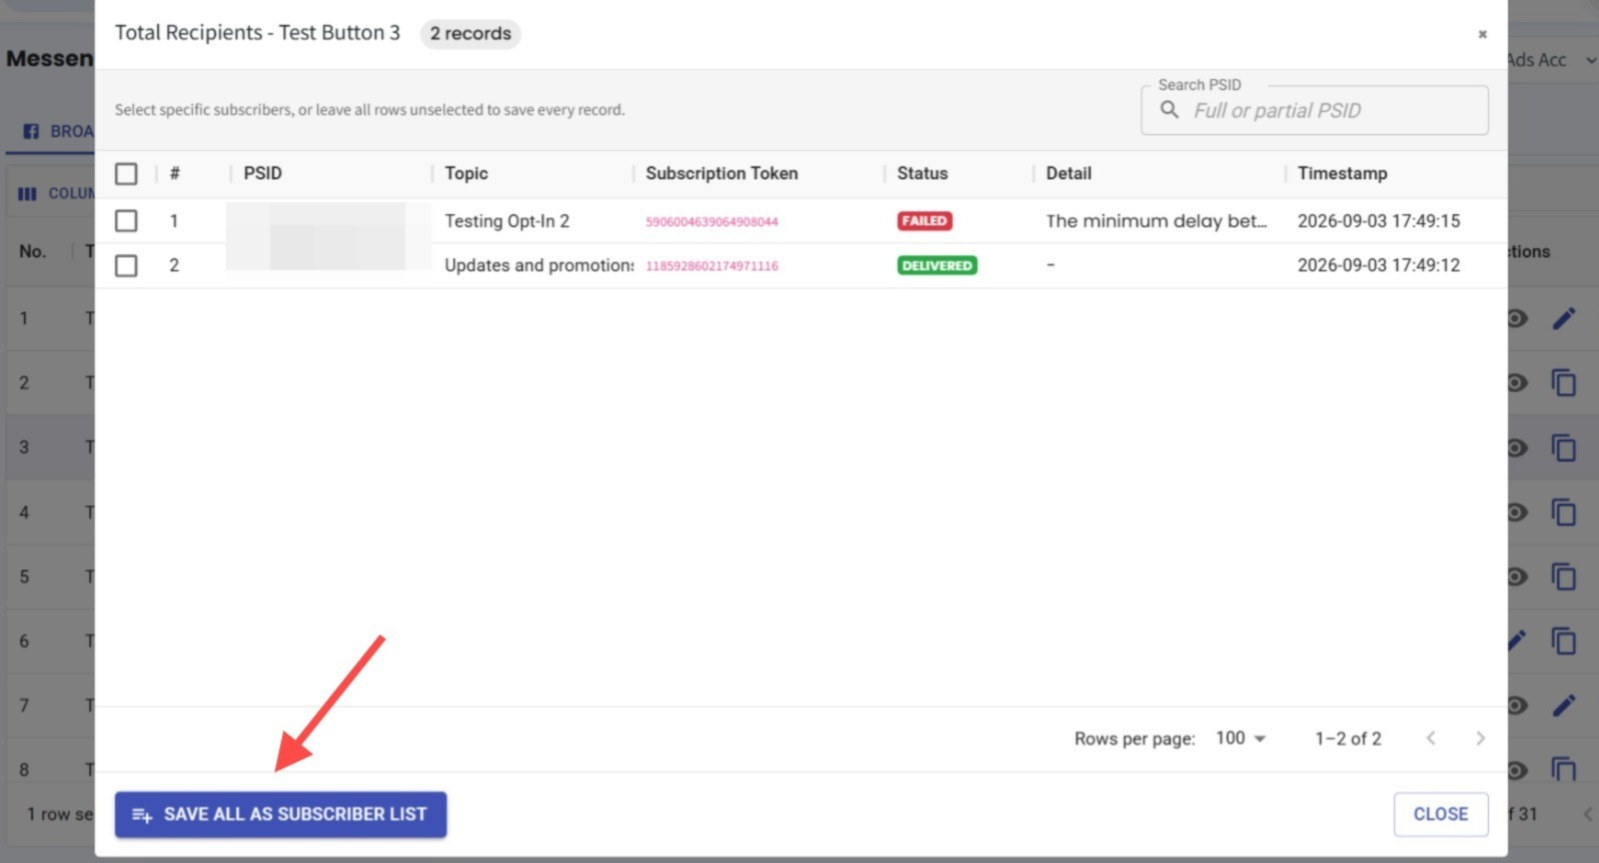
You can now add subscribers from your Messenger Broadcast stats directly to a Contact List. 📋
What it means to you:
This makes it easier to group subscribers based on their broadcast status, so you can follow up with specific audiences or include/exclude them in future broadcasts. 🎯
How you can go about it:
Head to Messenger Broadcast.
Double-click on the number under the relevant broadcast stat, such as Sent, Delivered, Read, Clicked, or Failed.
Select the subscribers you want.
Add them to a Contact List for future follow-ups or broadcast inclusion/exclusion. 🚀
7. Smart Delay with Specific Date & Time ✨
What’s New:
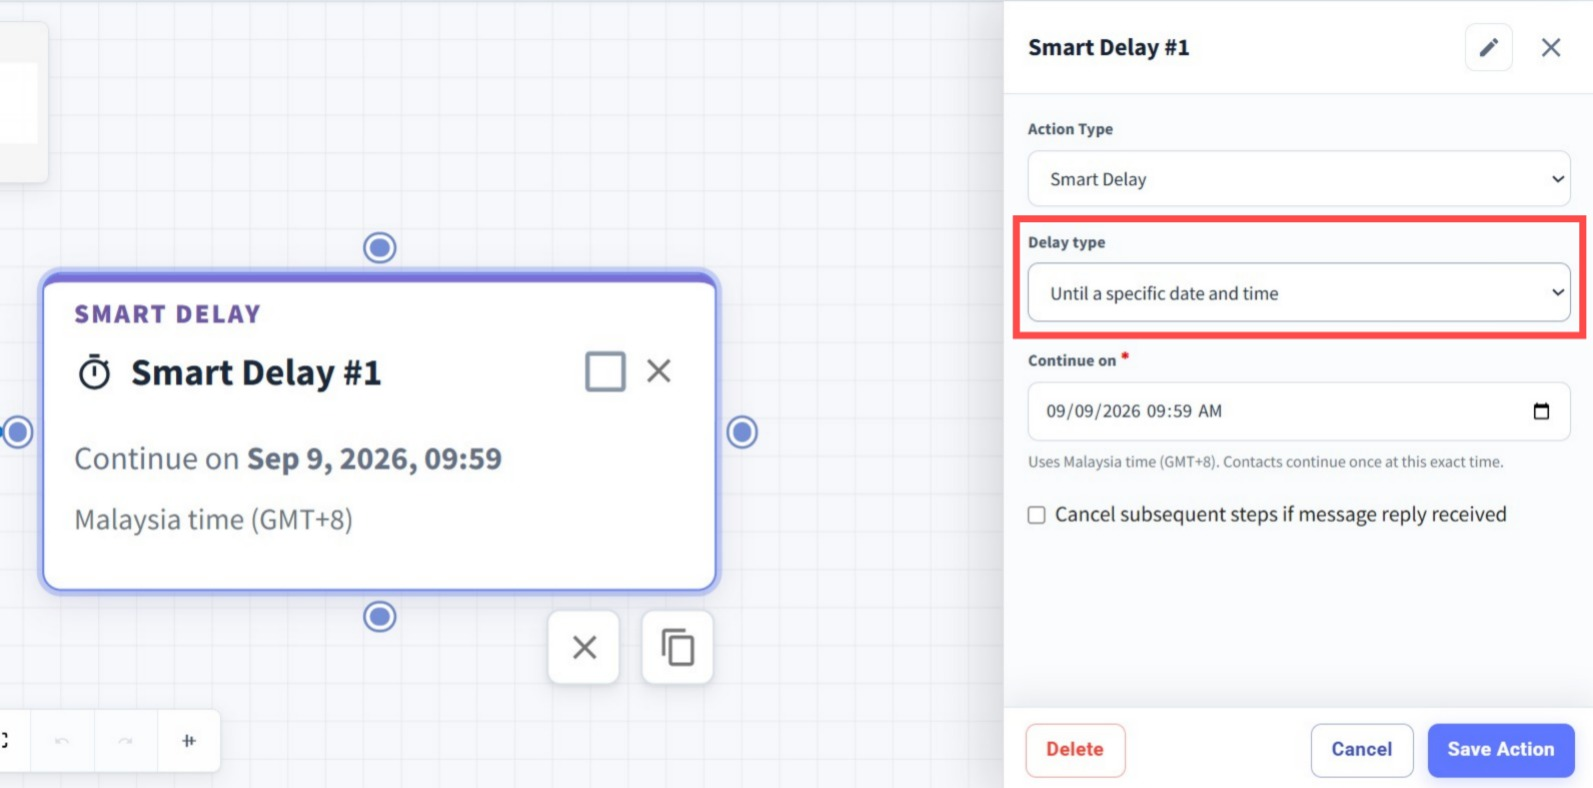
We’ve enhanced the Smart Delay node with a new delay type. Besides delaying For a Duration, you can now select Until a Specific Date and Time. ⏰
What it means to you:
You can now set your flow to continue at an exact date and time, giving you more flexibility when scheduling follow-ups, reminders, or time-sensitive messages. 📅
How you can go about it:
Head to the Flows Module and create a new flow or edit an existing one.
Add or edit a Smart Delay node.
Under Delay Type, select Until a Specific Date and Time.
Set the exact date and time you want the flow to continue.
Save your changes and enable the flow. 🚀
8. Automate Email Campaign Enrollment with Flowbuilder 📧
What's New:
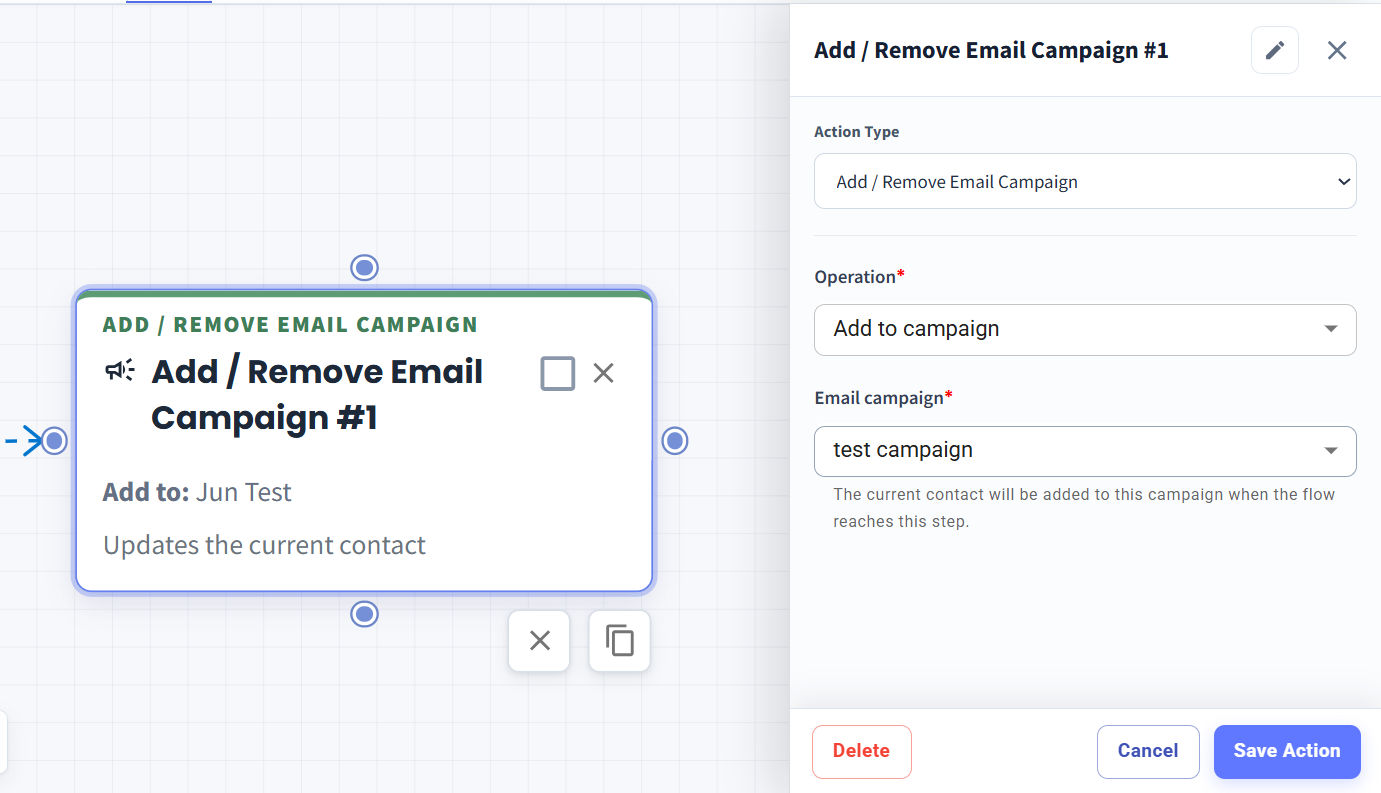
You can now use the new Add/Remove Email Campaign node in Flowbuilder to automatically add contacts to or remove contacts from an Email Campaign. No more manual enrollment needed. ✨
What it means to you:
Save time by automating your Email Campaign management. You can set your flow to automatically enrol contacts into a specific campaign when they reach the node, or remove them from a campaign when needed.
How you can go about it:
Go to the Flowbuilder Module and create or edit a flow.
Add the Add/Remove Email Campaign node.
Choose Add to campaign or Remove from campaign.
Select the Email Campaign you want to manage.
Save your flow, and you're all set! 🚀
9. Multiple Match Types in Keyword Flow ✨
What’s New:
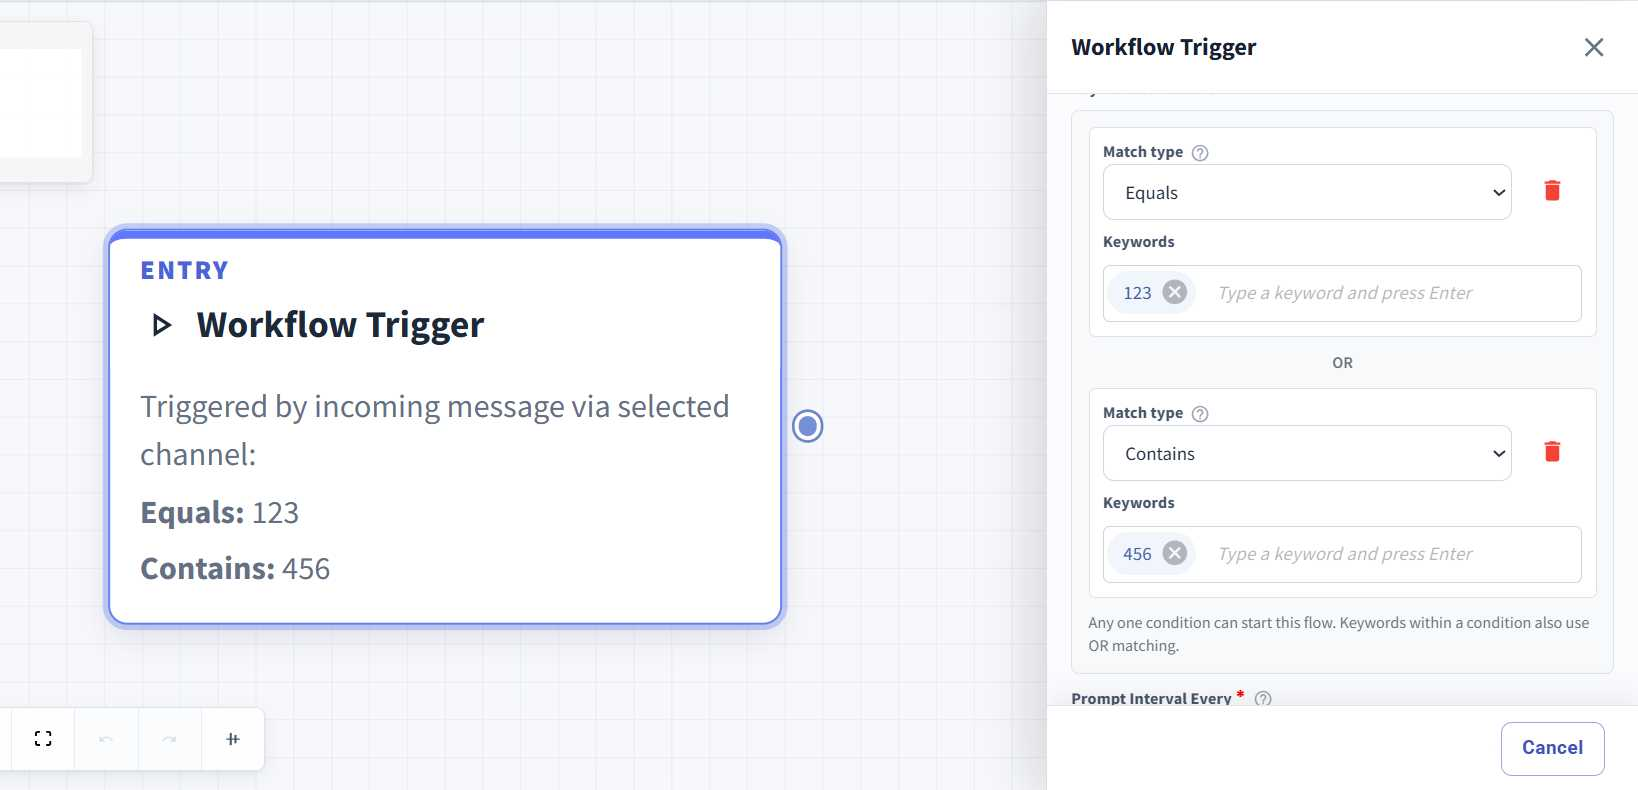
We’ve enhanced the Keyword Flow to support multiple match types within the same flow. You can now use both Equals and Contains together when setting up your keyword triggers. 🔑
What it means to you:
Previously, a Keyword Flow could only use one match type. Now, you can combine different match types and keywords in a single flow, giving you more flexibility while keeping your automation simpler. ⚡
How you can go about it:
Head to the Flows Module and create a new flow or edit an existing one.
Click the Workflow Trigger.
Select Keywords Based as the Flowbuilder type.
Select your Match Type and enter the relevant keywords.
Add another condition and select a different Match Type, such as Equals or Contains.
Save your changes and enable the flow. 🚀
10. Undo & Redo in Flowbuilder ↩️
What’s New:
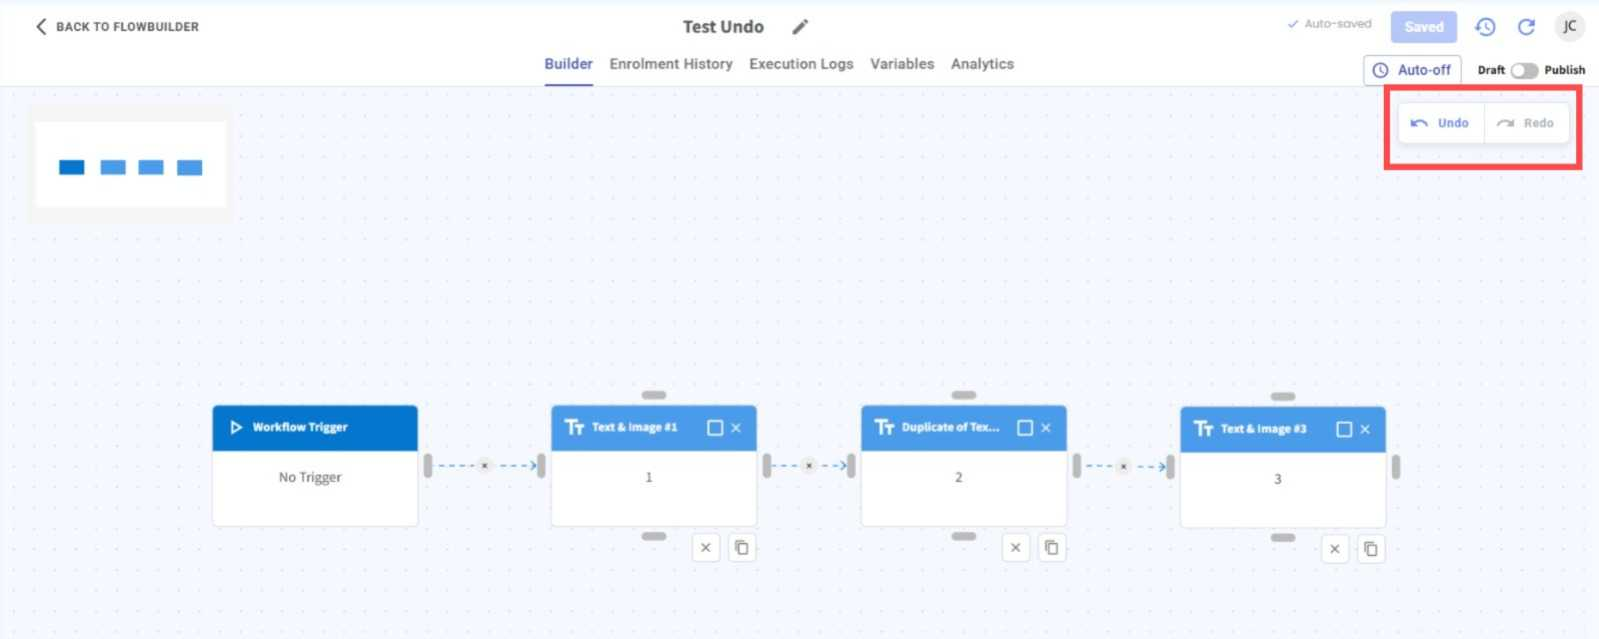
We’ve added Undo and Redo options in Flowbuilder, allowing you to quickly reverse or restore your recent changes. 🔄
What it means to you:
If you accidentally delete, move, or make changes to a node, you can simply undo the action instead of recreating it again. ✨
How you can go about it:
Head to Flowbuilder and edit your flow.
Click Undo to revert your previous action.
Click Redo if you want to restore the action you just undid. 🛠️
11. Daily Unique Messages in Inbox Analytics ✨
What’s New:
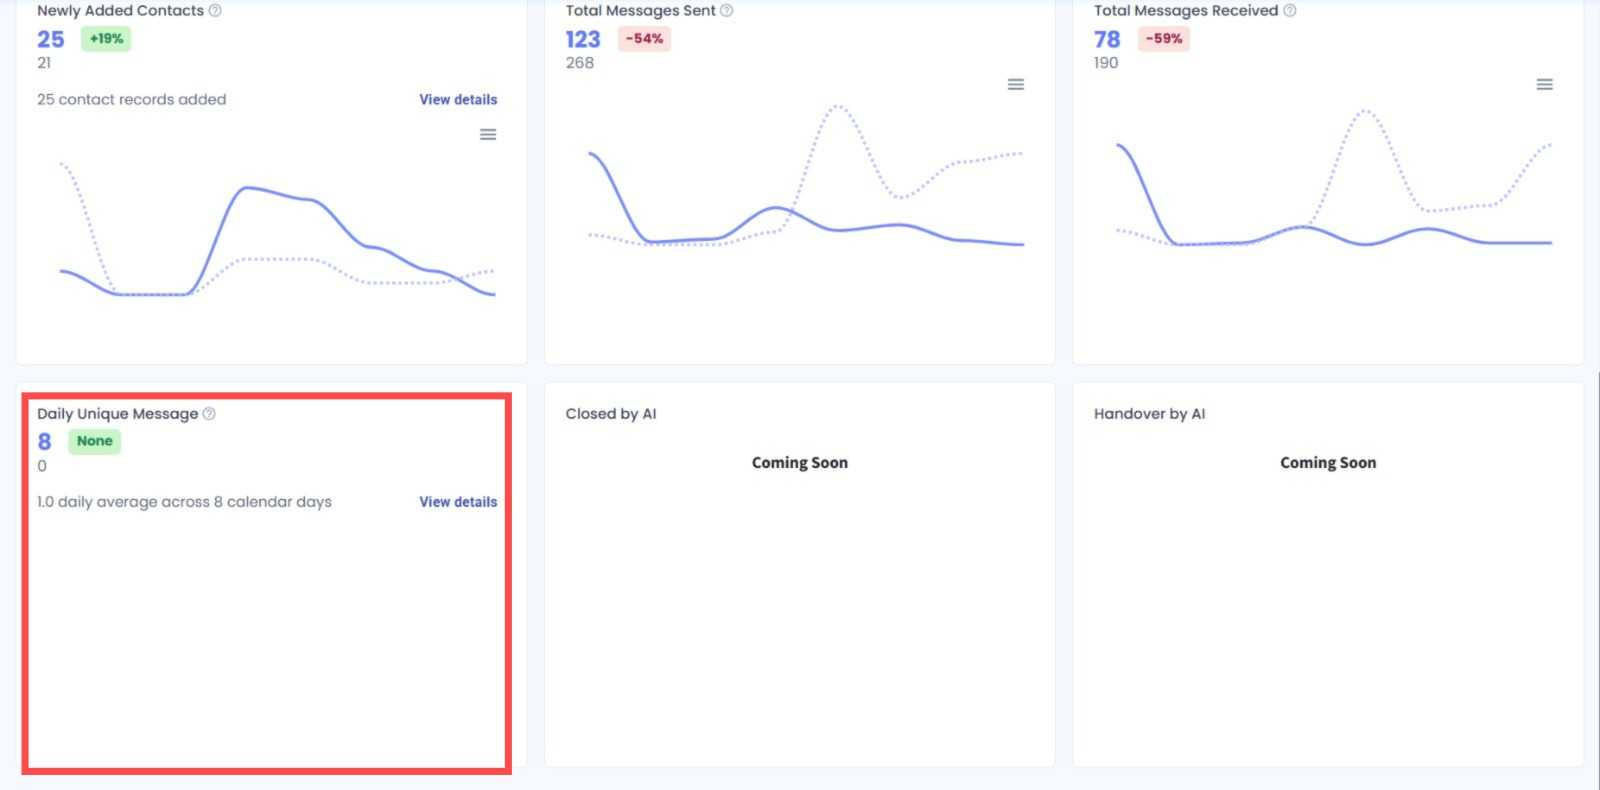
We’ve added a new Daily Unique Messages status card to Inbox Analytics. You can now track the number of unique contacts who messaged you during the selected period. 📊
What it means to you:
You can easily understand how many unique contacts are reaching out and view exactly which contacts messaged you on a specific date. 🔍
How you can go about it:
Head to Inbox Analytics.
Select your preferred date range and filters.
Locate the Daily Unique Messages status card.
Click View details.
Select a specific date to view the contacts who messaged you on that day. 🚀
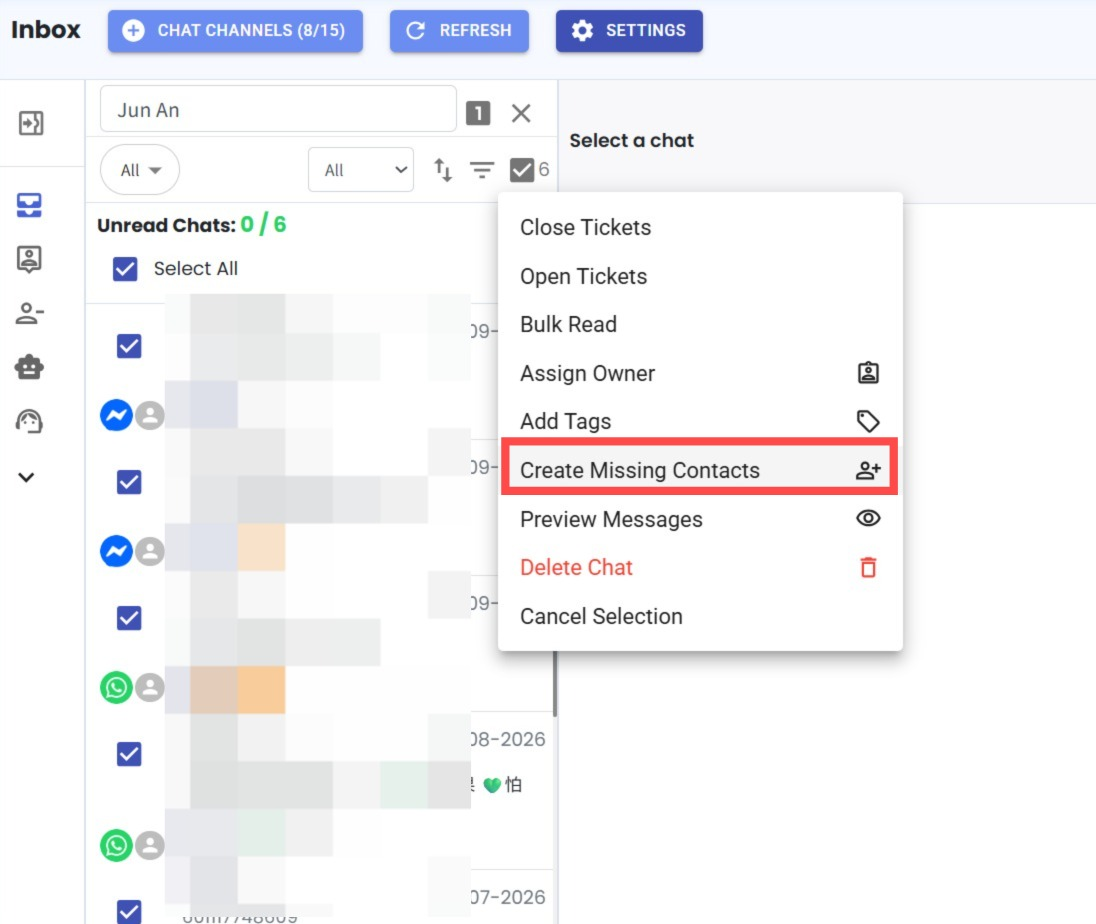
12. Create Contacts Directly from Inbox ✨
What’s New:
You can now create contacts directly from the Inbox Module. 👤
What it means to you:
If you have chats that haven’t been created as contacts yet, you can now create them directly from Inbox — including multiple chats at once — without having to create each contact manually. ⚡
How you can go about it:
Head to the Inbox Module.
Select the chats you want to create as contacts.
Click Create Missing Contacts.
The selected chats that don’t have a contact yet will be created as contacts. 🚀
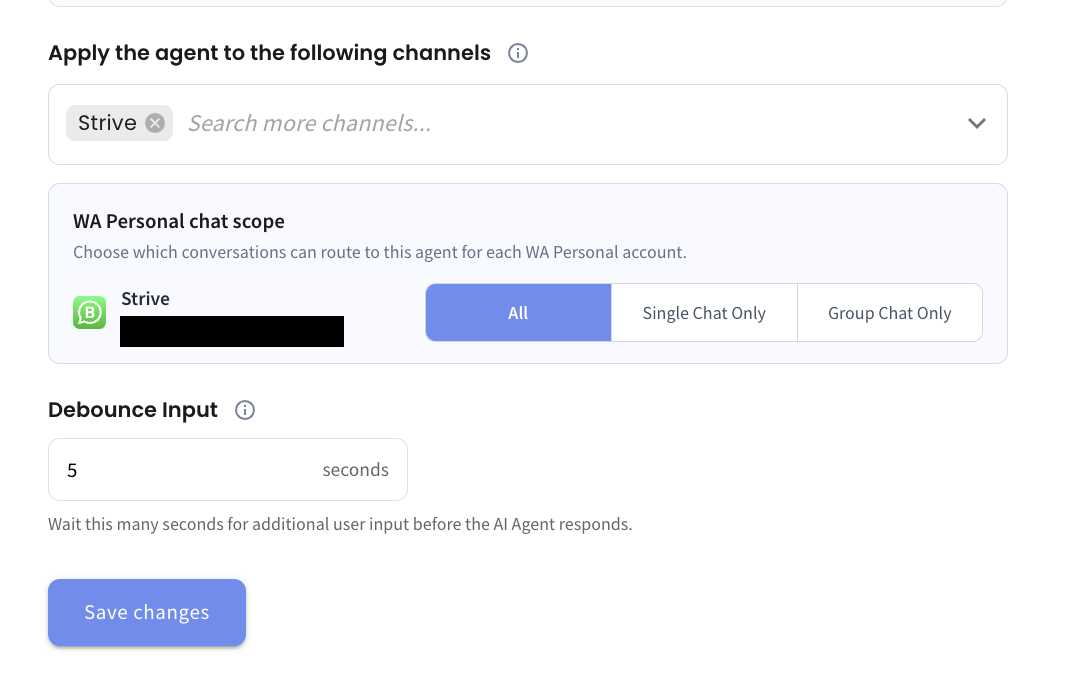
13. Choose Where Your AI Agent Responds ✨
What’s New:
We’ve added a new Chat Scope setting for AI Agents. You can now choose between All, Single Chat Only, or Group Chat Only when applying your Agent to a channel. 💬
What it means to you:
You now have better control over which conversations can trigger your AI Agent. For example, selecting Single Chat Only ensures that your Agent responds only to individual conversations and will not be triggered when members send messages in group chats. 🎯
How you can go about it:
Head to the Agent Module and click Go Live.
Select the channel you want to apply the Agent to.
Choose All, Single Chat Only, or Group Chat Only under Chat Scope.
Click Save changes to apply the setting. 🚀
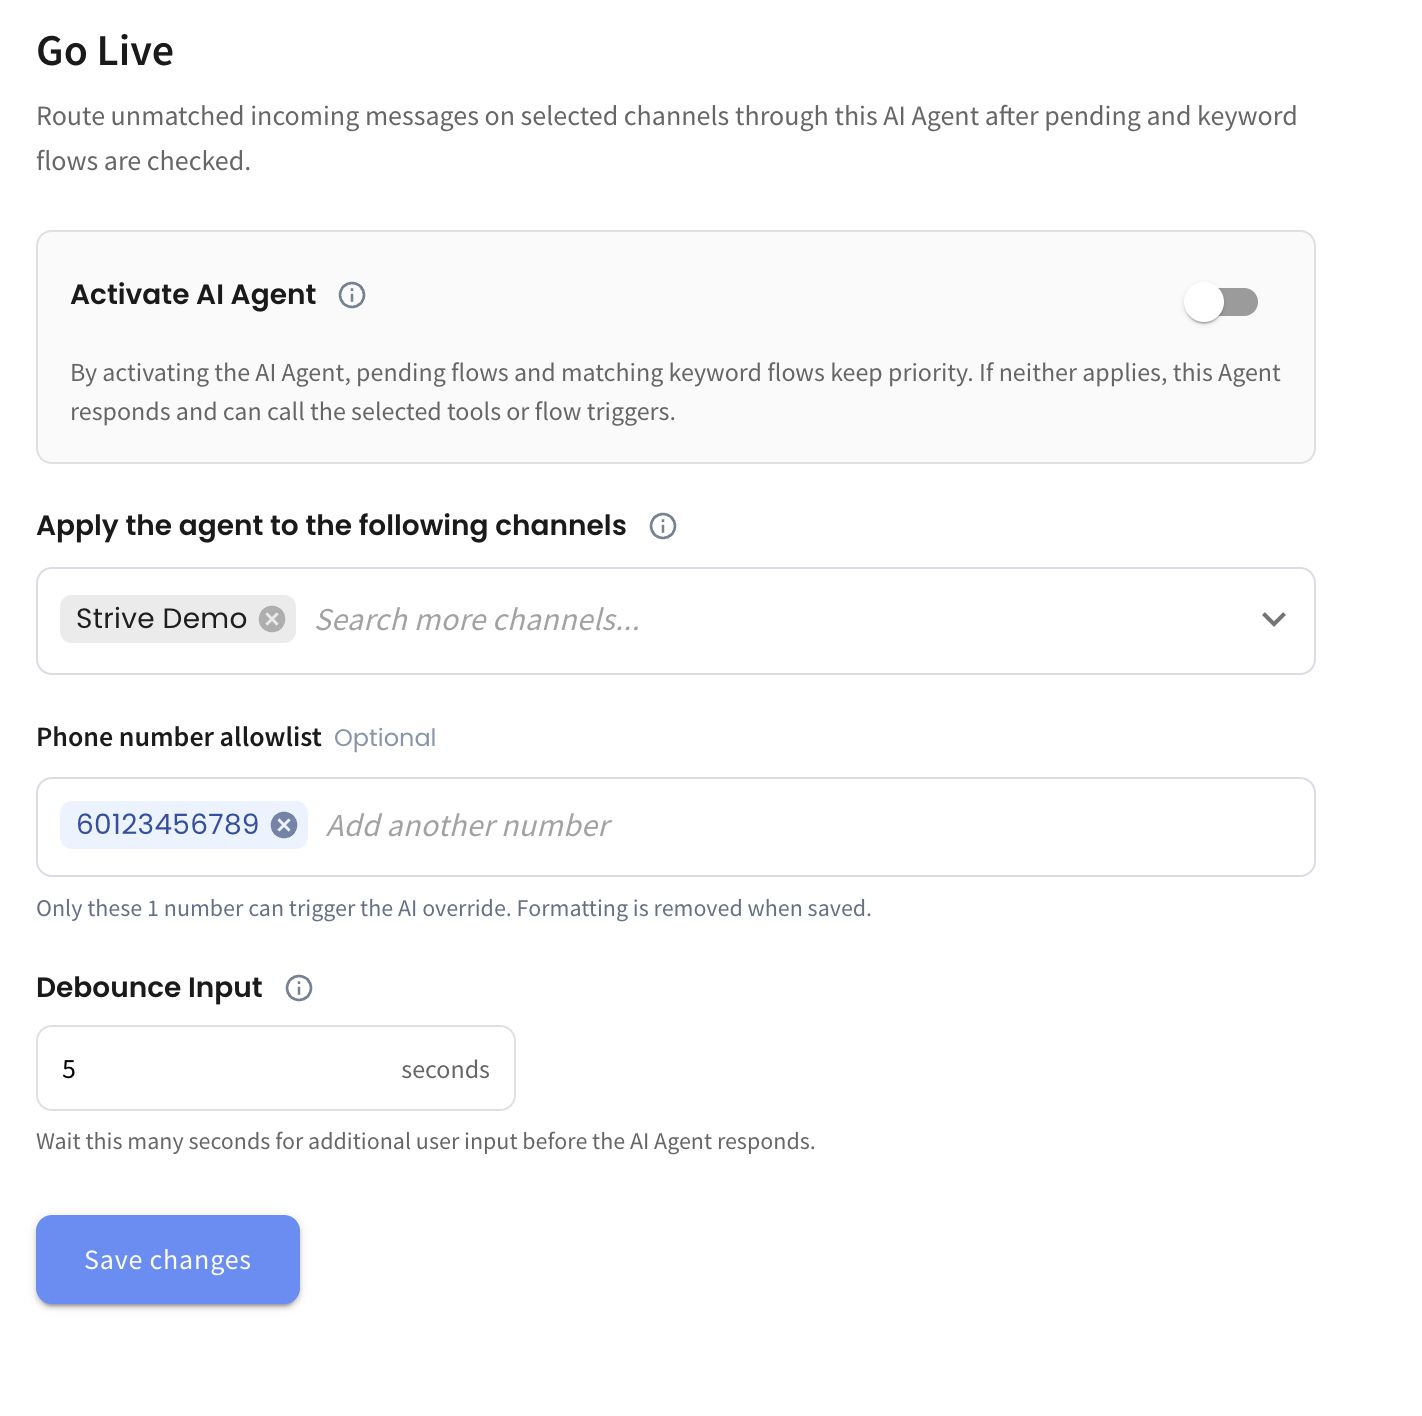
14. Test Your AI Agent with an Allowlist ✨
What’s New:
We’ve added a Phone Number Allowlist under Go Live, allowing you to specify which phone numbers can trigger the AI Agent. 📱
What it means to you:
You can now Go Live with your AI Agent for selected numbers only, making it easier for your team to test the Agent in a live environment before fully rolling it out to all customers. 🧪
How you can go about it:
Head to the Agent Module and select your Agent.
Click Go Live and select the channel you want to apply the Agent to.
Under Phone Number Allowlist, enter the phone numbers you want to use for testing.
Activate the AI Agent and click Save changes.
Only the numbers in the allowlist will be able to trigger the AI Agent. 🚀
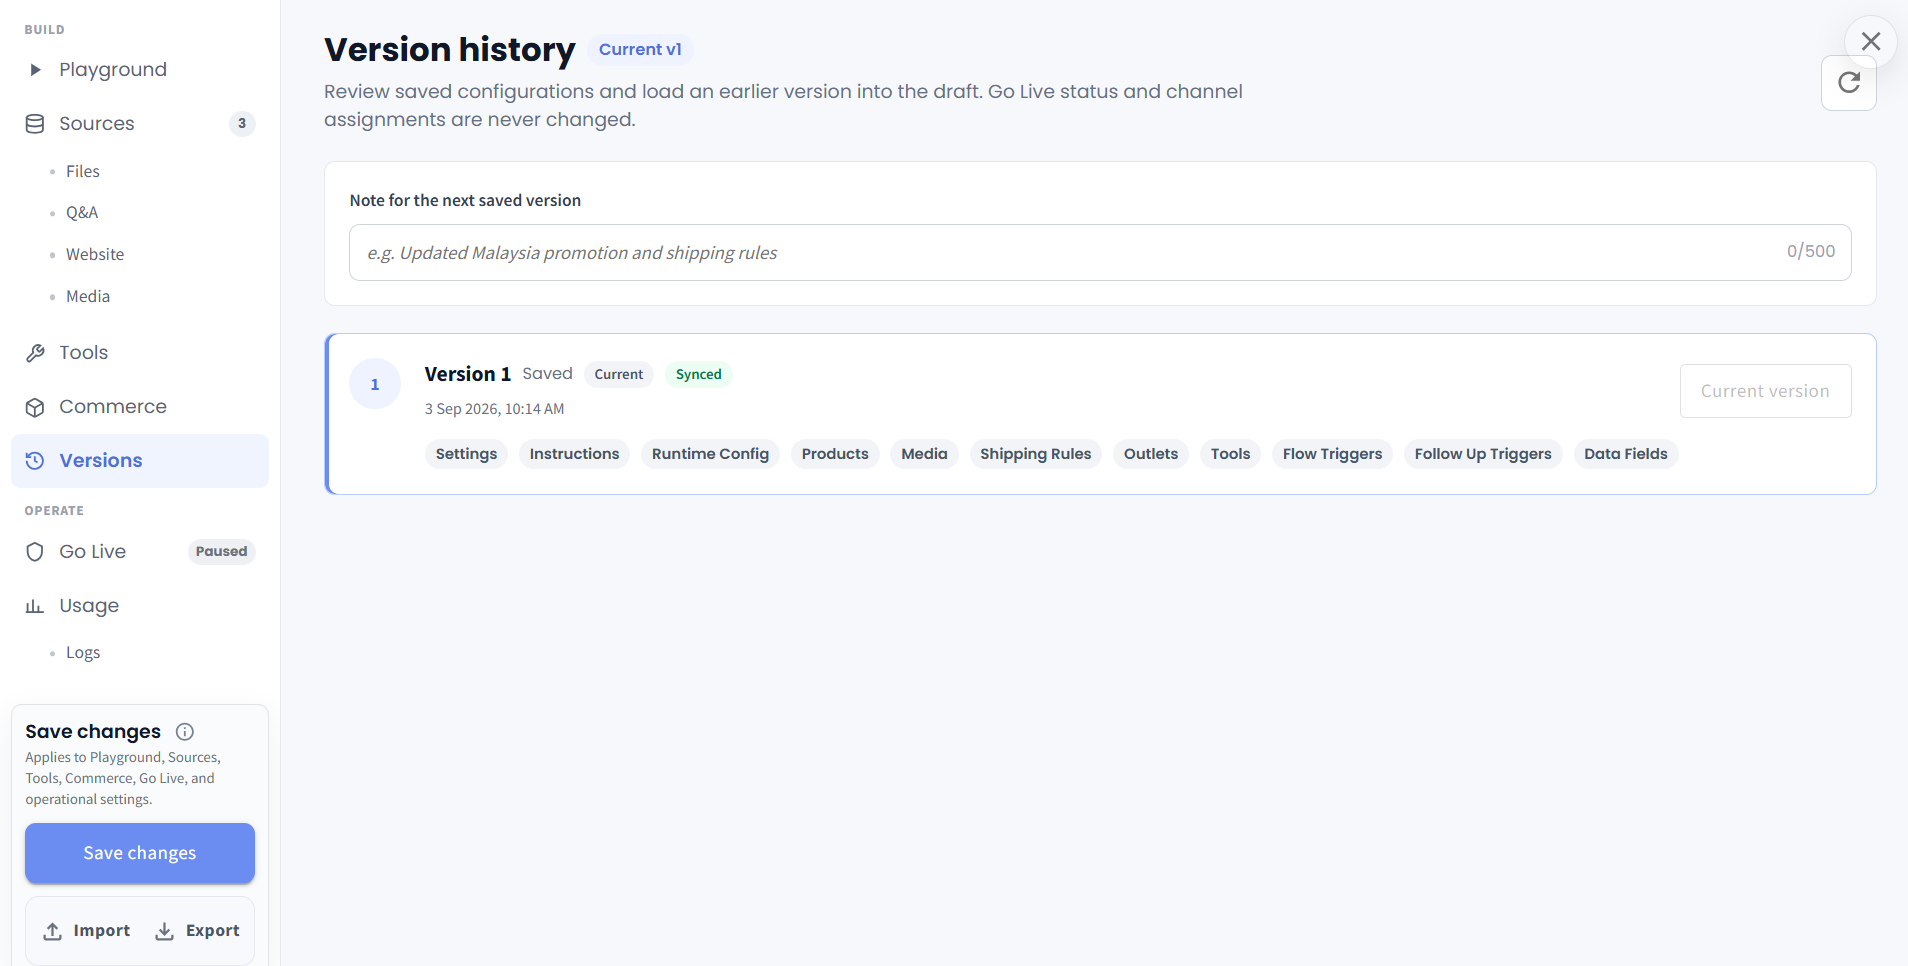
15. Version Control for AI Agents ✨
What’s New:
We’ve added Version History for AI Agents. Each time you save changes to an Agent, a new version can be recorded so you can review how the Agent configuration has evolved over time. 🕘
What it means to you:
You can now better trace which Agent configuration was used at different stages, making it easier to review changes, investigate behaviour, and understand the impact of future enhancements such as self-learning AI. 🔎
How you can go about it:
Head to the Agent Module and select your Agent.
Make the required changes to the Agent.
Add a note for the version if needed, then click Save changes.
Head to Versions to review the saved Version History.
You can refer back to earlier configurations whenever you need to trace or compare Agent changes. 🚀
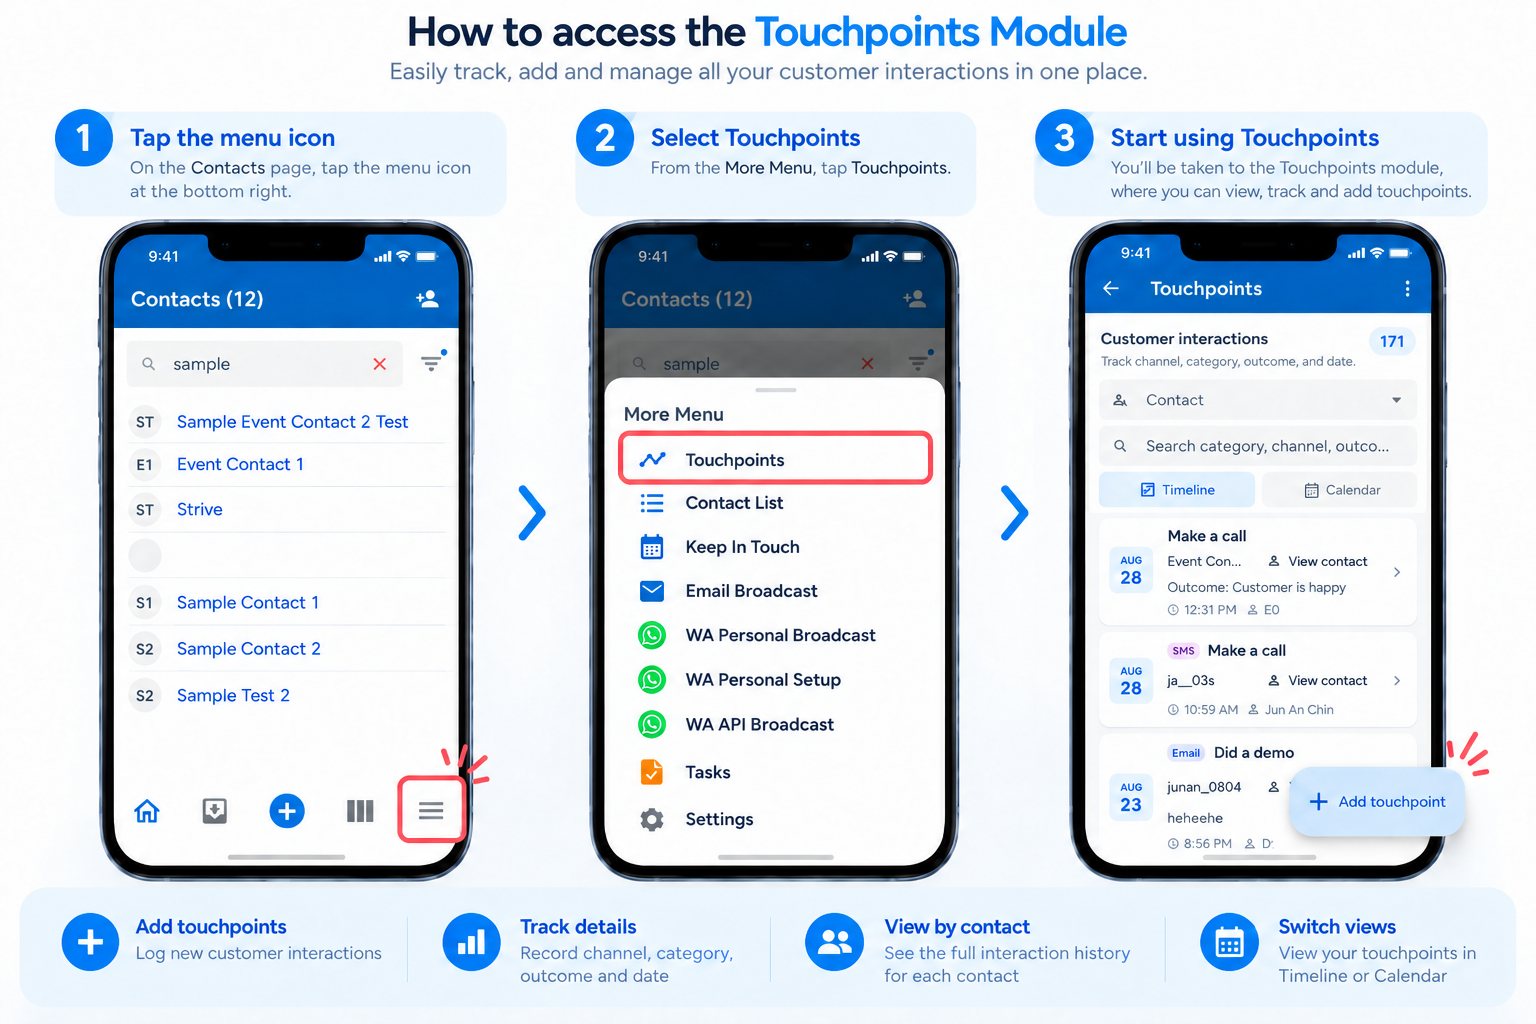
16. Touchpoints Module Now Available in Strive GO ✨
What’s New:
We’ve added the Touchpoints Module to Strive GO, allowing you to manage customer interactions directly from the app. 📱
What it means to you:
You can now add, view, and track customer touchpoints, including channel, category, outcome, and date. You can also review each contact’s interaction history and switch between Timeline and Calendar views. 📊
How you can go about it:
Make sure your Strive GO app is updated to the latest version.
Open Strive GO and tap the More Menu icon at the bottom right.
Select Touchpoints.
From there, you can view, search, filter, and add customer touchpoints. 🚀
17. ✨ Contact Lists Now Available in Strive GO
What’s New:
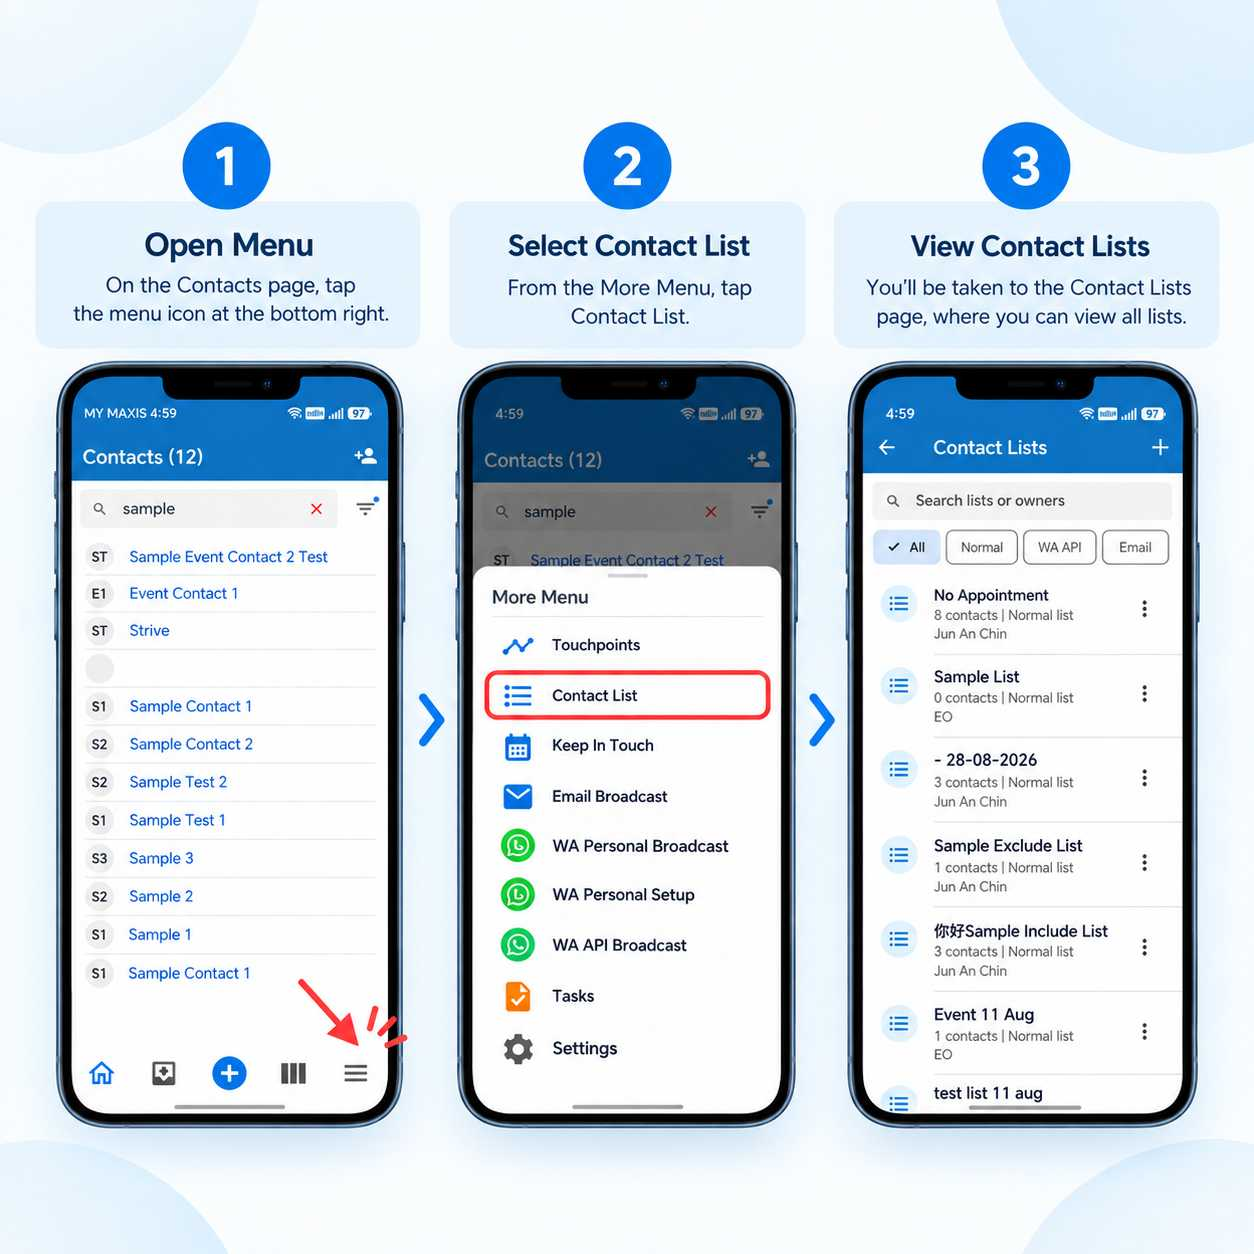
You can now access and view your Contact Lists directly in the Strive GO app, making it easier to manage your contacts while on the go. 📱
What it means to you:
No need to switch back to the web version just to check your Contact Lists. You can quickly view your lists and the contacts within them anytime from your mobile device. 🚀
How you can go about it:
Open Strive GO.
Tap the Menu icon at the bottom right.
Select Contact List.
You’ll be taken to the Contact Lists page, where you can view all your available lists. ✅
18. Find Chats by Message in Strive GO 🔎
What's New:
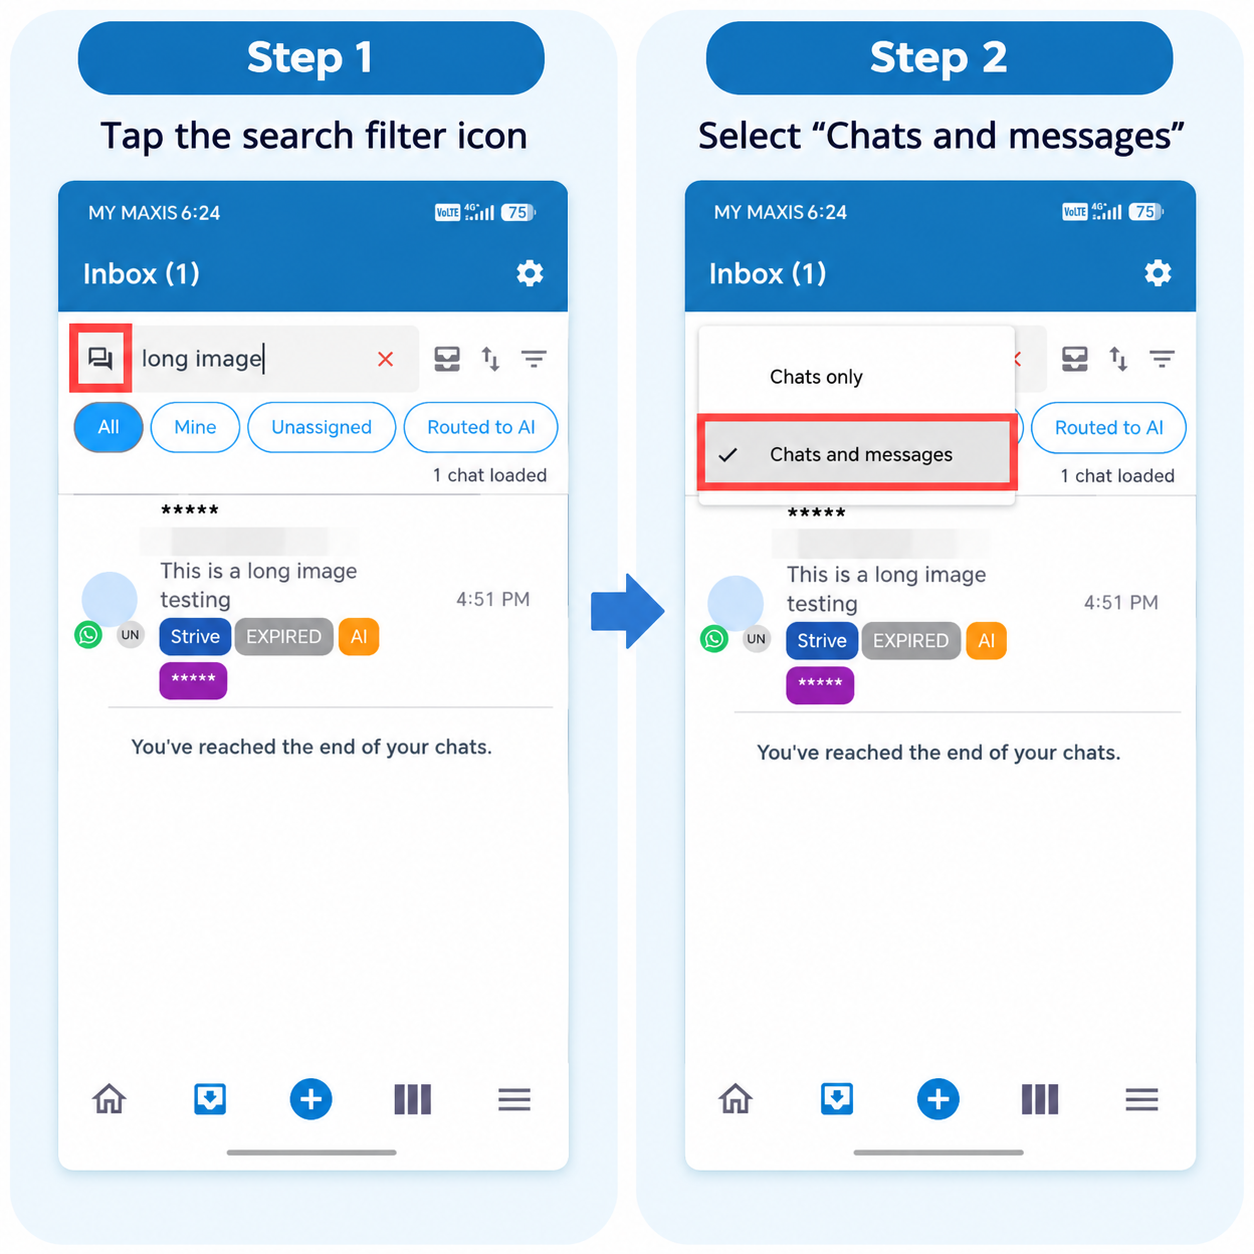
You can now search for specific messages directly in the Strive GO Inbox. 📱💬
What it means to you:
Instead of searching only by chat, you can search for a keyword or message content to quickly find the conversation where it was sent. This makes it easier to locate past customer conversations and information. 🚀
How you can go about it:
Open Strive GO and go to the Inbox.
Tap the Search filter icon.
Select Chats and messages.
Enter the keyword or message you want to search for.
Strive GO will show the chats containing the matching message. 🔍
19. Improved Contact Name Search ✨
What’s New:
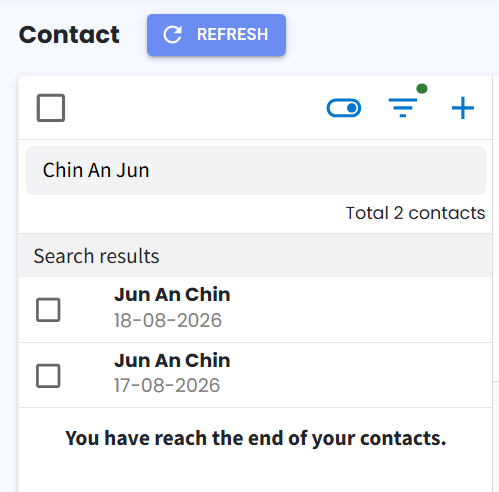
We’ve enhanced the Contact search to better recognise contact names even when the name sequence is entered differently. 🔍
What it means to you:
You no longer need to search using the exact name order saved in the contact. As long as the search terms match the contact’s name, the correct contact can still appear in the results. ⚡
How you can go about it:
Head to the Contact Module.
Enter the contact’s name in the search bar.
You can search using a different name sequence, such as “Chin An Jun” instead of “Jun An Chin”.
The matching contact will still appear in the search results. 🚀
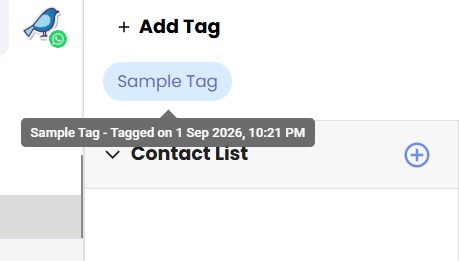
20. Tag Added Date on Hover 🏷️
What's New:
You can now see when a tag was added by simply hovering over it. This feature makes it easier to track the history of your tags at a glance. ✔️
What it means to you:
Understand the context of each tag and manage your records more effectively. Save time by getting all the details without extra clicks. ⏱️📈
How you can go about it:
1. Hover your mouse over a tag in Inbox Module or Contact Module.
2. A tooltip will appear showing the exact date and time the tag was added.
3. Move your mouse away to close the tooltip.
That's it – no further steps needed! 🎉
____________________________________________________________________________
That wraps up our September 2026 update. In the spirit of Malaysia Day, we’d like to take this opportunity to thank all our Strivers for your continued support and trust in us.
We’ll continue listening to your feedback and improving Strive to make your everyday experience even better. Stay tuned for more exciting updates coming your way in October! 🙂