Dear Strivers,
Welcome to the April 2024 update, and a warm Selamat Hari Raya Aidilfitri to all our friends celebrating! Ready to discover what’s new? Let’s dive in and read on for the updates!

Enhancements
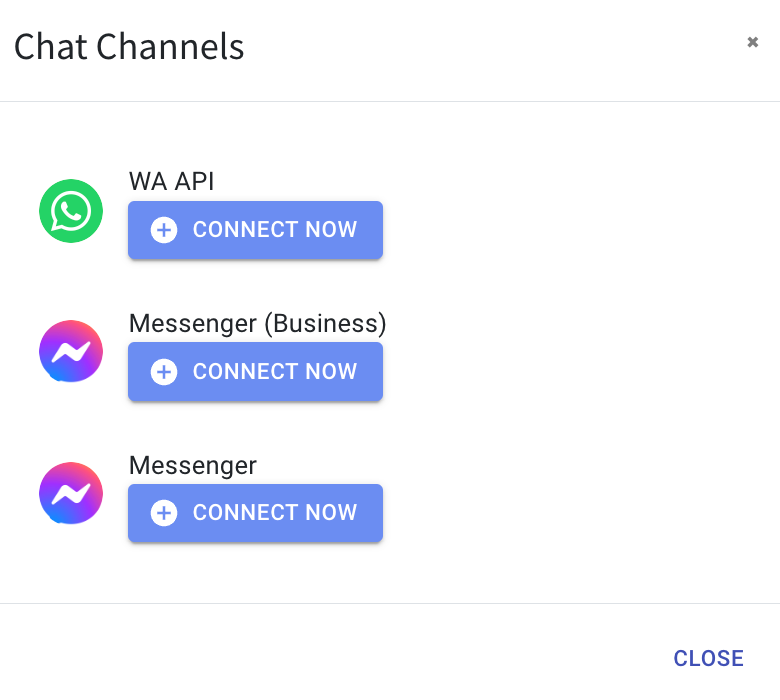
1. Link Your Messenger Page as an Admin! 🔗
As a Messenger page admin, you now have the ability to link your page.
Simply click on “Connect Now” located at the bottom of Messenger, and then follow the simple steps provided.
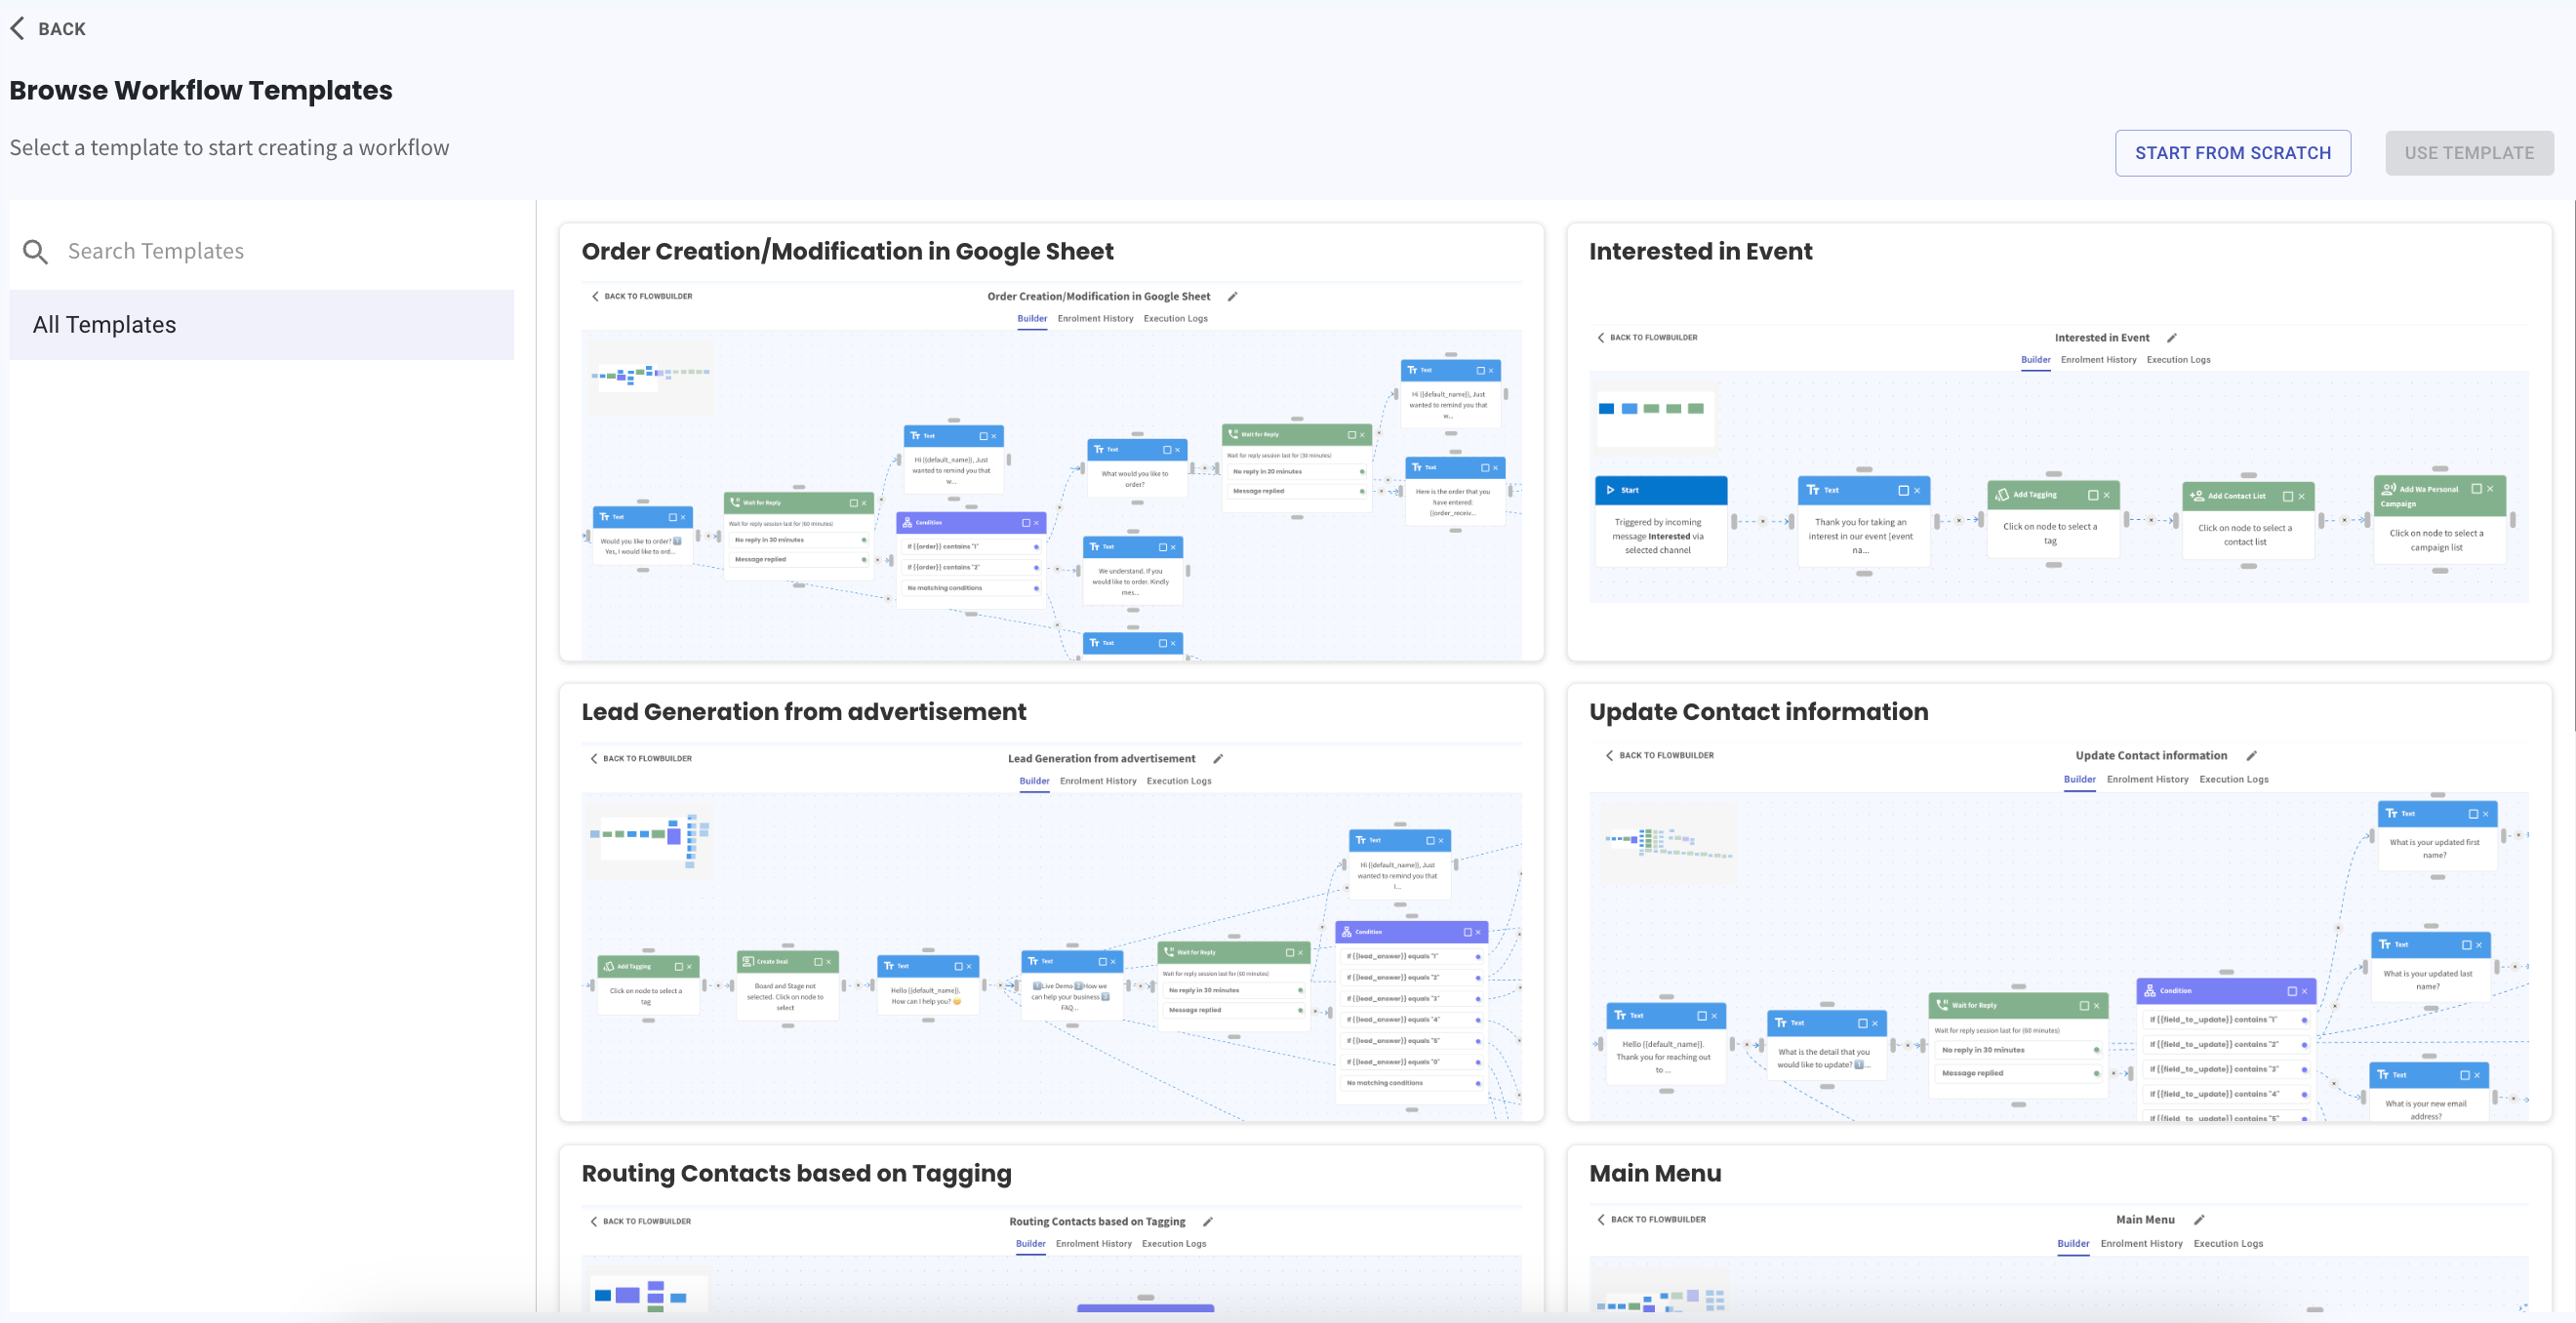
2. Flowbuilder Templates Now Available! 🎨
When you click on “Create Flowbuilder,” you’ll now see a selection of pre-designed templates to choose from.
Simply select a template that suits your needs then click “Submit” or start fresh by creating your own flowbuilder from scratch by clicking on “Start From Scratch”.
Whether you’re new to Flowbuilder or looking for some inspiration, these templates are here to streamline your workflow. 🌟
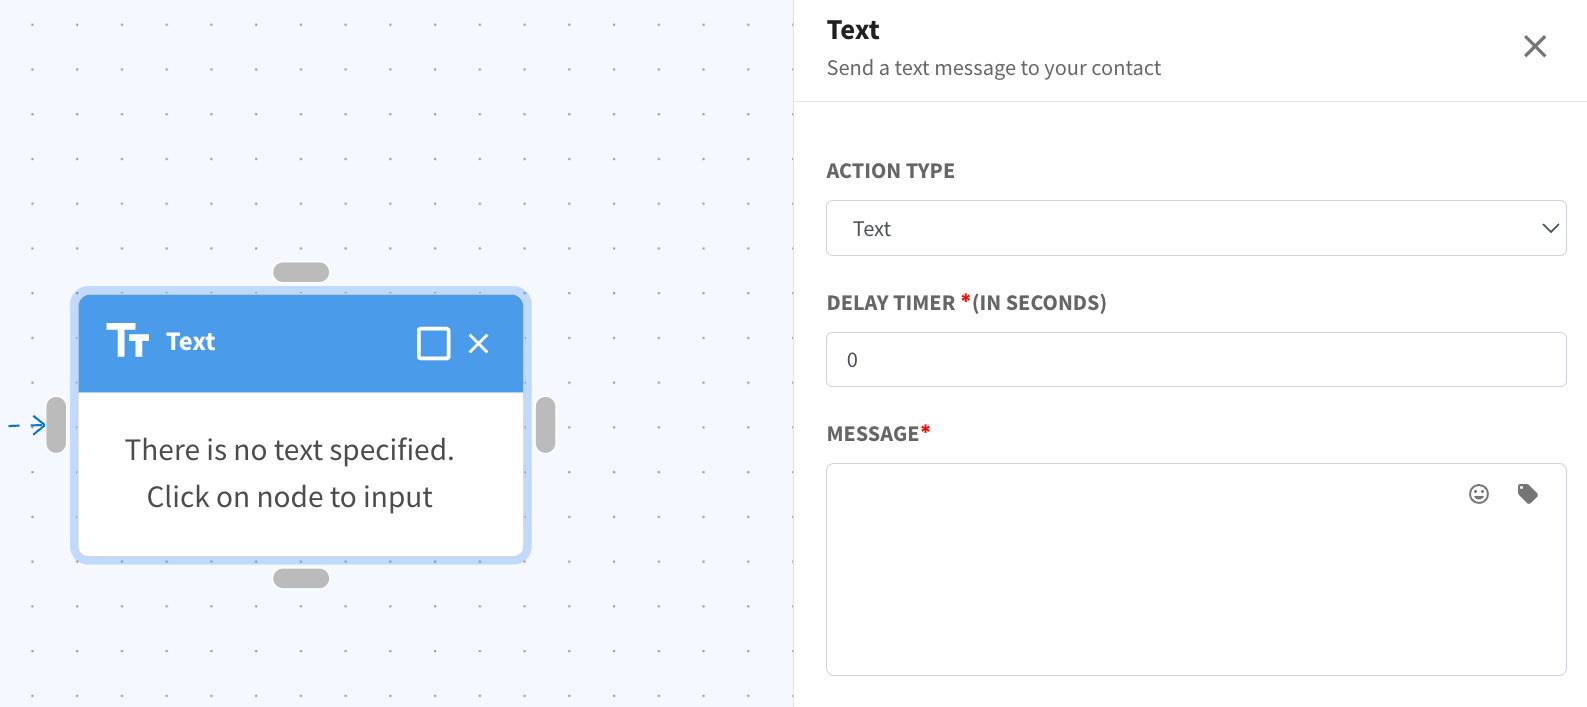
3. Spice Up Your Messages with Emoji in Flowbuilder! 💬
Now, you can enhance your messages in Flowbuilder by adding emoji effortlessly. Simply click on the emoji icon situated at the top right corner of the text area, and choose from a wide range of expressive emojis to add personality and flair to your messages.
This fun feature allows you to add a touch of personality and expressiveness to your messages, making them more engaging for your audience. 😉
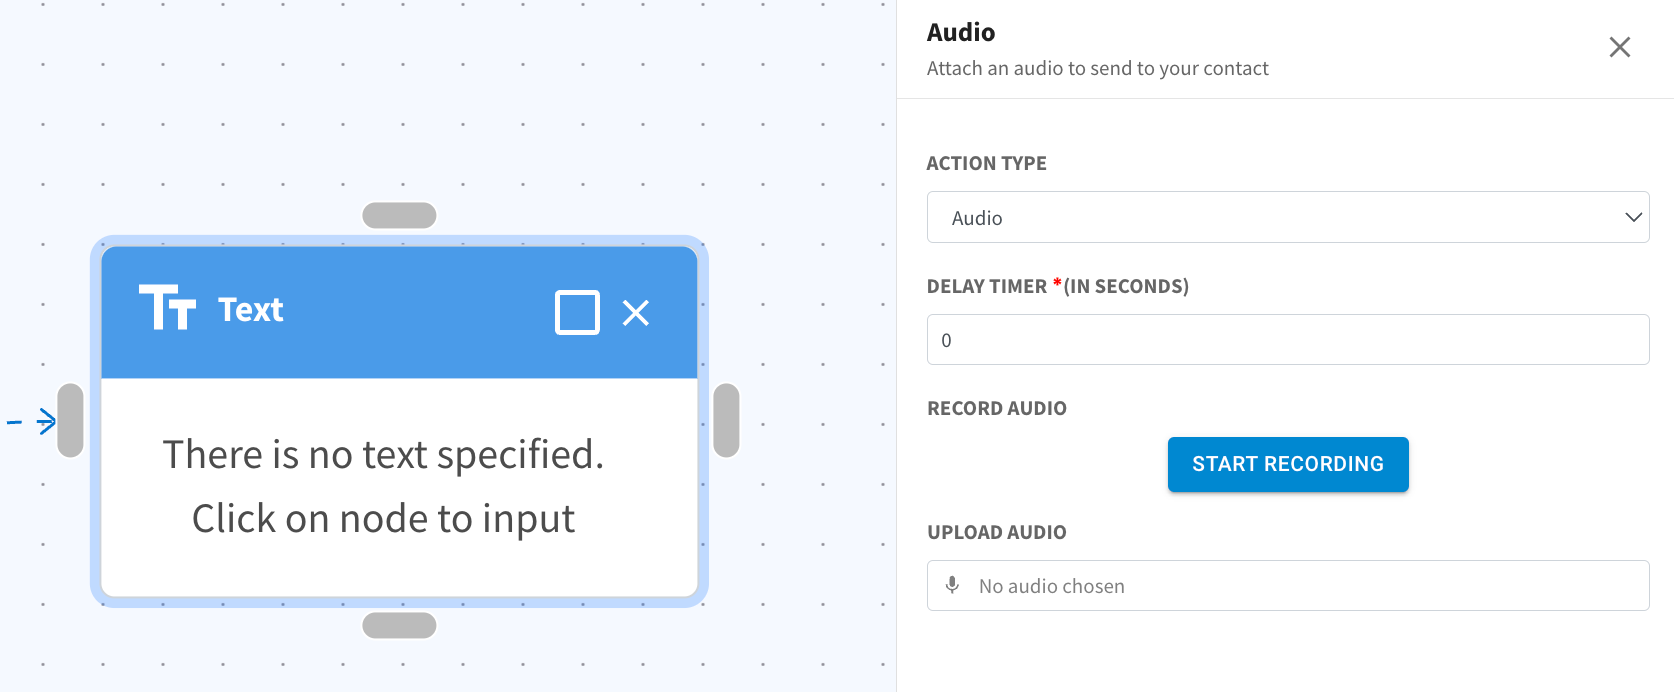
4. Introducing Flowbuilder Audio Action! 🎵
We’ve added a new action in the Flowbuilder that lets you send audio messages to your contacts. With the new “Audio” action, you can now record an audio message or attach an existing audio file which will be sent to your contacts who triggered the flowbuilder.
It’s a great way to engage with your contacts in a more interactive way. Get ready to bring your conversations to life with audio messages! 🎙️
*Note: You can attach either mp3, webm, or ogg audio format.
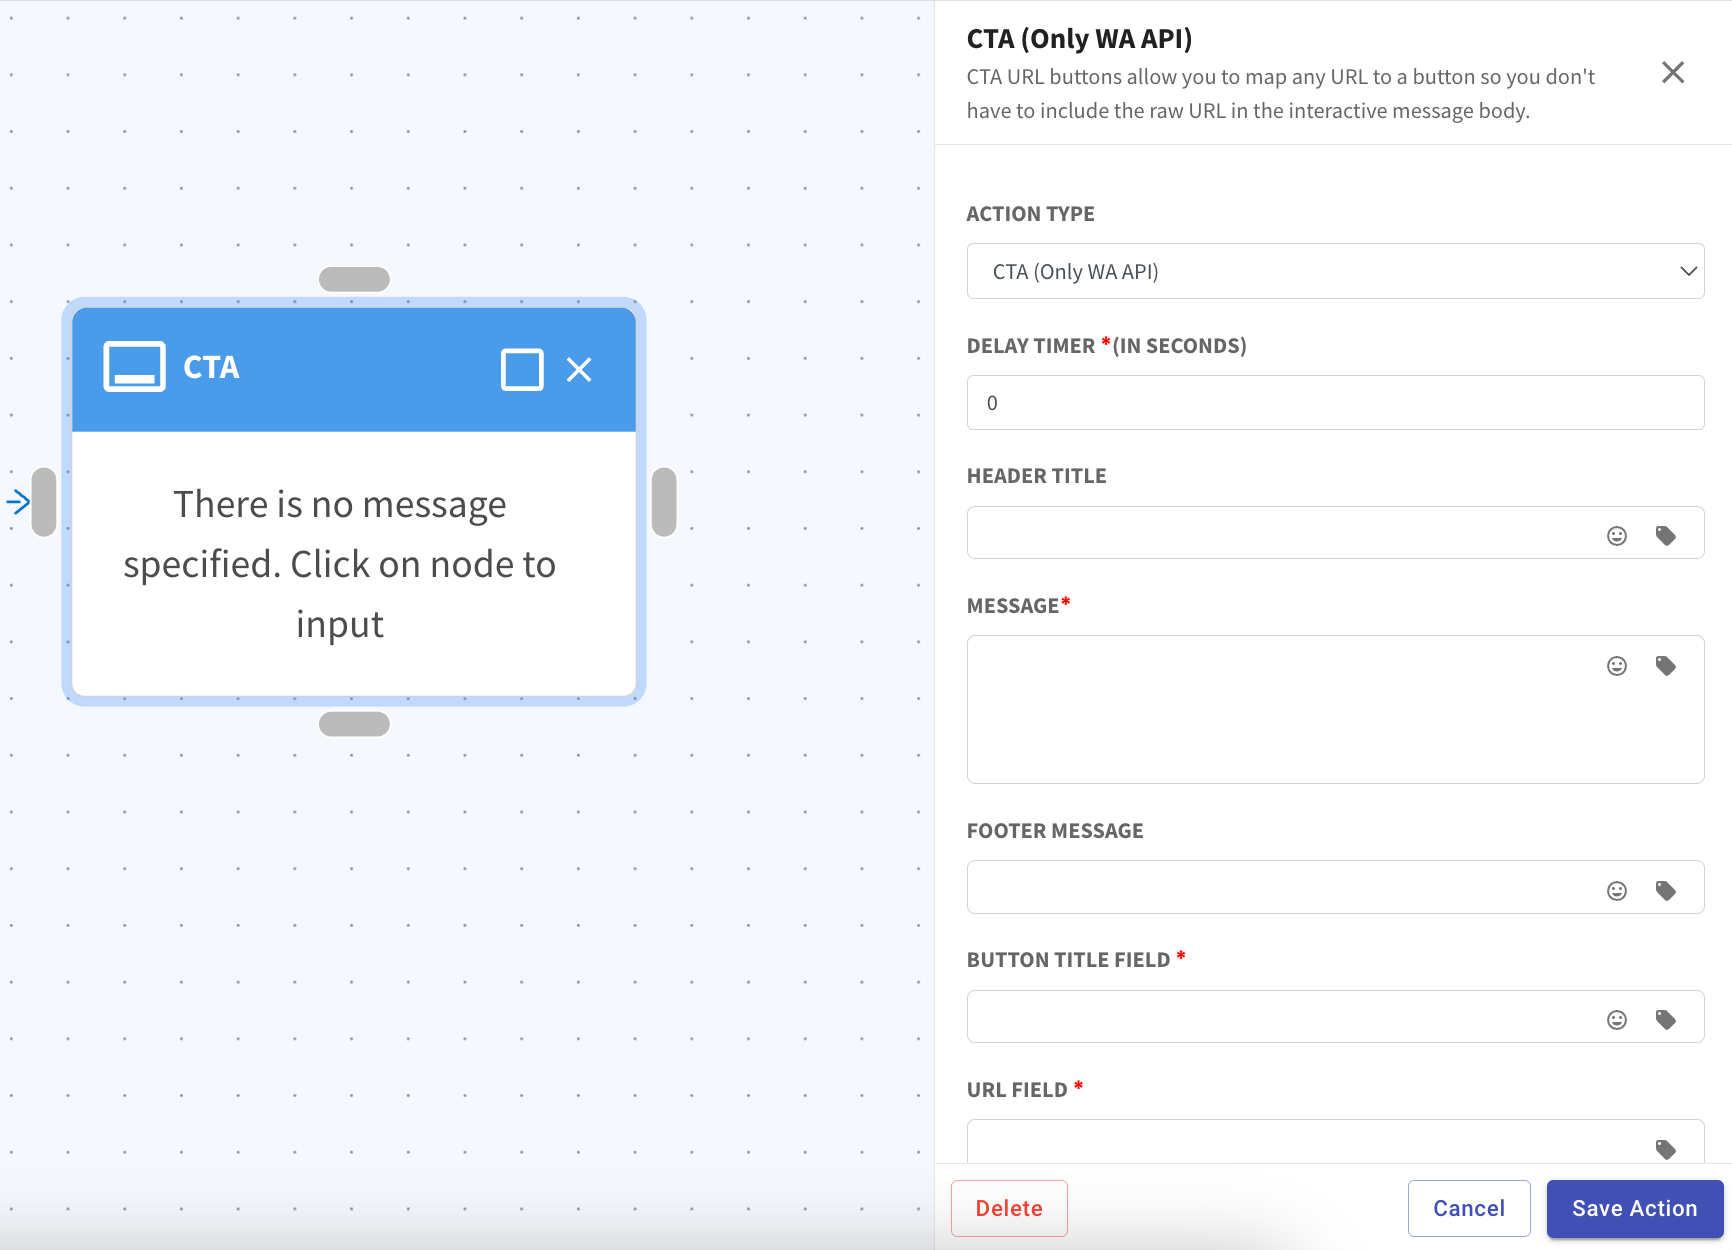
5. Adding Emojis to Flowbuilder CTAs Made Easy! ✨
Now, right next to your CTA field in Flowbuilder, there’s a handy emoji icon. Just click it, and you can effortlessly add emojis to your CTA header, message, footer and even in the button title.
It’s the perfect way to make your communication more engaging and expressive! 🤩
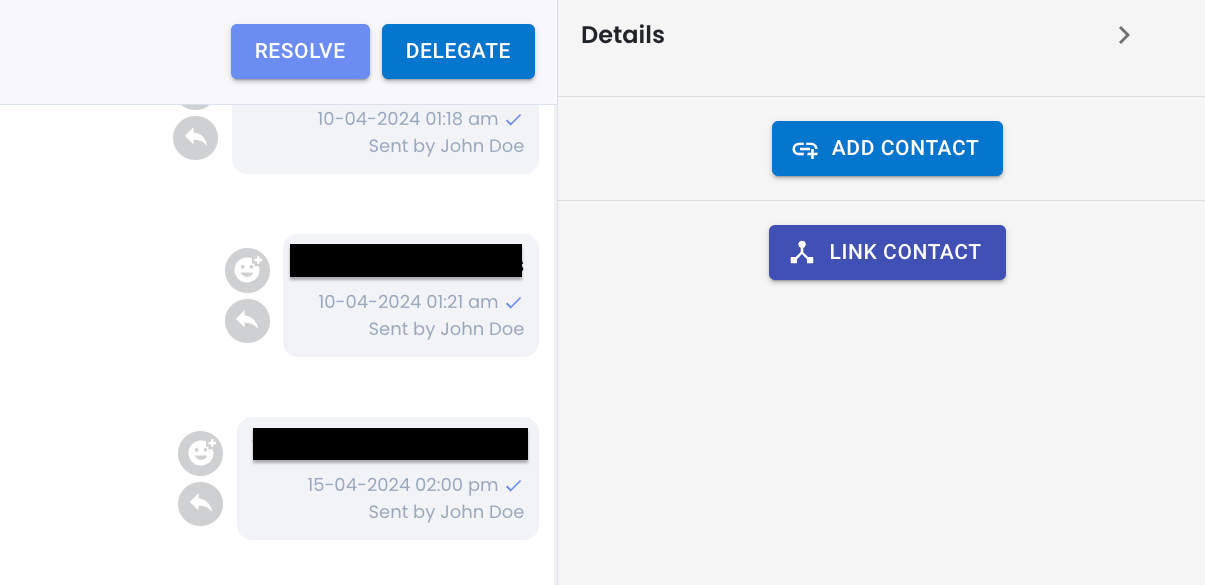
6. Broadcast WA Personal Messages to Group Chats! 📣
Now, you can send WA Personal messages to group chats!
But before you start broadcasting messages, you’ll need to create a contact for the group.
To do this, make sure the WA Personal device is in the group chat and the Inbox is enabled in the WA Personal Setup module. When someone in the group sends a message, a ticket will be created in the Inbox module. Then, click on the “Add Contact” button that is located in the right column to create the contact.
Once the contact is created, you can proceed to create the broadcast as usual then add the contact as the audience.
*Note: Remember not to make changes or edit the WA Personal Group ID as it may cause the message broadcasting to be unsuccessful. 🚀
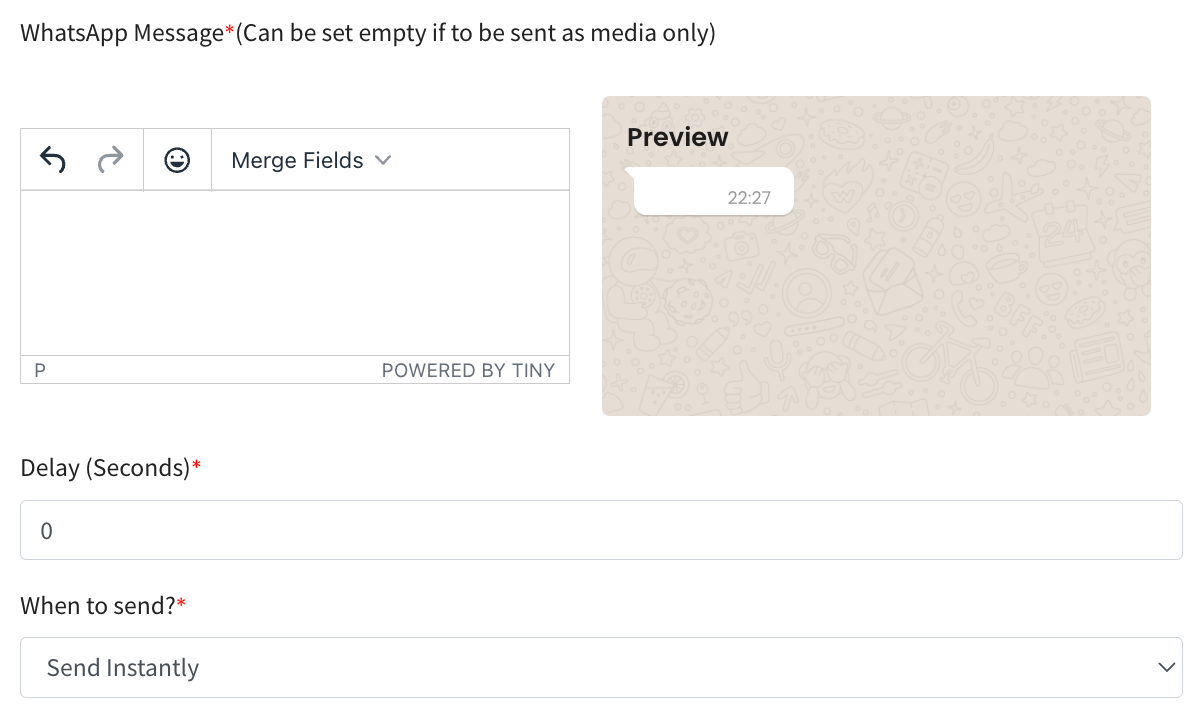
7. Add Delay to Your WA Personal Campaign Messages! ⏰
This means you can schedule a pause between messages being sent out, allowing for a more spaced-out and natural flow of communication with your contacts.
For example, if you’re sending multiple messages in a sequence but want to ensure they’re not all delivered at once, you can specify the delay duration in each message.
Don’t worry, if you prefer to send messages instantly without any delay, you can remain the delay duration at 0 seconds.
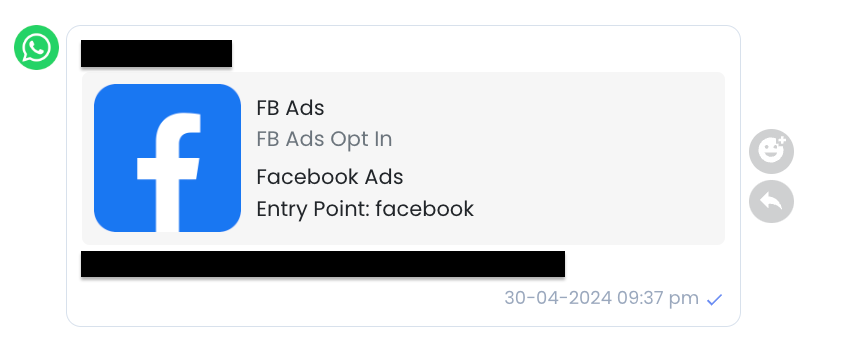
8. Identify Contact Source in Inbox Messages! 🔎
Wondering which Facebook ad your contact messaged in from? Now you can easily find out because the specific ad they clicked on will be displayed in the message that they sent.
This way, you can track the effectiveness of your Facebook ads and better understand your audience’s engagement. 📊
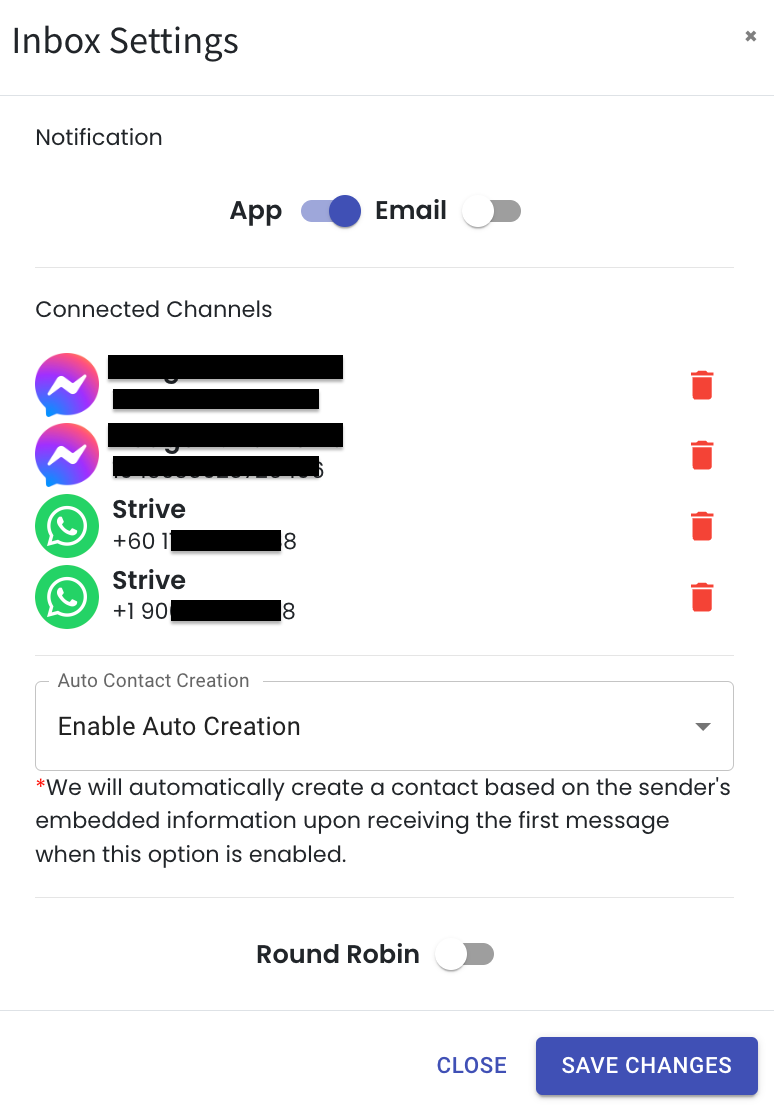
9. Manage Your Inbox Notifications! 📬
Now, you have the flexibility to control your inbox notifications separately for the app and email. Whether you prefer to receive alerts only on your app or through email, it’s entirely up to you!
To adjust your notification preferences:
- Go to the Inbox module.
- Click on the Settings button.
- Turn notifications on or off for the app and email as needed.
- Remember to click Save Changes to apply your settings.
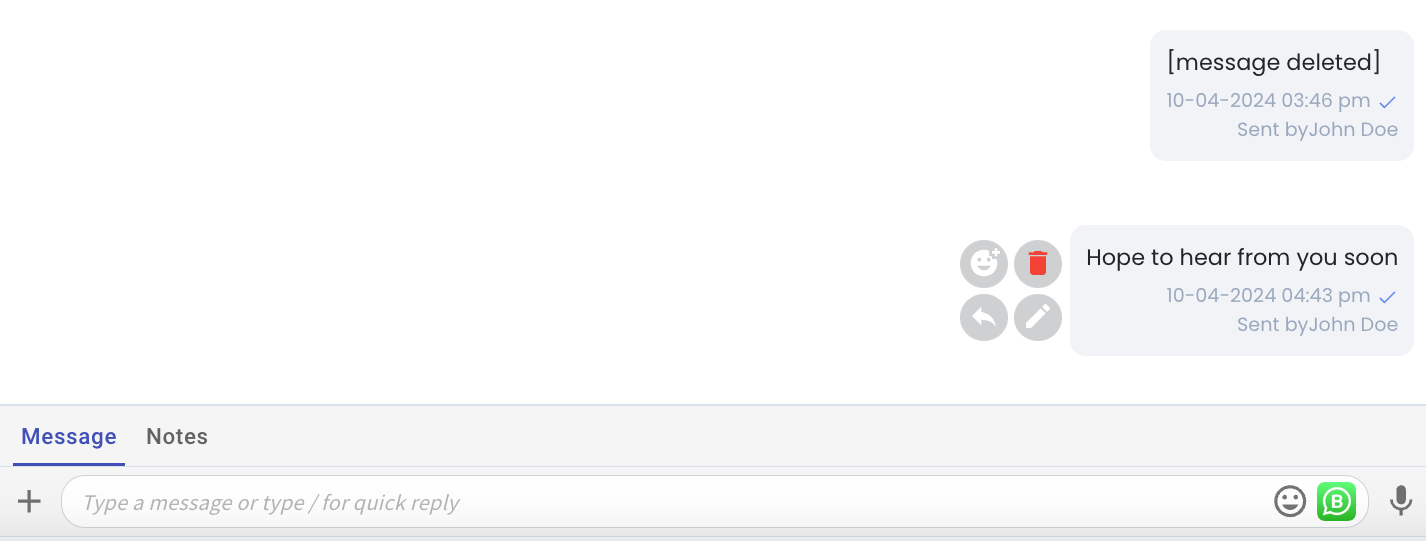
10. Edit or Delete Your WA Personal Messages in Inbox! ✏️
You can now edit or delete your WhatsApp messages directly from the Inbox feature. Whether it’s a typo you need to fix or a message you regret sending, you have the flexibility to make changes.
However, keep in mind that if you delete a message, it will disappear for both you and the recipient.
Similar to WhatsApp on your phone, you have 15 minutes to edit your message after sending it, and deletion is only possible within 60 hours.
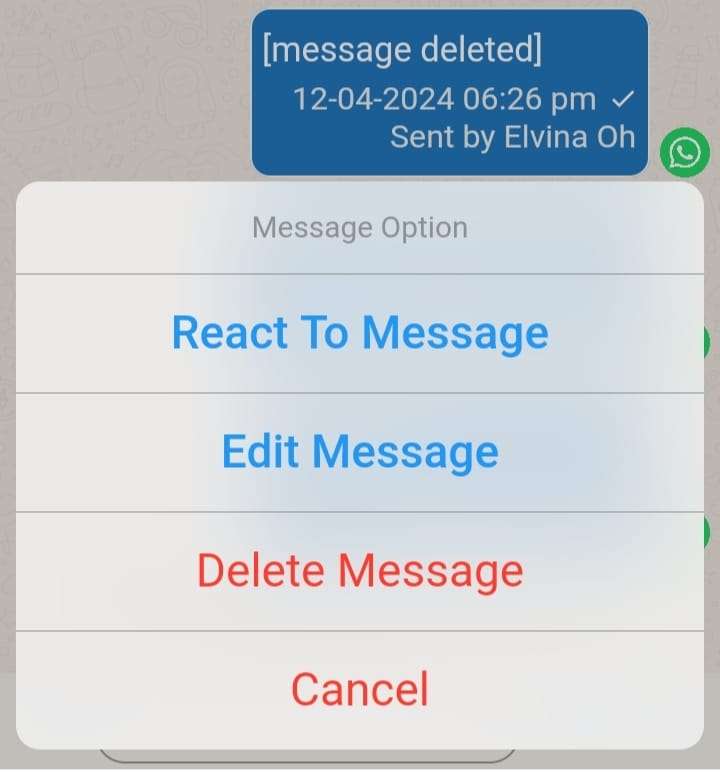
11. Edit and Delete Your WA Personal Messages within Strive Go Inbox! 📱
Our Strive Go app now supports editing and deleting your WA Personal messages directly from your mobile device.
Simply long-press on the message you want to modify or remove, and you’ll see options to react, edit, or delete it.
*Remember, editing or deleting a message will affect both you and the recipient, just like on WhatsApp. And don’t worry, you have up to 15 minutes to edit your message after sending it, and deletion is possible within 60 hours.
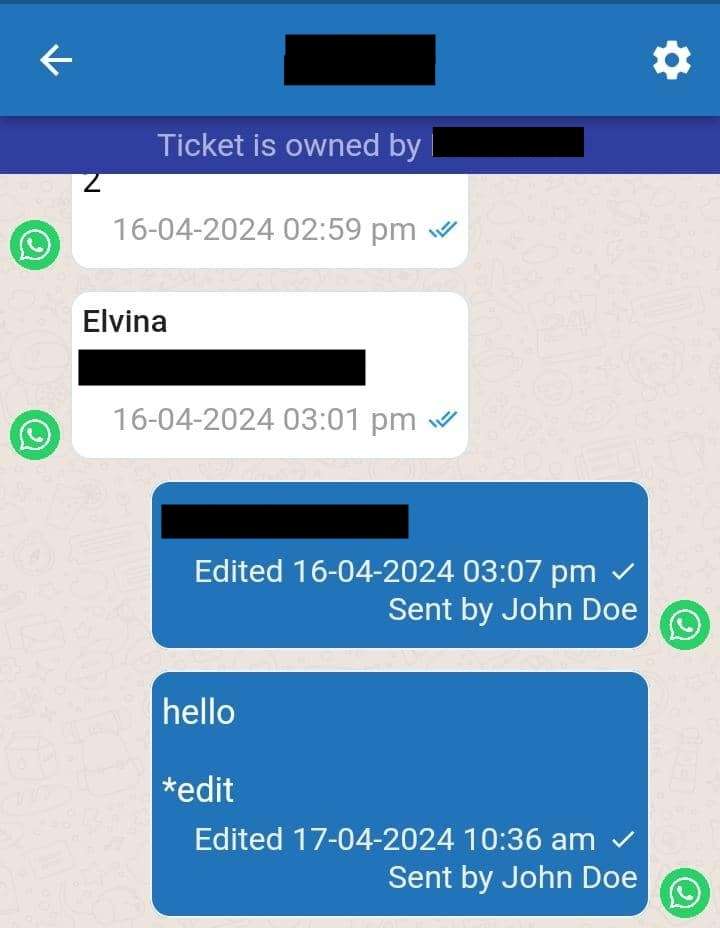
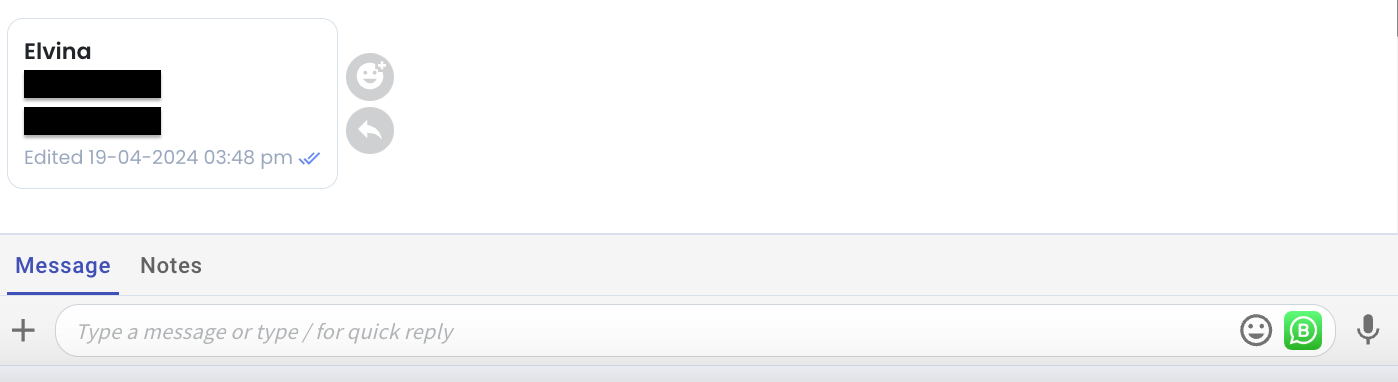
12. Easily Spot Edited Outgoing Messages in Strive Go! ✏️
Now, when you or your users edit outgoing messages in Strive Go, a label “Edited” will appear at the bottom of the message.
This feature helps you quickly identify which messages have been changed.
13. Enhancements to WA API Template Module 🎉
Here’s what’s new:
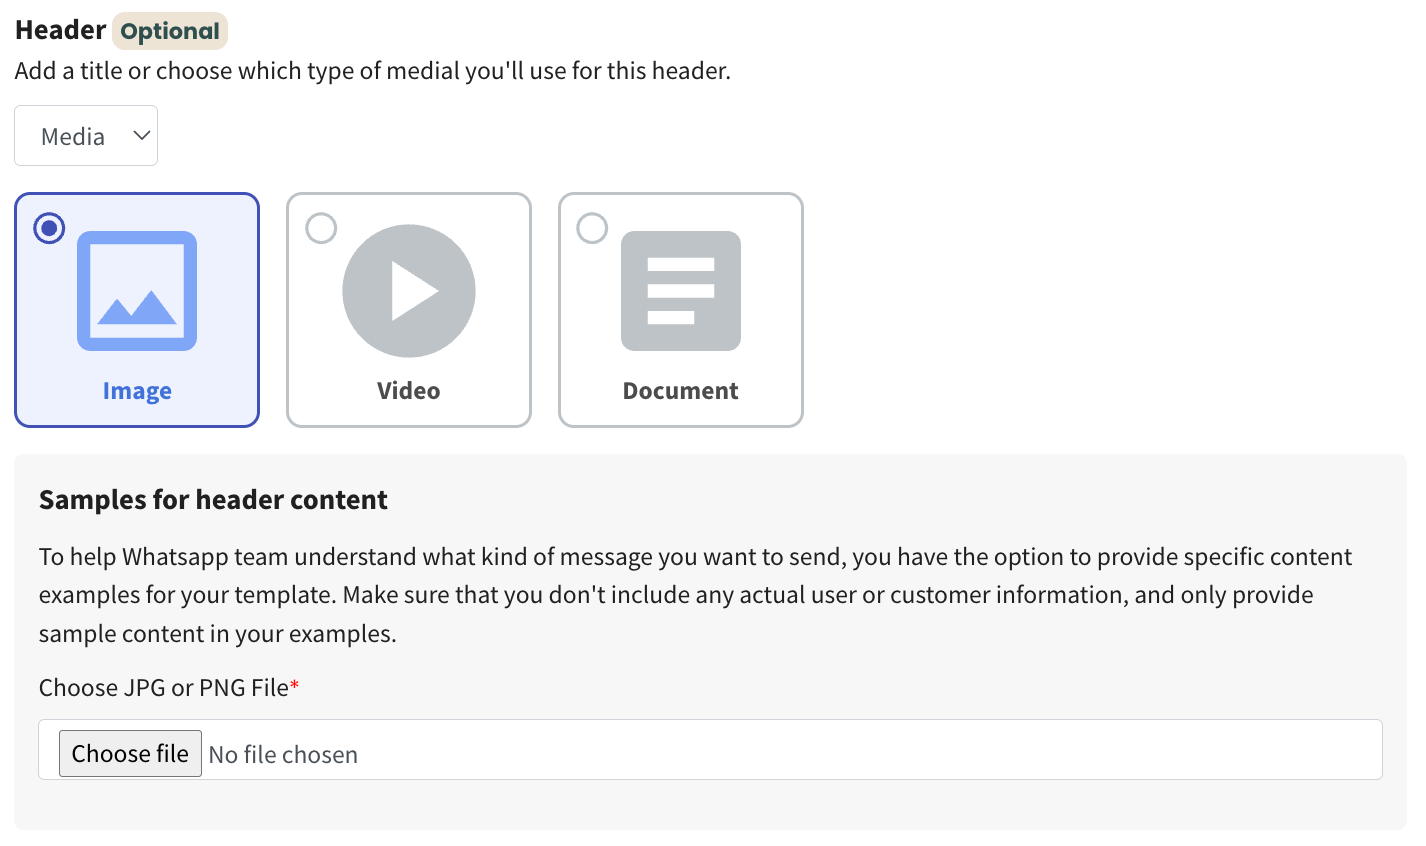
1. Sample for Media Header
When you choose ‘Media’ for the header, you’ll now see three options: image, video, and document. You can upload your header content sample right below these options.
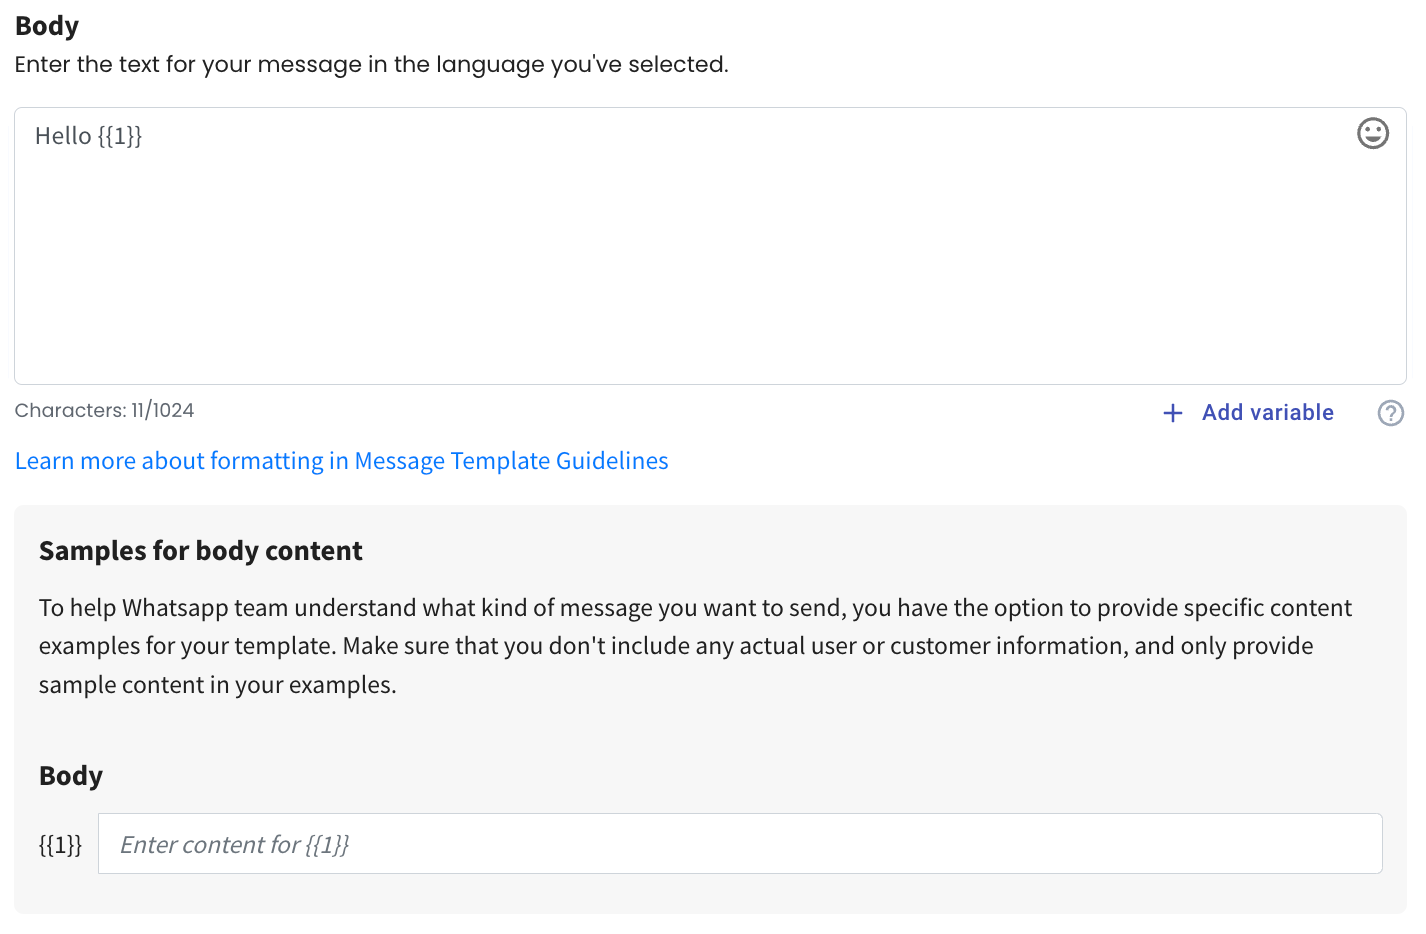
2. Easily Add Variables
Need to add a variable? Simply click on the ‘Add variable’ button located at the bottom right of the body text area. After adding, you’ll see area to type in the sample just below the body text area.
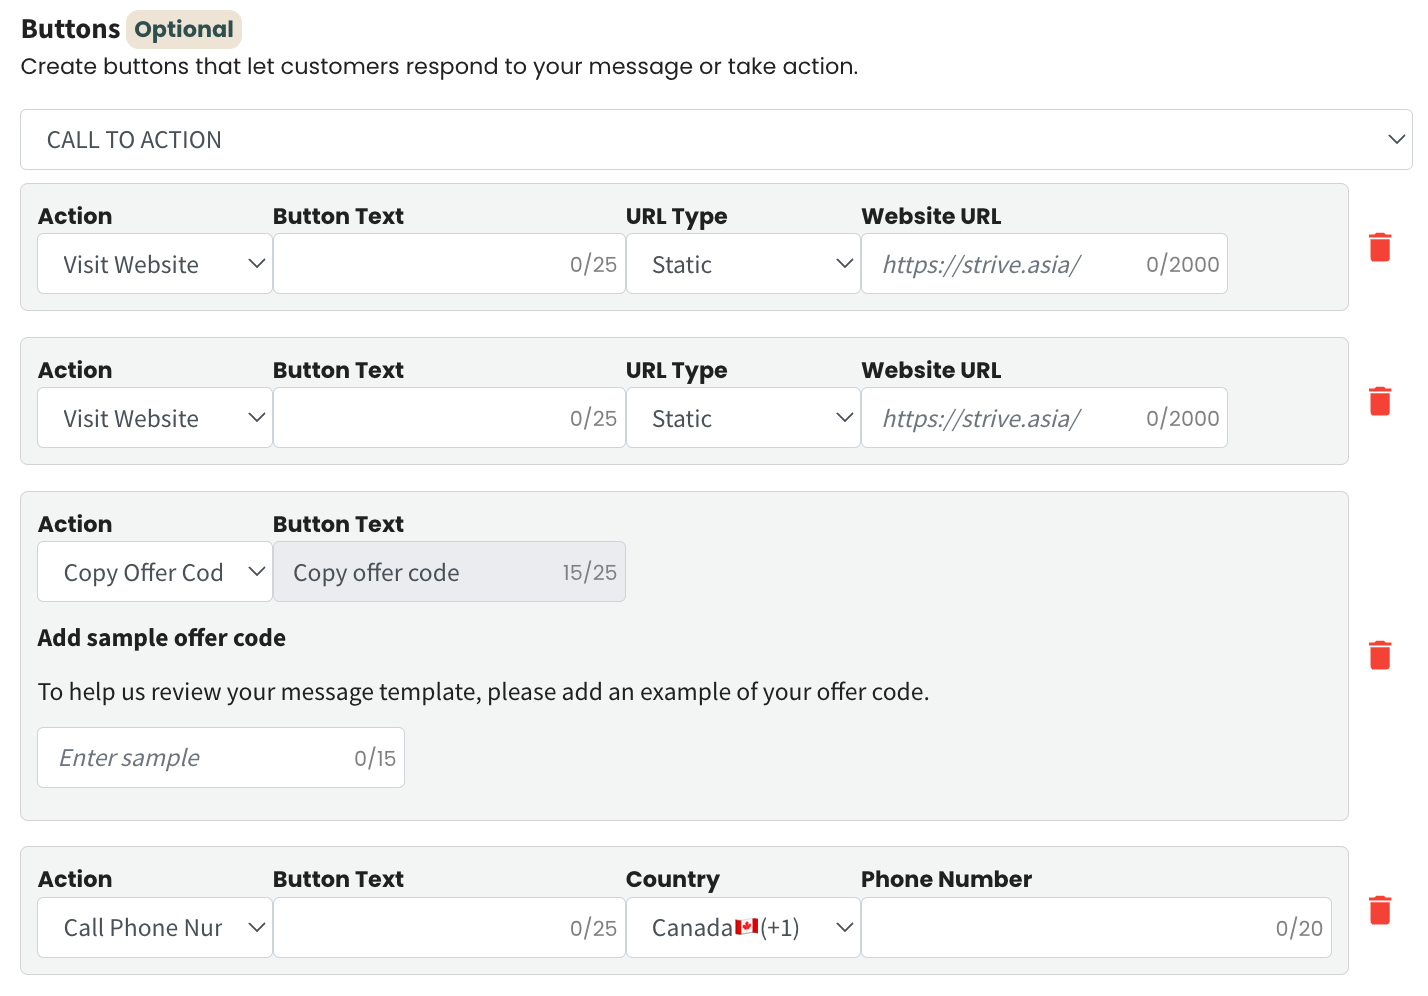
3. Enhanced Call to Action (CTA)
For the Marketing category, you can now include up to 4 Call to Action buttons. This includes 2 ‘Visit Website’, 1 ‘Phone Number’, and 1 ‘Copy Offer Code’.
14. Updated Incoming Messages in Inbox 📩
Now, when your contact edits a message they’ve sent, you’ll see the word “Edited” at the bottom of the message.
This lets you know that changes have been made to the original text. 💬
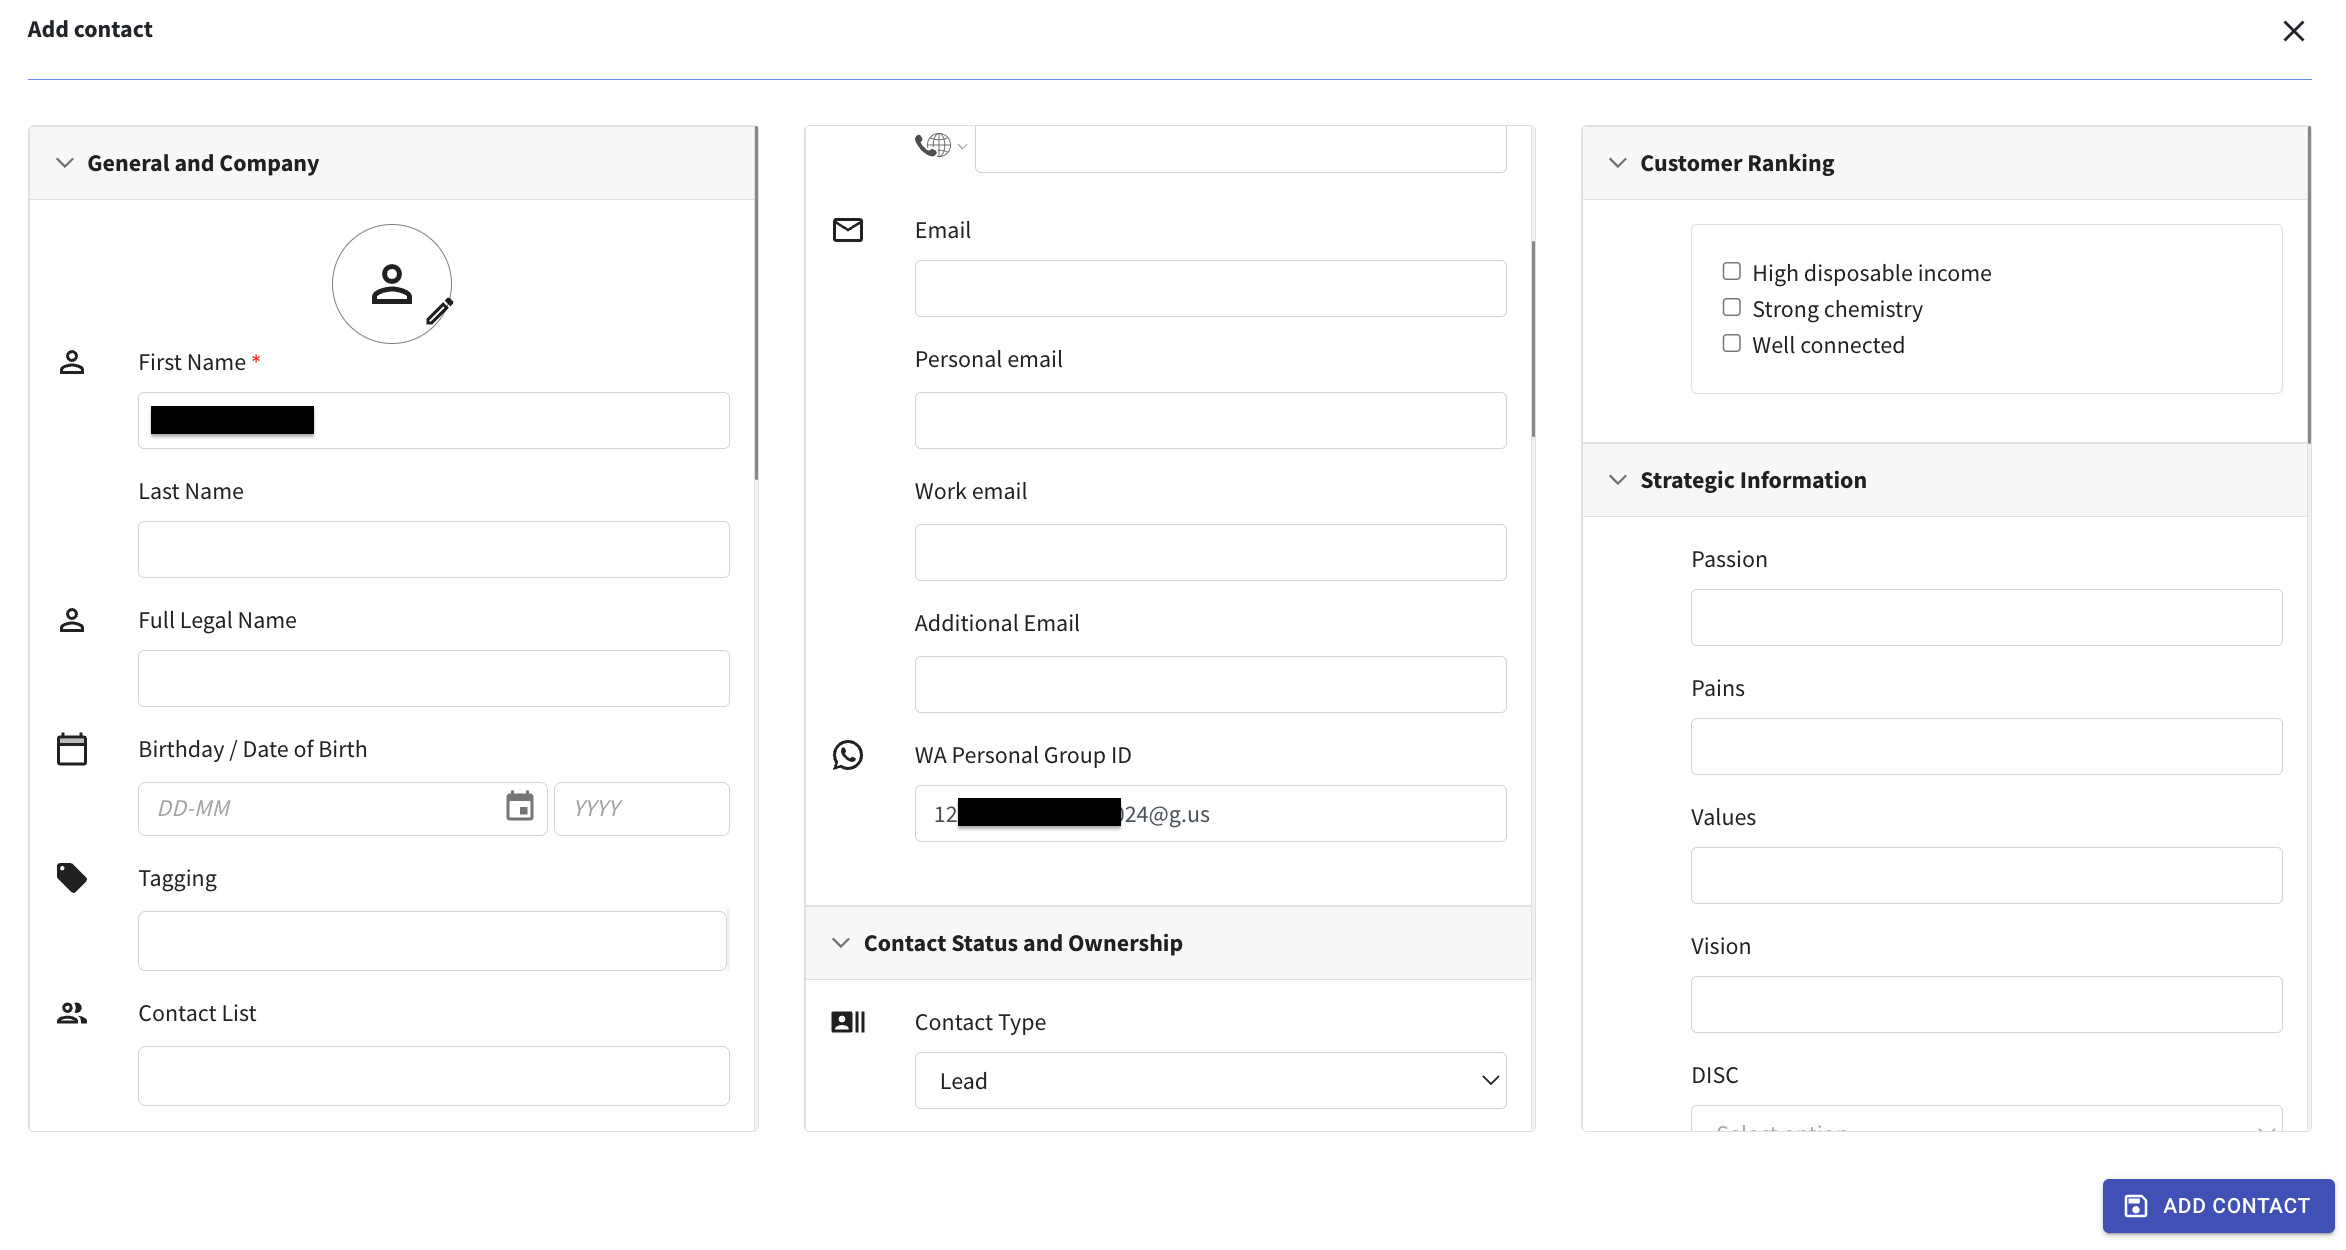
15. Smoother Contact Creation in Inbox! 📥
Now, even if you haven’t turned on auto contact creation, it’s easier than ever to add new contacts from your messages. When you click “Add Contact,” the contact’s first name and phone number (for WhatsApp API and WhatsApp Personal channels) will be automatically filled in for you based on their WhatsApp profile.
This saves you time, making contact management a breeze! ✨
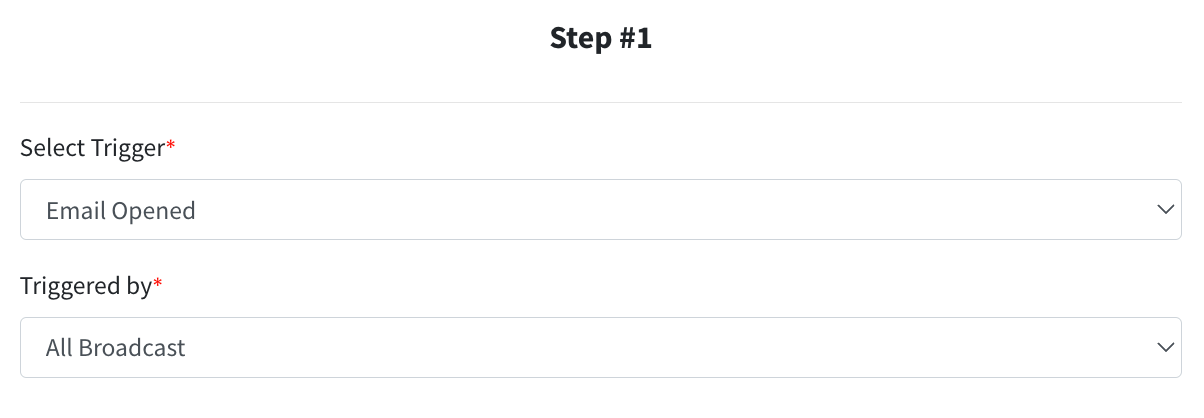
16. Introducing Email Opened Automation Trigger! 📧
Now, you can automate actions based on when your email broadcast gets opened! Whether it’s for all broadcasts or just specific ones, you have the flexibility to choose.
If you want to use this automation for a specific broadcast that hasn’t been created yet, no worries! Simply create the broadcast, save it as a draft, and then select it when setting up your automation.
Just remember to activate the automation before sending out your broadcast to ensure it works smoothly.
17. New Automation Action: Remove Contacts from WA Personal Campaign! 🤖
Exciting news! We’ve introduced a new automation feature that allows you to remove contacts from a particular WA Personal Campaign automatically.
It’s super simple to set up: just choose the “Remove from WA Personal Campaign” action, then select the campaign you want to remove the contact from.

18. Automate Contact Removal from Email Campaigns! 🤖
Now you can automate the process of removing contacts from your email campaigns with our latest automation action. This new action allows you to streamline your workflow by automatically removing contacts from specific email campaigns based on the selection automation trigger.
Say goodbye to manual removals and hello to efficient automation! 🤖

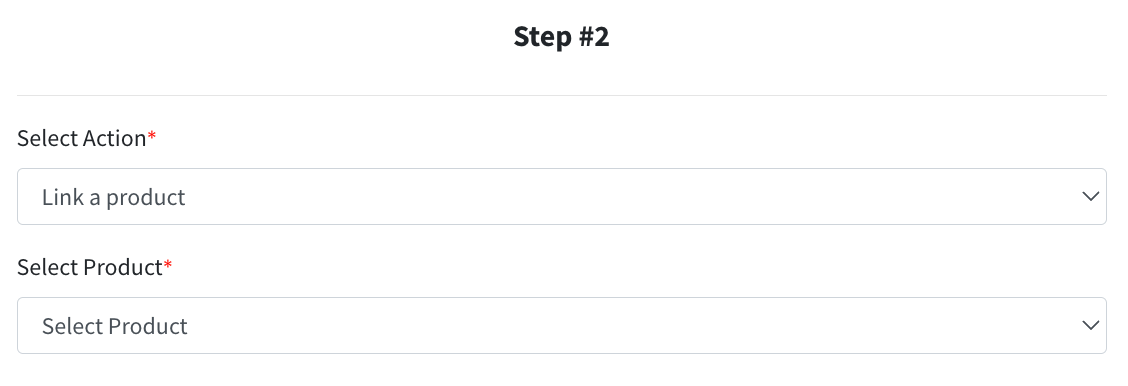
19. Automate Product Linking to Deals! 🛠️
Now, with our latest automation feature, you can easily link products to your pipeline deals without manual effort. This new action automates the process based on specified triggers, such as when a deal reached a certain stage.
With this automation in place, you’ll save time and effort, allowing you to focus on other important tasks.
Let automation do the heavy lifting for you! 🤖
*Note: The linked product trigger purchase will be “On Deal Won”
20. Show Custom Phone Numbers of Your Contacts! 📱
Now, you have the option to show your contact’s custom phone numbers directly in the Contact module.
Here’s how to set it up:
- Click on the Contact Display Option (toggle icon) in the Contact module.
- Check the box for ‘Contact Custom Phone Numbers.’
- Don’t forget to save your changes by clicking on ‘Save Changes.’
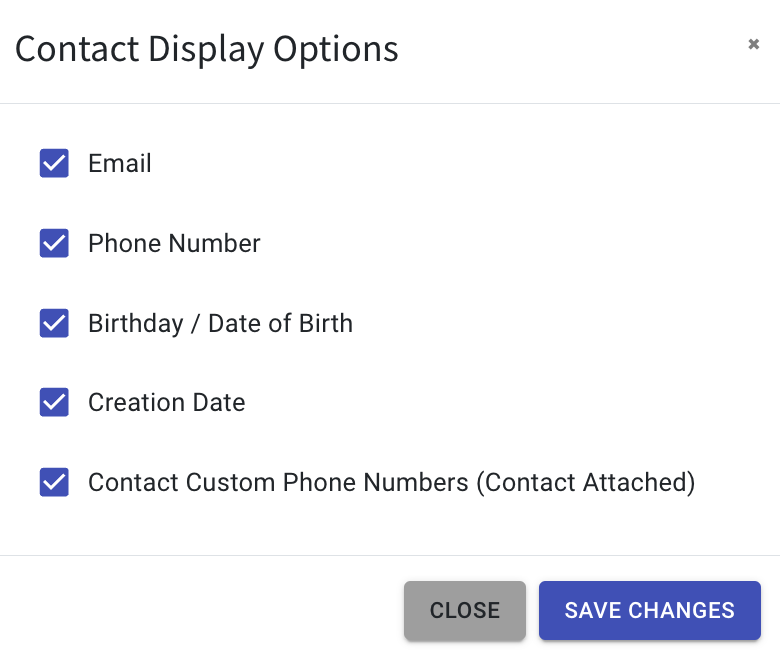
Example of how the contact looks with the custom phone field in the Contact module:

21. Quick Board & Stage Selection! 🚀
We’ve enhanced the loading speed when you’re choosing a board name and stage name in the Automation module for Pipeline related triggers and actions.
Enjoy the quicker and more efficient experience! 😉
22. Enhanced Stage Creation in Pipeline 📊
Now, when setting up a new stage in your KPI Pipeline or Task Manager, if you forget to enter a stage name and hit “Save,” the stage won’t be added.
This helps prevent unintentional or incomplete stages from being added into your board.
23. Enhanced WA Personal Broadcast & Campaign Oversight for Super Admins 👀
As a super admin, you now have visibility into all WA Personal broadcasts and campaigns created by your users.
This feature enables you to monitor when your users send broadcasts to their contacts, offering better oversight and control.
It’s a great way to stay informed and manage your team’s activities more effectively.
24. Faster Loading for Products and WA Personal Campaign 🚀
We’ve supercharged the loading speed for both the Products and WA Personal Campaign modules! Linking products to deals or accessing the product module? You’ll notice a quicker load time. 🏎️
Additionally, the WA Personal Campaigns will also load quicker, ensuring a smoother and more efficient experience for users.
25. Faster Inbox Ticket Loading! 🚀
We’ve boosted the speed at which tickets load in your inbox module. Now, when you access your inbox, you’ll notice that tickets load much quicker than before.
Enjoy the speedier access to your Inbox tickets! 🎉
That’s all for the April update, but the excitement doesn’t stop there. Keep an eye out for what’s coming your way in the next update!