Dear Strivers,
March 2024 update is here, but before we start exploring, let’s take a moment to go over some changes we’ve made So, grab a cup of coffee, sit back, and let’s walk through these changes and exciting updates together!
Changes
1. Removal of Appointment Module 📆
In our ongoing efforts to refine user experience, we’ve made the decision to permanently discontinue our Appointment module. This adjustment supports our goal of improving our platform and prioritizing user satisfaction.
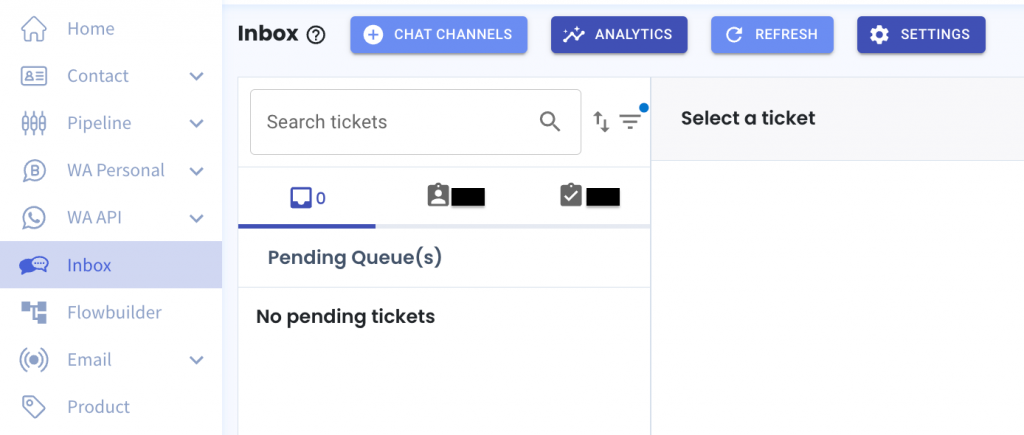
2. Converse Module is Now Inbox! 💬
Your favorite Converse module has a new name – Inbox! But don’t worry, we’ve kept the sleek design you love.
Enjoy the familiar interface with a new and improved name! 📨
That concludes the changes! Now, let’s move forward and read on for the updates!
Enhancements
1. Unlimited WA Personal Credits for Standard and Pro Plans! 🎉
Great news for our Standard and Pro plan users! We’ve made some changes to our pricing structure, and now you can enjoy unlimited WA Personal credits.
Whether you’re on the Standard or Pro plan, you won’t have to worry about running out of credits when sending out messages via WA Personal Broadcast or Campaign. 💬

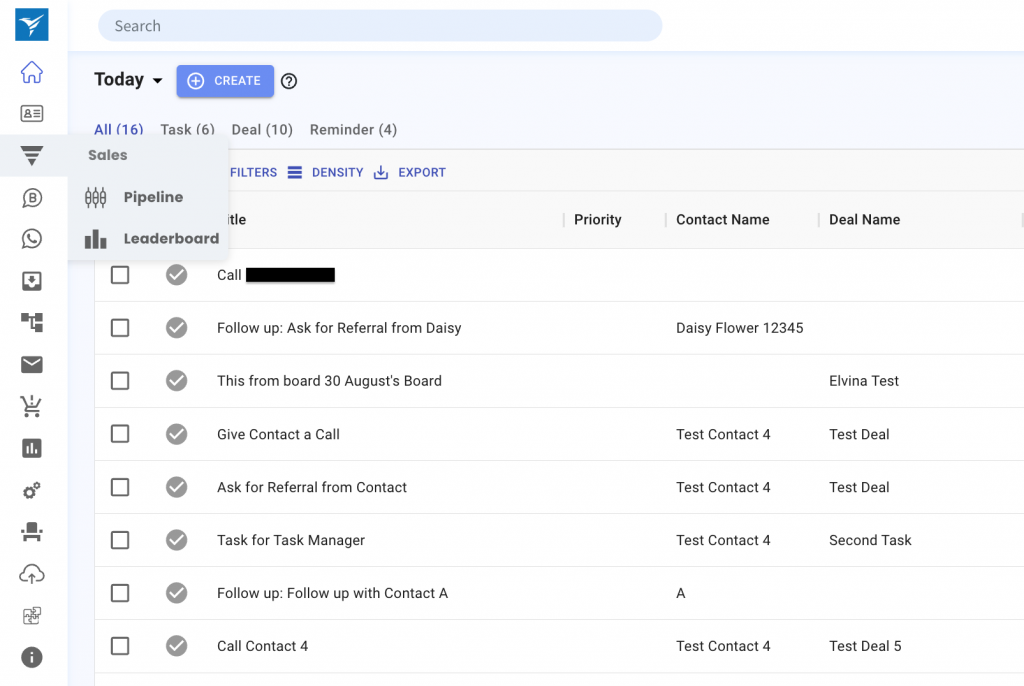
2. Explore Our Fresh Sidebar Design! 🌟
Have you noticed our updated sidebar? We’ve given it a fresh new look to make it sleeker and more modern.
Now, simply hover your mouse over the icons to reveal the module names and any submodules associated with them.
Do check it out and let us know what you think about it! 😉
3. New Feature: Bulk Accept in Inbox 📥
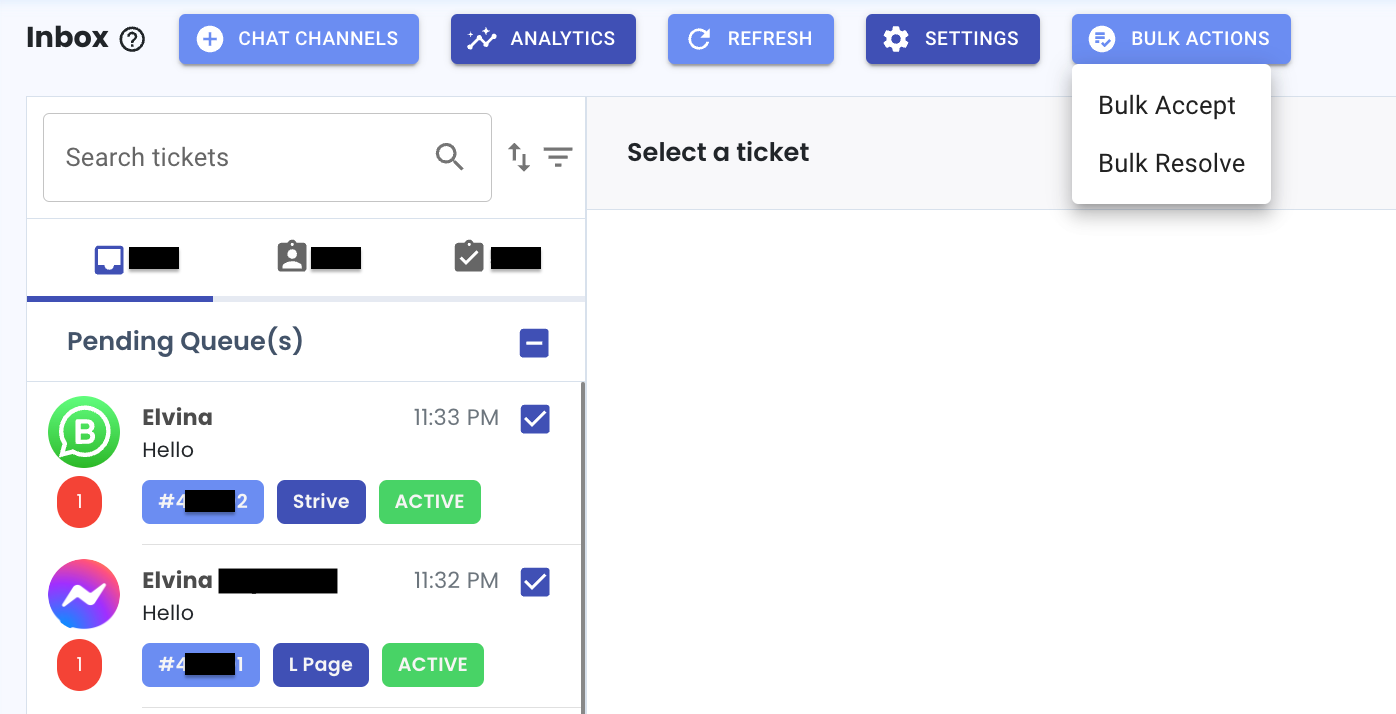
Tired of accepting tickets one by one? With our new feature, Bulk Accept, you can now accept multiple tickets at the same time!
Simply select the tickets you want to accept by checking the boxes next to them, then click on the ‘Bulk Actions’ button. From there, choose ‘Bulk Accept,’ and voila!
Your selected tickets will swiftly move to the resolving ticket section, saving you time and effort. 🎟️
4. Exciting New Note Feature in Inbox! 📝
- Create Notes:
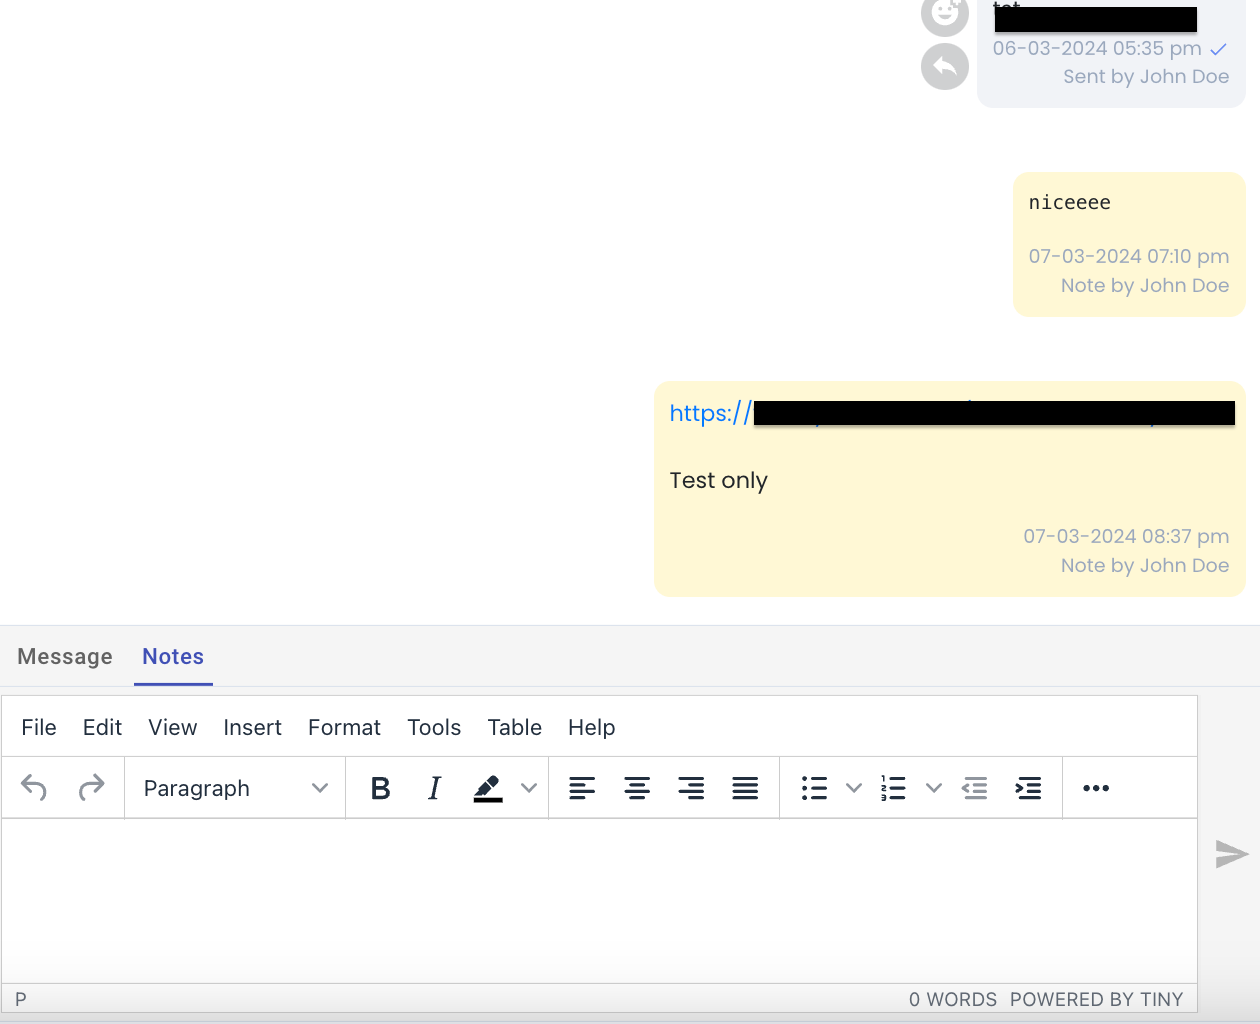
Ever needed to leave a quick note on a ticket? Now, you can! Just click on “Notes” at the bottom of the ticket, type in your message, and hit send. Your note will appear with a distinctive yellow background.
Note: Your notes are for internal use only and won’t be sent to your contact.
- View Notes:
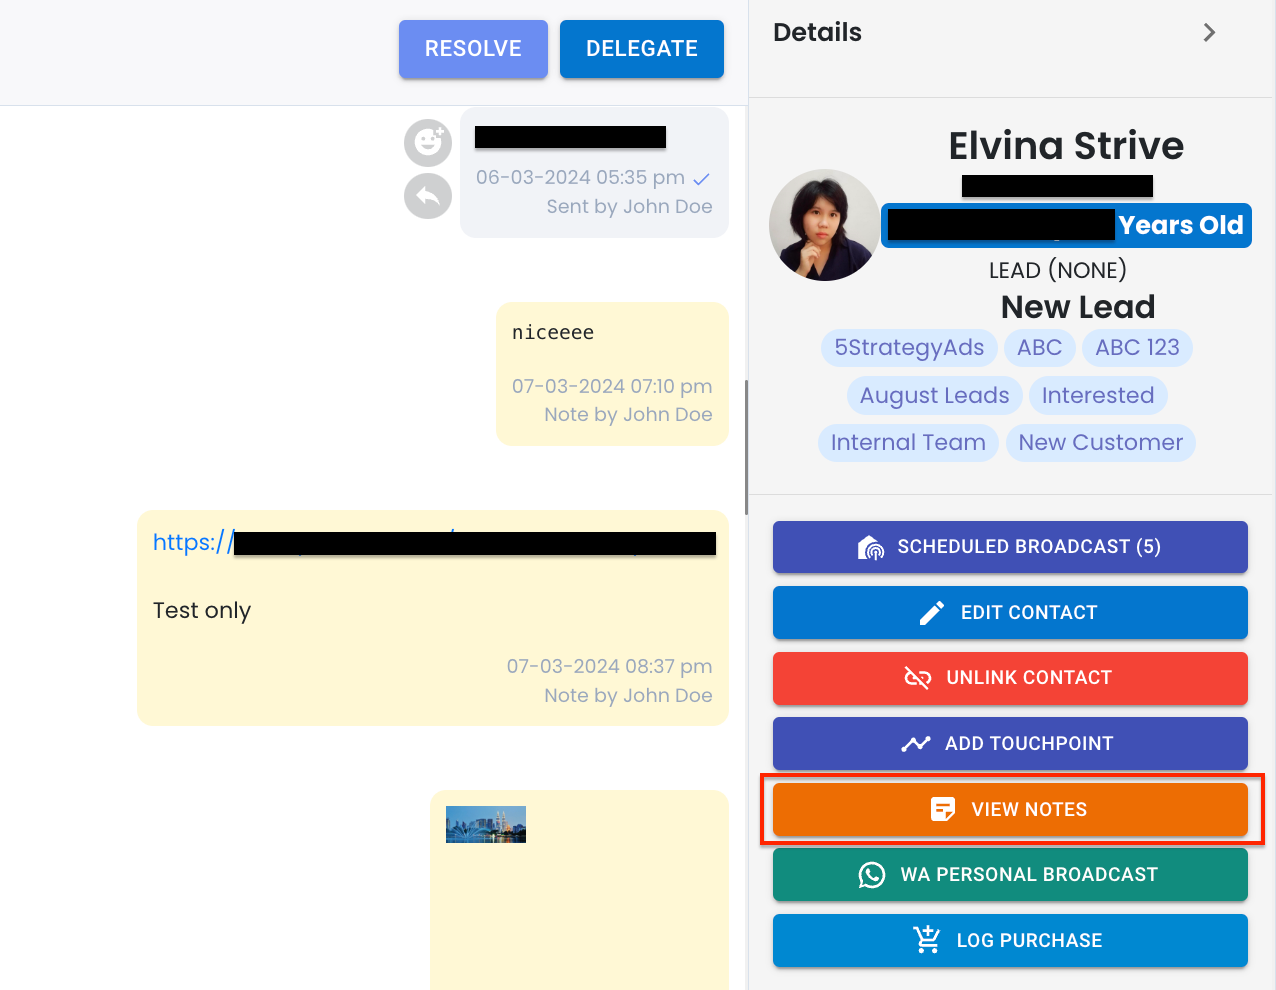
Easily view your notes by scrolling through the ticket or using the “View Notes” button in the right column of your inbox. Your inbox notes are conveniently organized in the Inbox section.
- Edit/Delete Notes:
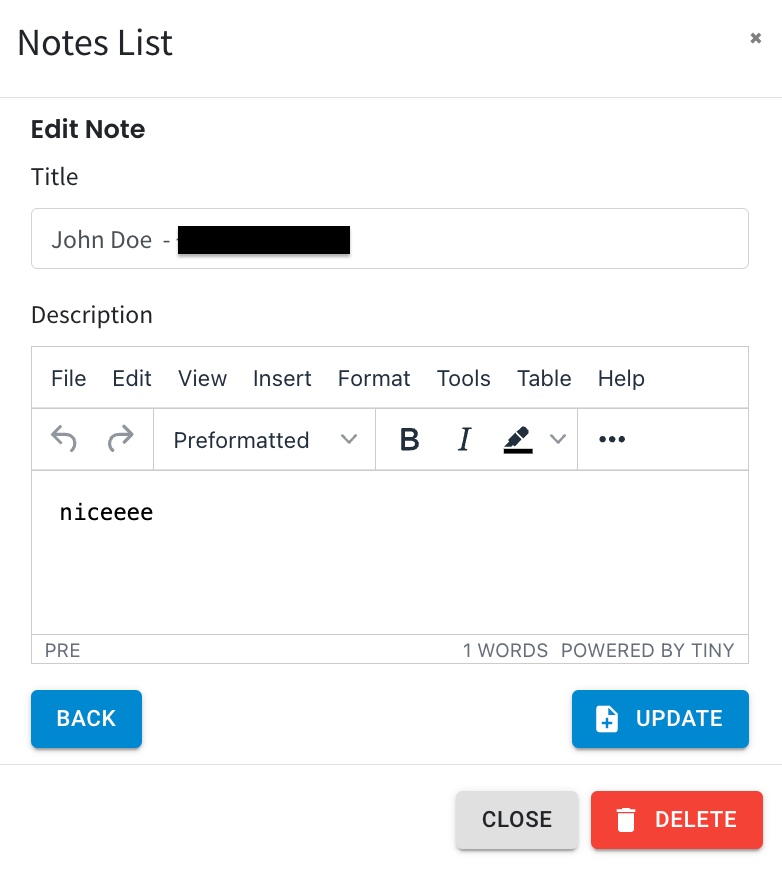
Simply edit your note by clicking on it within the ticket, make your changes, and then hit “Update.” If you’re done with a note and want to remove it, just click the note and press the “Delete” button.
Alternatively, click the “View Note” button at the right column, select the note, and either edit or delete your note.
5. View Your Inbox Notes Anywhere with Strive Go! 📝
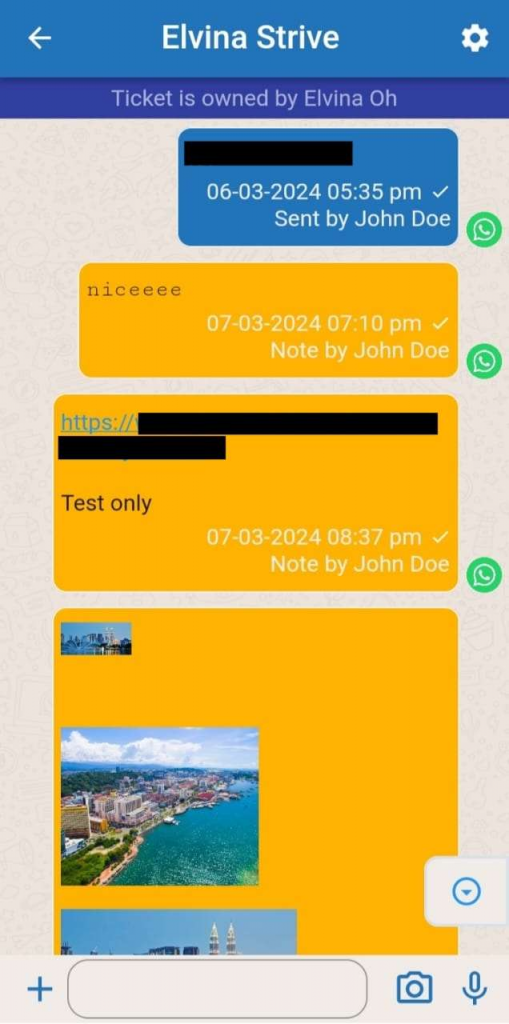
With our latest update, you can now access your inbox notes directly through the Strive Go app, making it easier to stay organized and informed while on the move.
Simply open the app to view all your important notes attached to your inbox tickets no matter where you are! 📱
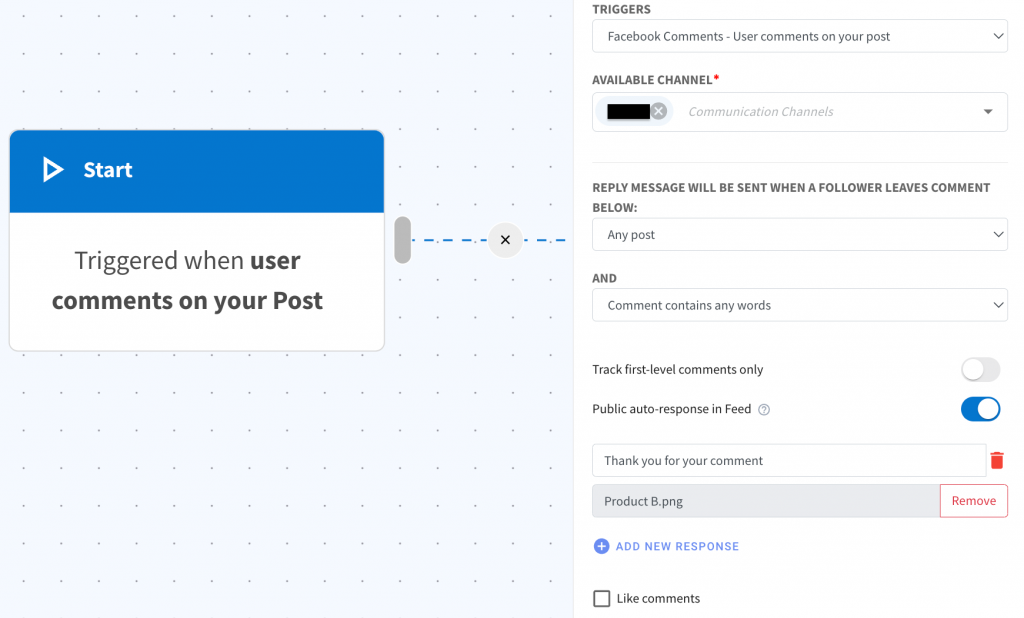
6. Enhanced Facebook Responses in Flowbuilder! 🚀
Now, when you’re setting up your Flowbuilder for Facebook and want to send public auto responses, you can include media attachments along with your text responses.
Simply click on “Add New Response” and you’ll see a text area where you can type your message, as well as an option to attach media files like images or videos.
Remember, you can add multiple responses to engage your audience effectively! ✨
*Note: Document attachments are not supported for public auto responses
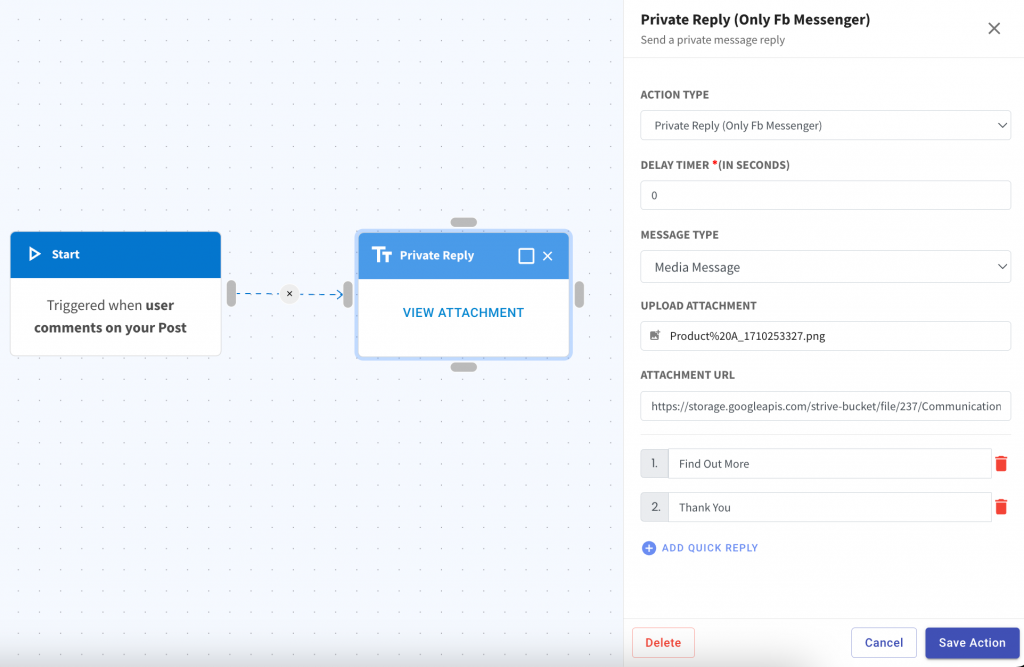
7. Enhanced Private Replies for Facebook Flowbuilder! 📨
Now, when you set up a private reply in your Facebook-based flowbuilder, you’ll notice some new features. You can choose between sending a regular text message or a media message. For both message type, you can also add quick replies.
Just click on “Add New Response” then type in your quick reply option.
8. Find Your Deal with Ease! 🔍
Searching for your deal is now a breeze, even when you’re not on the board.
Simply enter your deal name or running number in the highlighted area, and we’ll show you the board where your deal resides.
Once you click on the board, all the deals within it will be visible. Use the search area within the board to quickly locate your specific deal.

9. Easily Delete Contacts and Lists! 🗑️
In the Contact List Module, you now have the option to delete entire contact lists along with their contacts.
Just select the contact list(s) you want to delete, and you’ll see the new “Delete Lists and Contacts” option appear next to “Delete Lists.” Clicking on this option will prompt a confirmation message to prevent accidental deletions.
Once you click on OK, all contacts within the selected list(s) will be deleted from the system, and the contact list itself will be deleted.

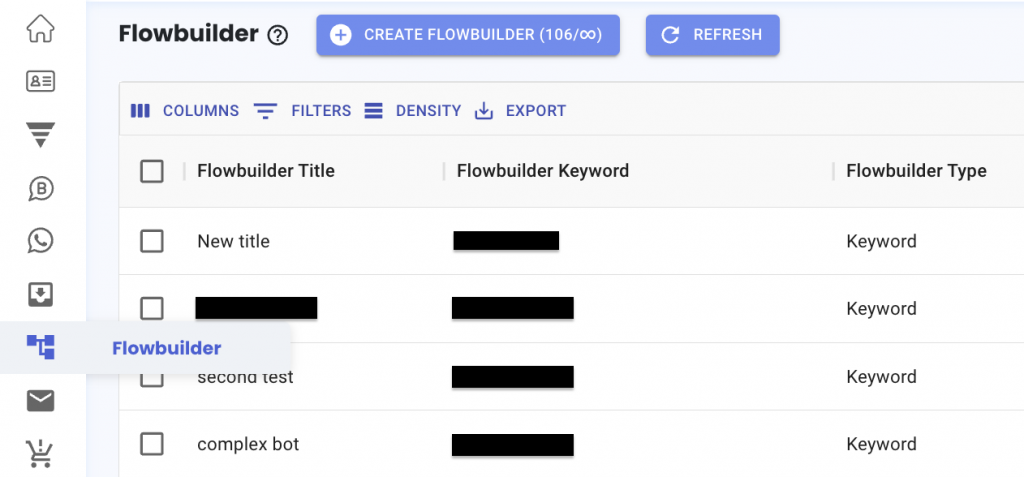
10. Flowbuilder Takes Center Stage! 🌟
Discover Flowbuilder right between the Inbox and Email Modules, making it more accessible than ever.
Same great look and features – just putting it in the spotlight for easier access and smoother navigation! 🚀
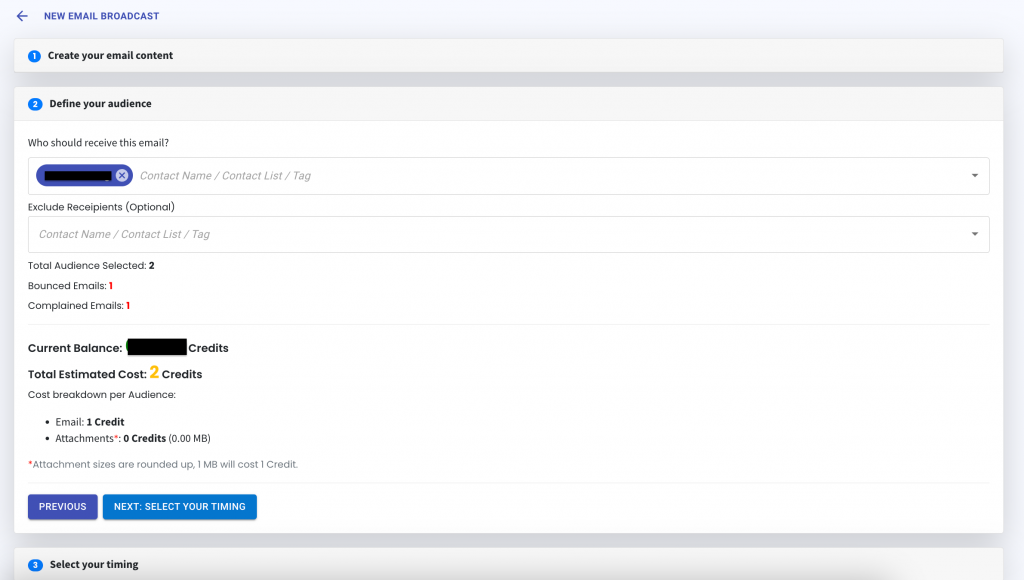
11. Enhanced Email Broadcast Insights! 📧
Now, when you set up your Email Broadcast, we’ve added a feature that shows you the number of contacts that would not receive the email, categorized as “Bounced” and “Complained.”
When you click on the bounced or complained number, you will be able to view who are the contacts that are under the category
🚫 Bounced Category: Indicates emails that couldn’t reach the contact.
📢 Complained Category: Signals recipients who do not wish to receive your emails.
12. Track Your Pipeline Board Creations! 📊
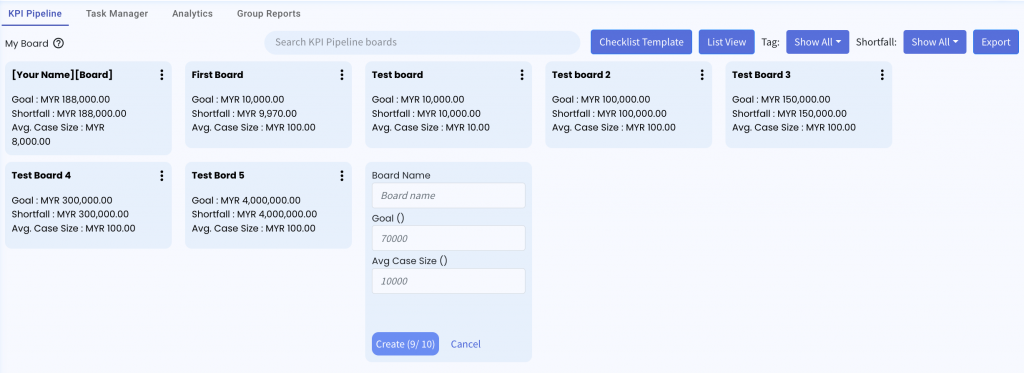
Now, when you create a new KPI Pipeline or Task Manager board, you can keep track of the total number of boards you’ve created, ensuring you stay within the limits defined by your pricing plan. 🚀
*Note: The count includes boards created in both KPI Pipeline and Task Manager.
13. Explore More Contact Details in KPI Pipeline! 🔍
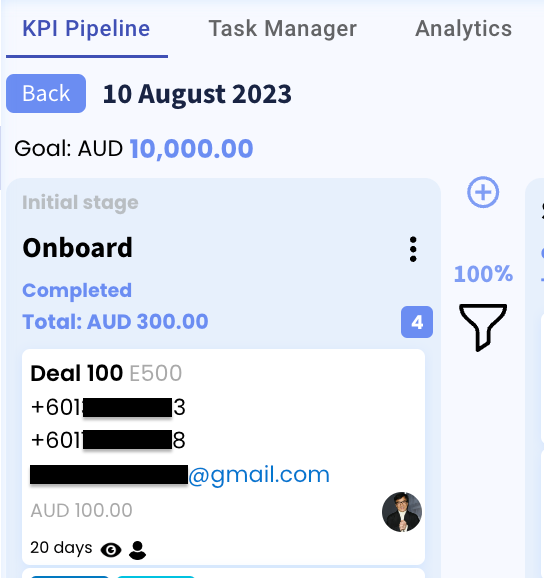
Now, it’s even easier to keep track of your contacts in the KPI Pipeline. You have the option to display additional contact details, such as phone numbers or email addresses.
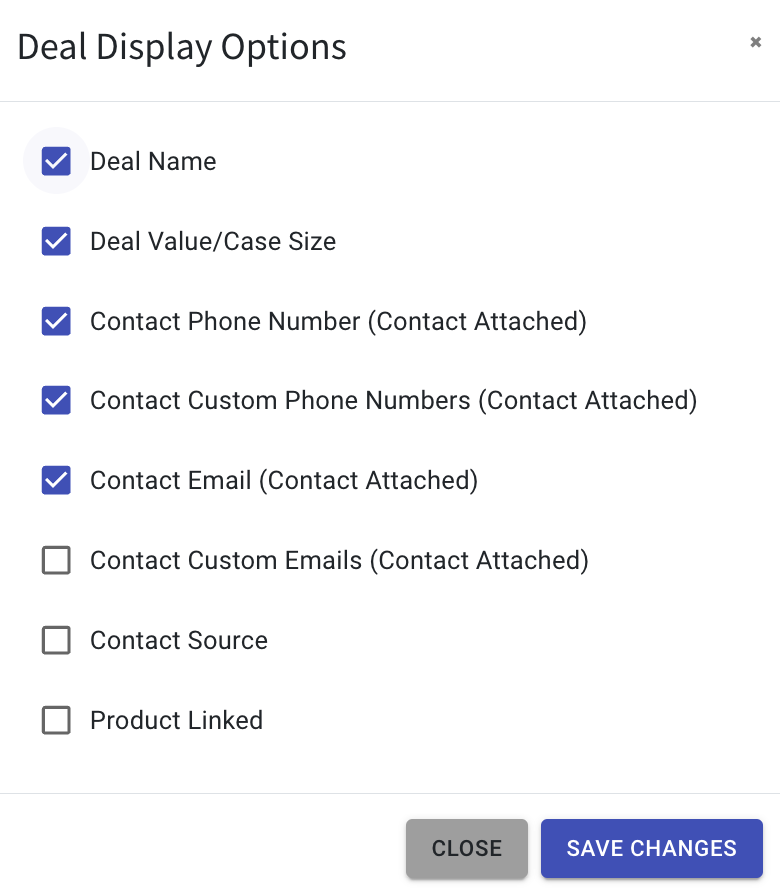
🛠️Configuration Steps:
- In the board, click the three dots at the top right.
- Choose “Deal Display.”
- A popup will appear. Pick what you want to see.
- Click “Save Changes,” and you’re good to go!
Your chosen details will be there whenever you need them. 🚀
14. Difference of WA Personal and WA API Converse Ticket 🔍
Wondering how to tell WA Personal and WA API Converse Tickets apart (in Strive web and Strive GO)? 🤷♂️
Here’s how:
- Look for the Logo:
WA Personal Channel: WhatsApp logo with the letter B (WhatsApp Business logo).
WA API Channel: The standard WhatsApp logo.
- Hover for Info:
Hover your mouse over the channel name to see the phone number associated with that channel.
No more confusion – just a quick glance and you’re in the know! ✨

15. Monitor Your WA API Status in the WA API Module! 📊
Now, when you head over to the WA API Template, WA API Broadcast, or WA API Campaign module, you’ll see a new addition at the top right.
We’ve added color-coded indicators on the left of your WA API channel.
Here’s what each color means:
🟢 Green : Good status
🟡 Yellow : Flagged
🔴 Red : At risk of being banned

16. Manage Your User’s WA API Blasting Usage!
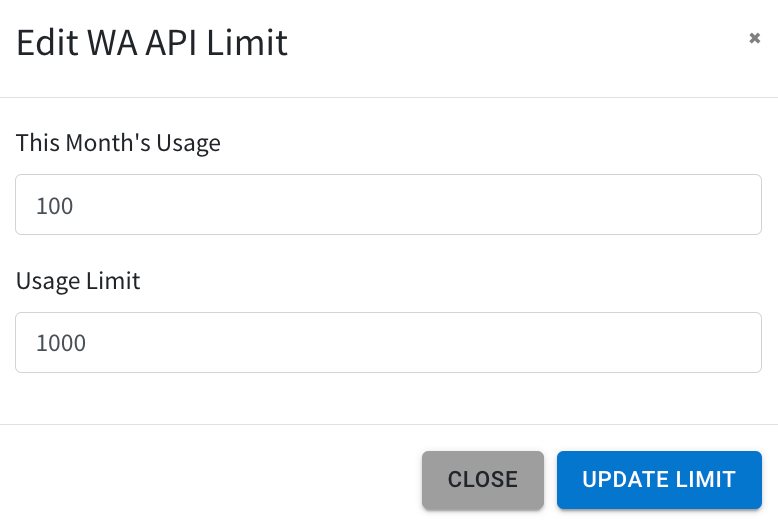
Now, you can set limits on how much your users can blast via WA API.
To configure this limit:
- Click on your profile picture.
- Select “Manage.”
- Go to “Organisation.”
- Click on the WhatsApp icon.
- Set the usage limit or adjust the month’s usage .
This Month’s Usage: See how much your users have used WhatsApp blasting this month. It resets on the 1st of each month.
Usage Limit: Set the maximum number of WhatsApp blasts each user can send per month.
17. Enhanced WA API Insights! 📊
Now, in your WA API Broadcast module, you’ll find more detailed insights regarding your WA API phone number:
Business status: Reflects your Meta business suite status
Phone Number status: Indicates the current WA API phone number status
WA API status: Displays your WhatsApp account status
App status: Displays Strive’s Facebook app status
You can move your mouse over the question mark next to each status to see an explanation of what that status means.
If the status displayed doesn’t show normal, simply hover your mouse over the status to view the explanation.

18. Improved WA API Broadcast Insights! 📢
Now, in your WA API Broadcast, you’ll find a new column called “Total Unique Contacts.” This helps you see how many different people you’re reaching out to.
The “Total Scheduled” count shows how many contacts are scheduled to receive your broadcast. After sending, this count resets to zero.
Clicking on the “Total Scheduled” count allows you to see the list of new and previous contacts (if you’ve made changes to your broadcast or audience).

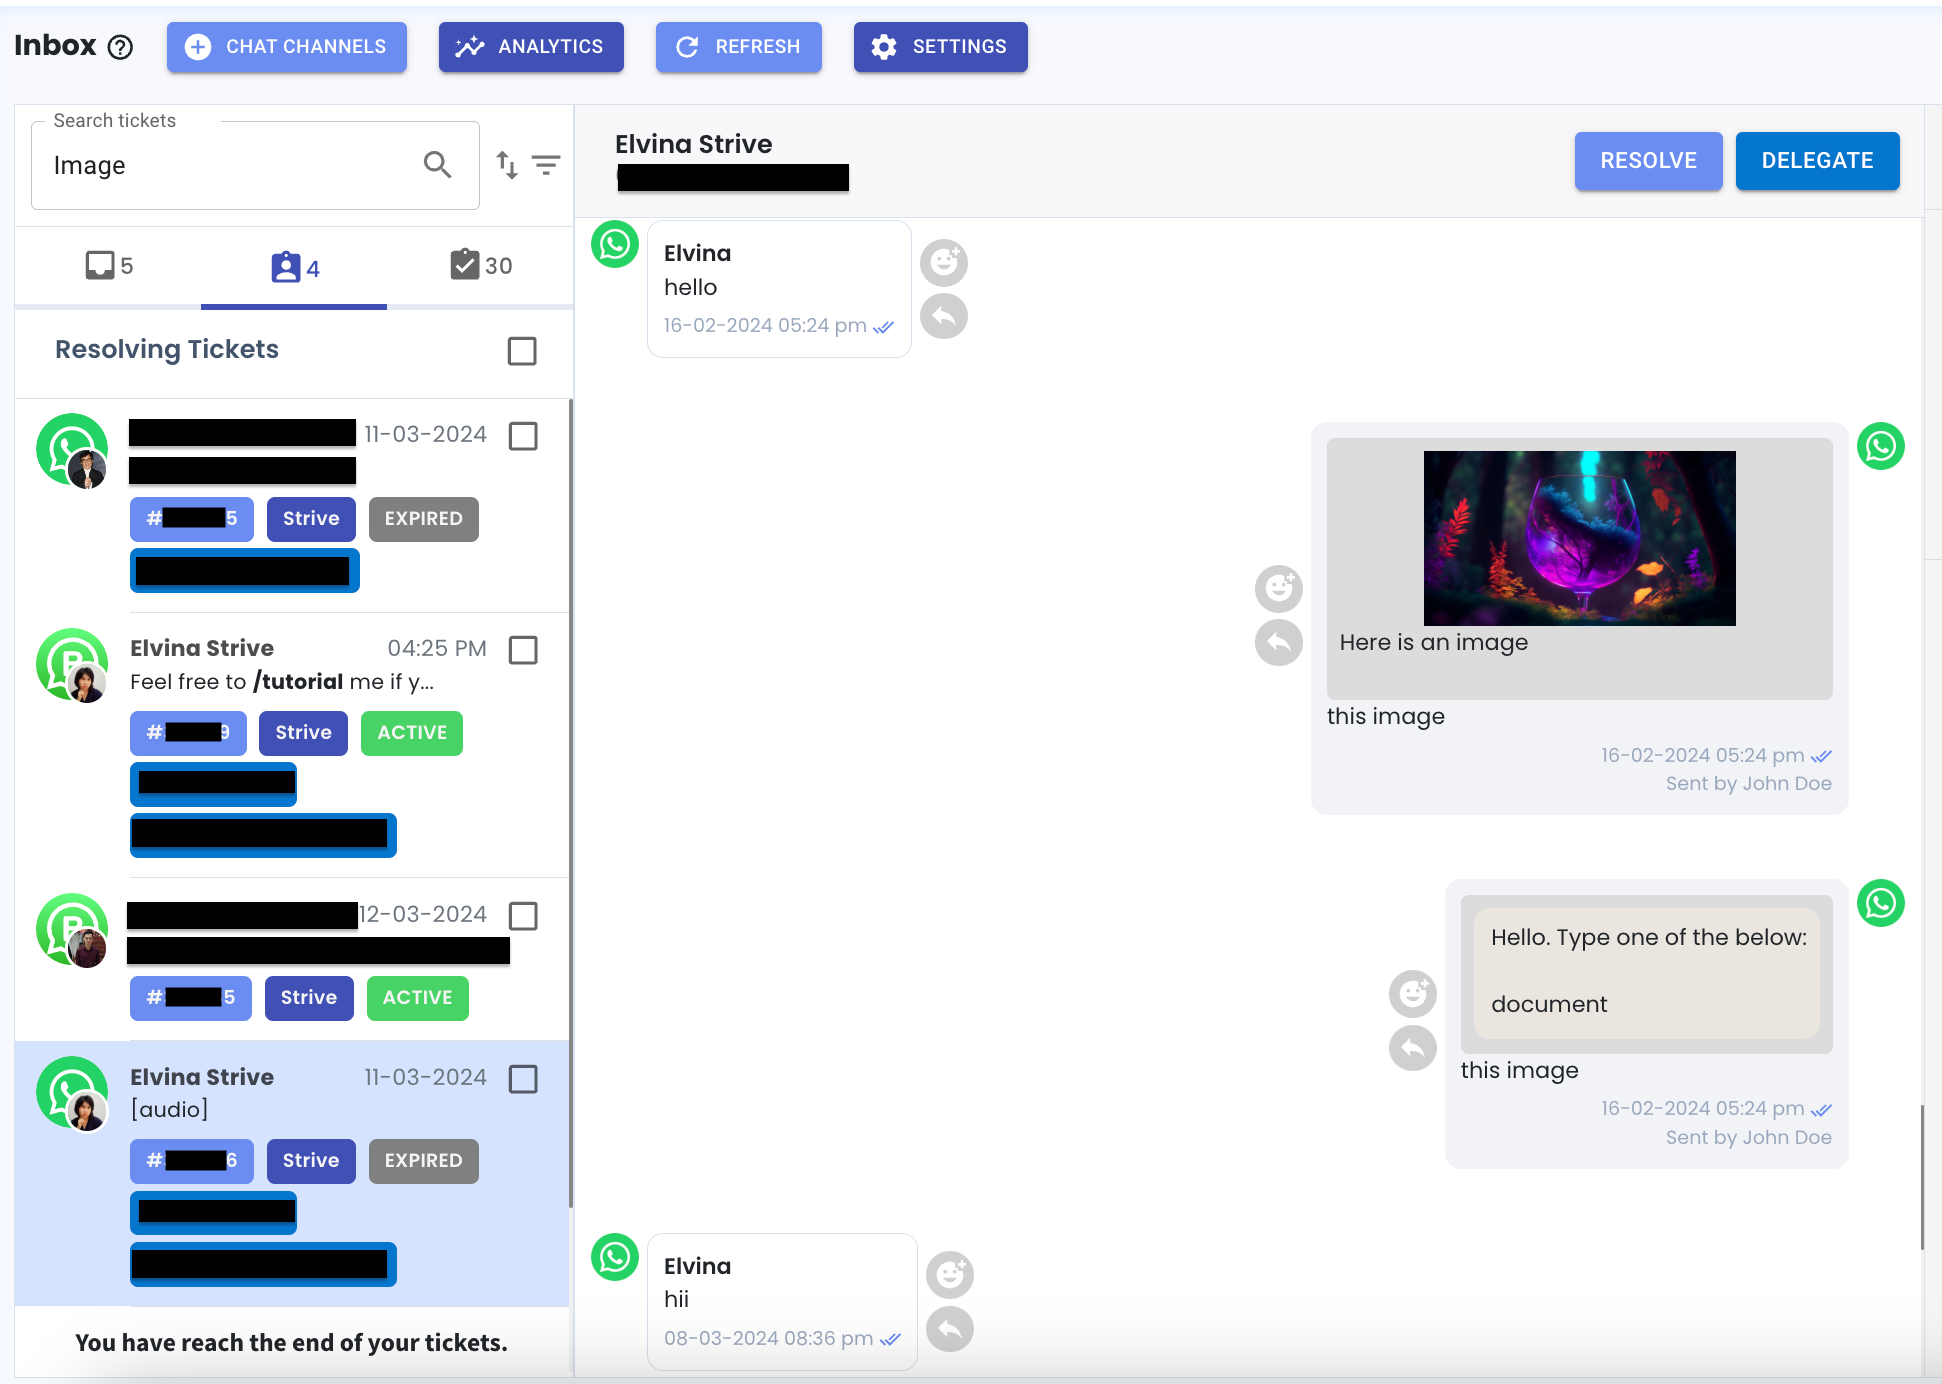
19. Improved Search Functionality in Inbox! 🔍
We’ve upgraded the search feature in the Inbox module to make it even easier to find what you’re looking for.
Now, when you type a keyword into the search bar, it will quickly display all the tickets containing that keyword.
No need to scroll through all your tickets anymore to find the one with the keyword in the message. 😉
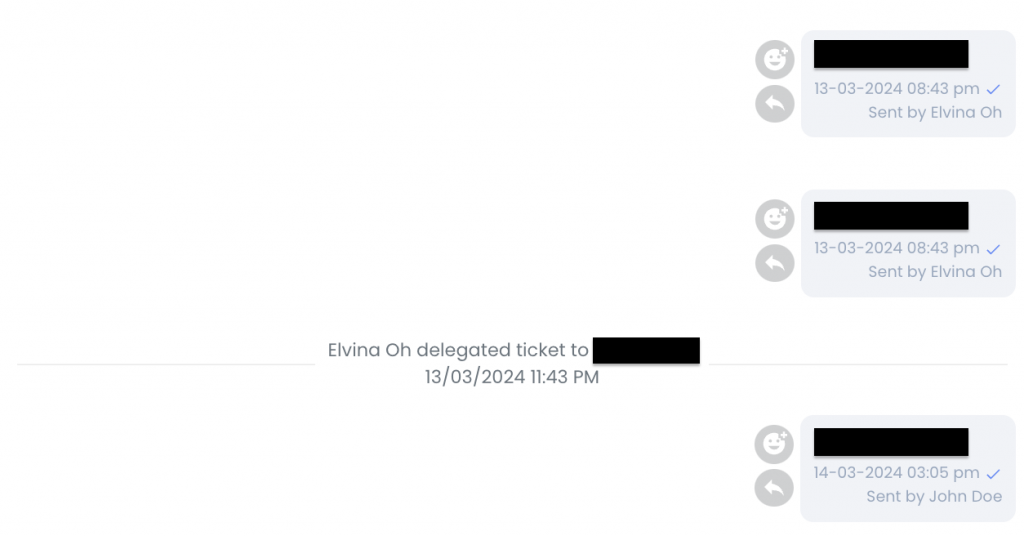
20. Inbox Delegated Ticket Display Improvement! 🕒
Now, when you delegate a ticket to another user and reply to the contact, the delegation information will appear following the message timeline.
This enhancement ensures that the ticket flow aligns with the chronological order of messages. ⏳
21. Super Admin Contact Rule Settings 📇
Now, super admins have the ability to decide how contact duplicates are managed within the organization. When contacts are created or imported, the system checks for duplicates based on these rules.
By default, the setting is for the entire organisation (right icon), meaning it checks for duplicates across all users’ contacts.
If you prefer, you can switch it to check for duplicates based on individual users (left icon). This ensures that duplicates are only checked within each user’s contacts.
To configure these rules:
- Click on your profile picture.
- Click on the “Manage” button.
- You’ll find the Contact Rules setting below the KPI Pipeline Setting.
These rules apply to in WA Personal auto-contact creation and the Flowbuilder module. And remember, this feature is exclusively for Super Admins of the organization. 🛠️

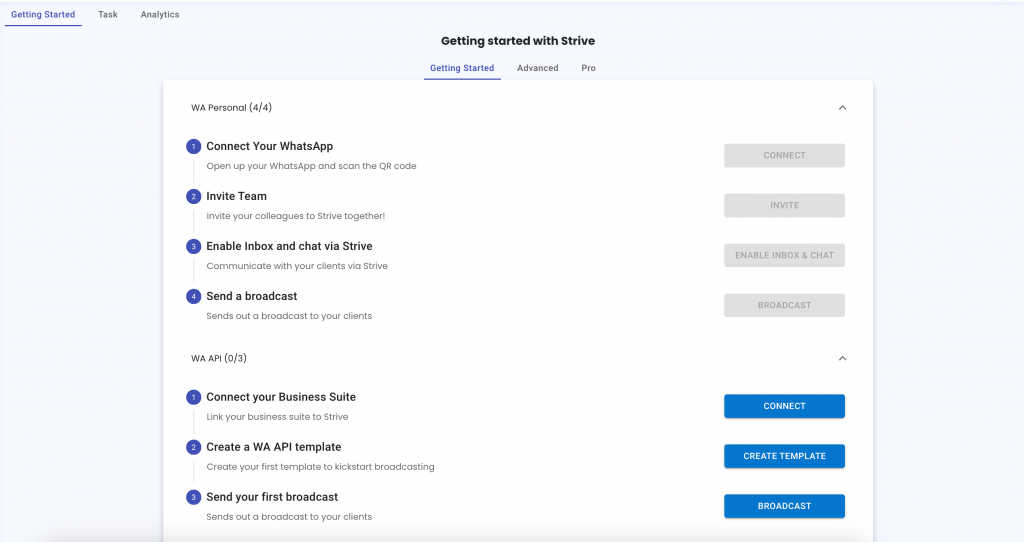
22. Explore Strive with Easy-to-Follow Steps! 🚀
New to Strive or feeling a bit lost? No worries!
We’ve introduced a helpful feature called “Getting Started” right in the Home module. When you log in, you’ll find this guide designed to walk you through the basics of using Strive and help you become more comfortable with the platform.
The “Getting Started” guide is divided into three stages: Getting Started, Advanced, and Pro, each offering progressively deeper insights into using Strive effectively. 📝
Simply click on an item button and you’ll be brough to the relevant module in a new tab. As you complete each item on the list, the corresponding button will be grey in colour, letting you know it’s been completed and isn’t clickable anymore.
*Just remember to refresh your Home page to see your progress! 🔄
23. Quicker Inbox Ticket Loading! 🎉
We’ve boosted the speed at which your inbox tickets load.
That means when you open your inbox, the tickets will appear much faster than before. ⚡
24. Faster Ticket Loading Across Sections! 🎫
Experience lightning-fast ticket loading as you switch between different sections of your inbox tickets!
Whether you’re checking the Pending Queue, Resolving Tickets, or Resolved Tickets, you’ll notice that the tickets load much faster than they did previously.
Now, you can seamlessly navigate through different ticket sections without any delays. 🚀
25. Faster Loading for WA API Campaign! ⚡
Great news! We’ve sped up the loading time for your WA API Campaign.
Now, they load quicker than ever before, making your experience smoother and faster🚀
26. Updated Deal Value Reflects in Product Log! 🛒
Now, when you adjust the value of your deal in the “deal won” stage, the changes will automatically sync with the associated product’s price and be recorded in the product log within the Product module.
This enhancement simplifies tracking your product changes alongside your deals.
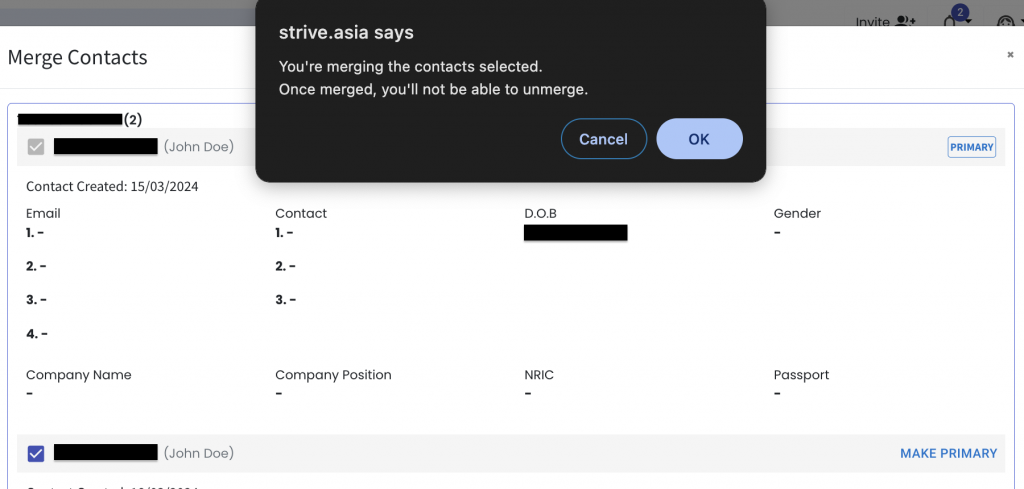
27. Contact Merging Confirmation Alert! 🚨
Now, before you proceed with merging, a prompt will ask for your confirmation to prevent any accidental merges.
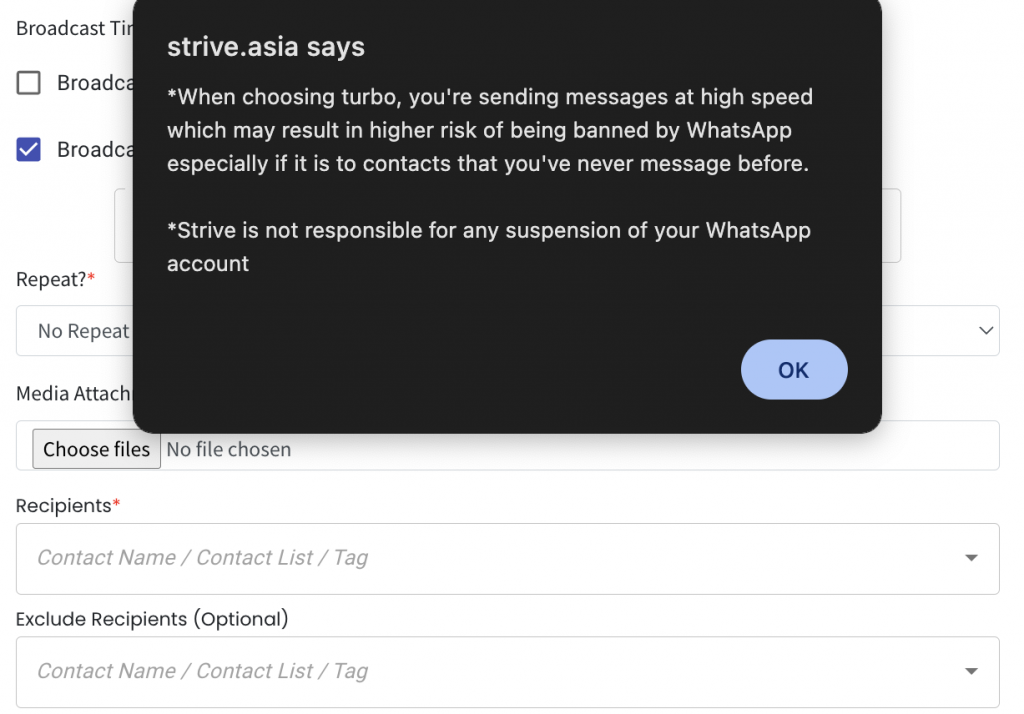
28. Turbo Reminder for WA Personal ⚡️
Opting for turbo speed in WA Personal?
A quick reminder pops up, ensuring you’re aware of the potential risks to your WA Personal number before proceeding.
29. Extended WA Personal Device Removal Time! ⏳
Good news! We’ve increased the device removal time from 1 minute to 10 minutes.
If your device is disconnected for more than 10 minutes, it will be removed from the list automatically.

30. Easy Exit from Edited Comments in Pipeline 🛠️
Editing your deal comments in the Pipeline module?
If you change your mind, no worries! Simply click on the Exit button to smoothly exit the comment editing mode.

31. Improved Touchpoint Contact Selection! 👤
Now, when adding touchpoint in the Touchpoint module, your contacts are sorted in alphabetical ascending order.
Easily locate your contacts or simply type their names for quick access
32. Organized Completed Tasks! ✅
Completed tasks are now arranged based on their completion dates, allowing you to easily review your tasks.
Click on the “Complete” dropdown, and your tasks will be displayed from the most recent completion date to the earliest.
Keep track effortlessly!
That’s all for the March update, but the excitement doesn’t stop there. Keep an eye out for what’s coming your way in the next update!

